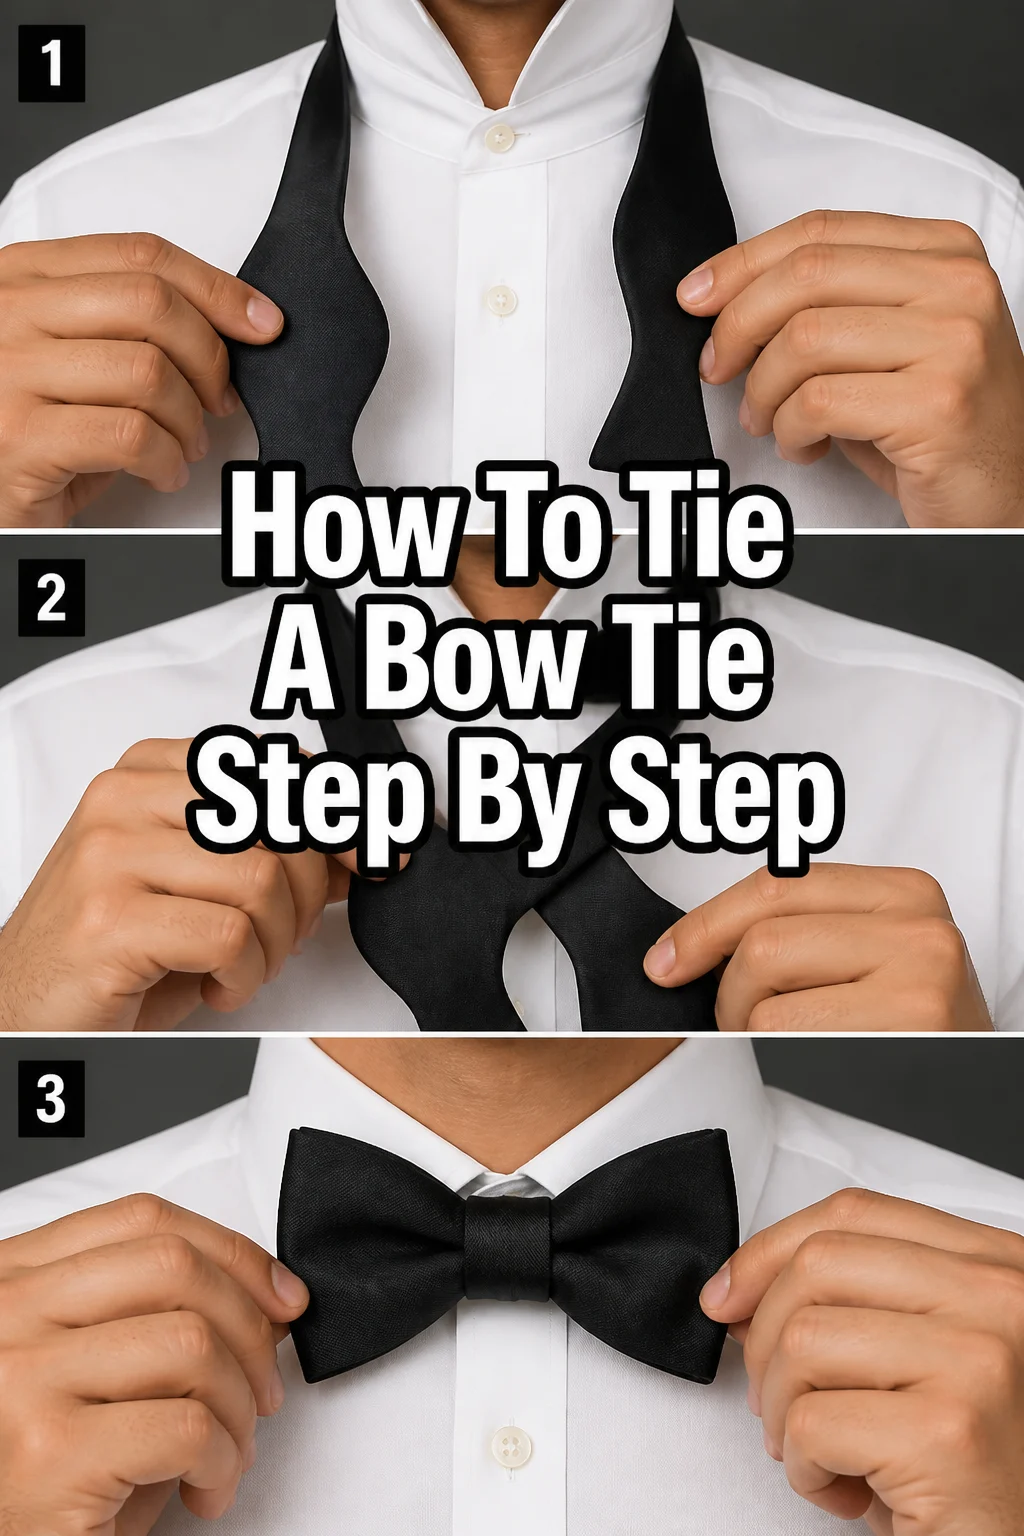
🤵 How To Tie A Bow Tie Step By Step
Tying a bow tie can seem like a daunting task, a sartorial secret reserved for the most dapper individuals.
I remember my first attempt, fumbling in front of a mirror, watching countless videos, and still ending up with something resembling a crumpled napkin.
But with patience and the right guidance, anyone can master this classic skill, and I’m here to share the straightforward method that finally clicked for me.

Quick Overview
This guide will equip you with the knowledge and practice to confidently tie your own bow tie, adding a touch of timeless elegance to your look.
- Time needed: 10-15 minutes for your first few tries, then under 2 minutes with practice.
- Difficulty: Intermediate (requires a little dexterity and patience initially).
- What you’ll need: A self-tie bow tie, a mirror, and a dash of determination.
Step-by-Step Instructions
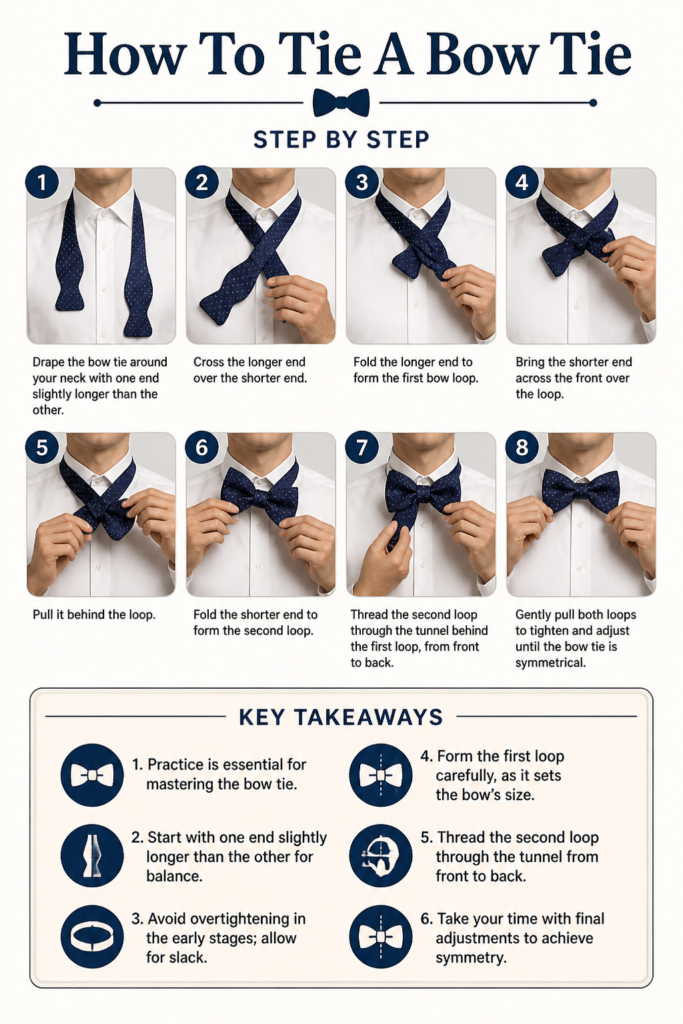
Step 1: Drape the Bow Tie
Begin by placing the bow tie around your neck, ensuring one end hangs slightly lower than the other.
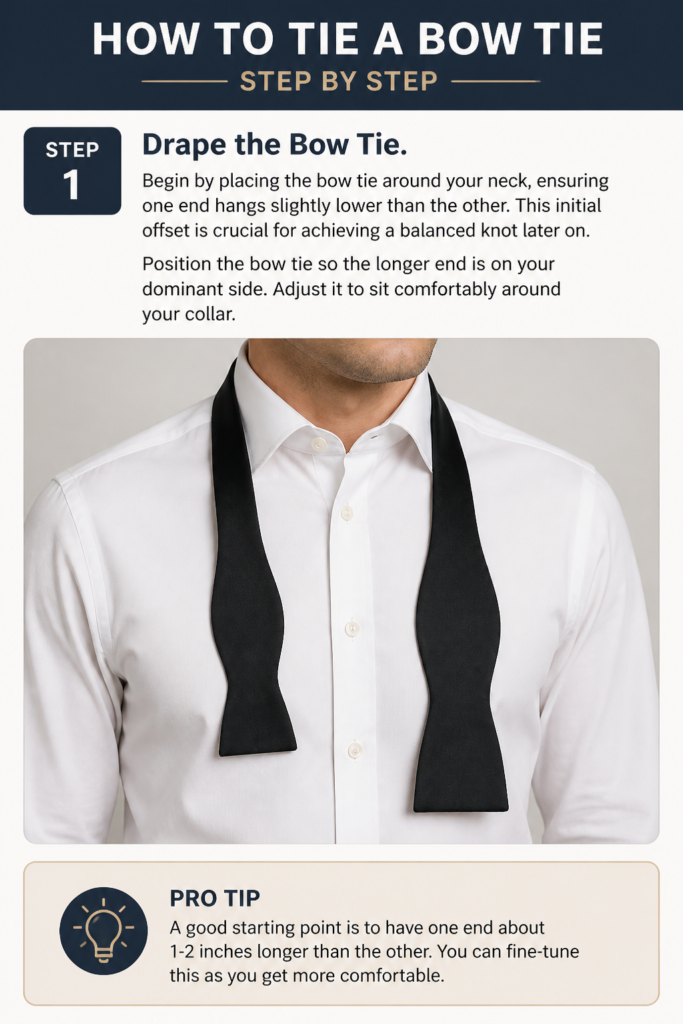
This initial offset is crucial for achieving a balanced knot later on.
- Position the bow tie so the longer end is on your dominant side.
- Adjust it to sit comfortably around your collar.
Pro Tip: A good starting point is to have one end about 1-2 inches longer than the other. You can fine-tune this as you get more comfortable.
Step 2: Cross the Ends
Take the longer end and cross it over the shorter end.
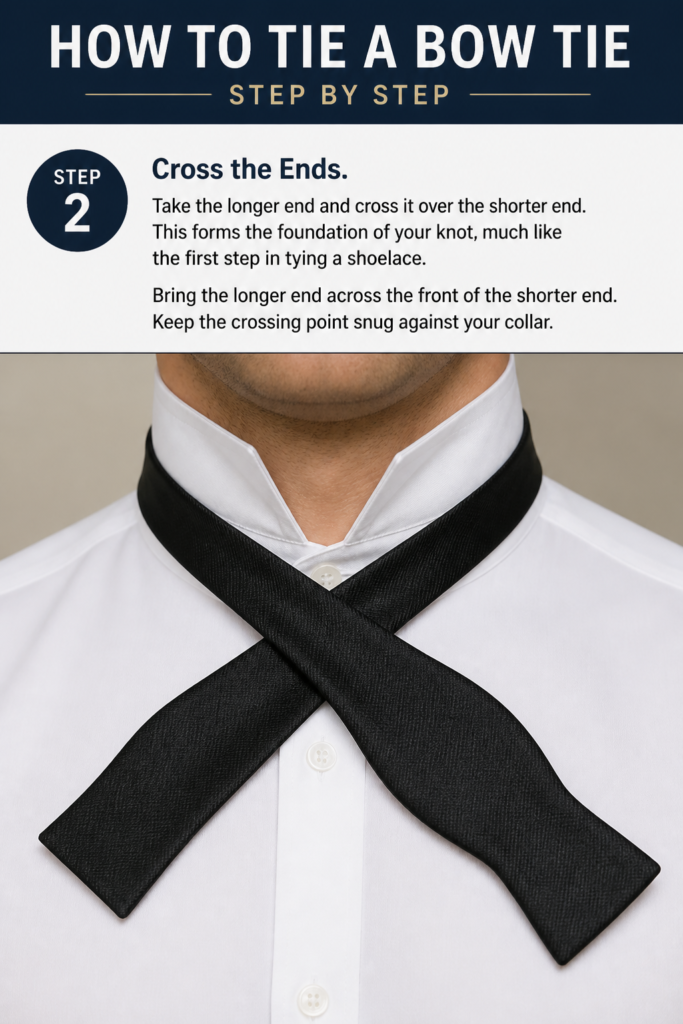
This forms the foundation of your knot, much like the first step in tying a shoelace.
- Bring the longer end across the front of the shorter end.
- Keep the crossing point snug against your collar.
Step 3: Bring the Long End Up and Through
Now, thread the longer end underneath the shorter end, bringing it up through the loop you just created around your neck.
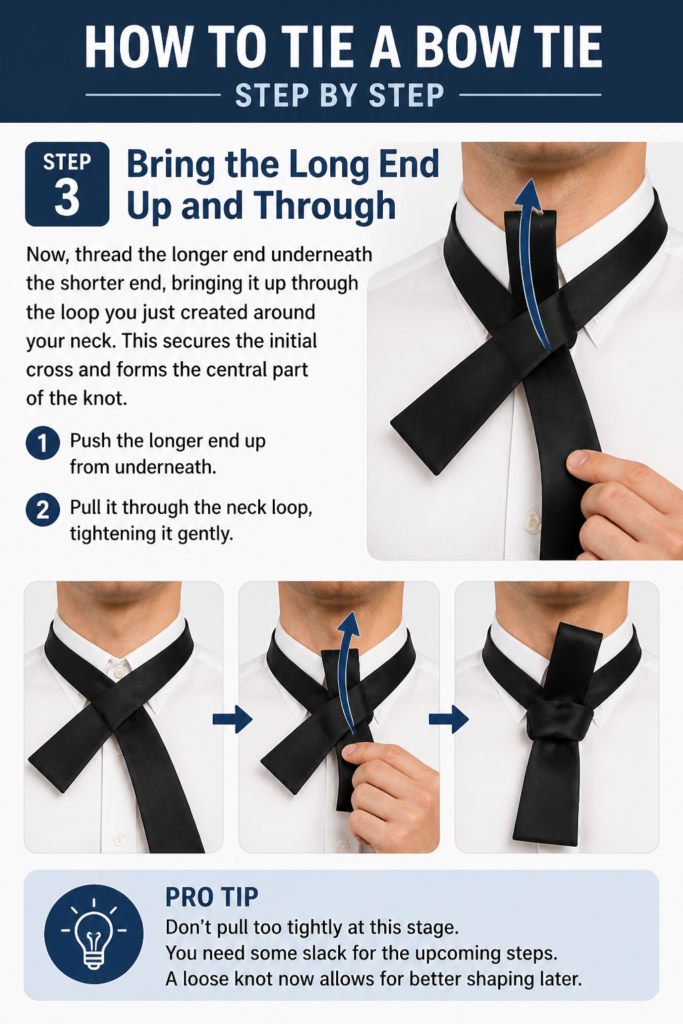
This secures the initial cross and forms the central part of the knot.
- Push the longer end up from underneath.
- Pull it through the neck loop, tightening it gently.
Pro Tip: Don’t pull too tightly at this stage. You need some slack for the upcoming steps. A loose knot now allows for better shaping later.
Step 4: Form the First Bow Loop
Take the shorter end (which is now hanging down) and fold it horizontally across your neck to create one side of the bow.
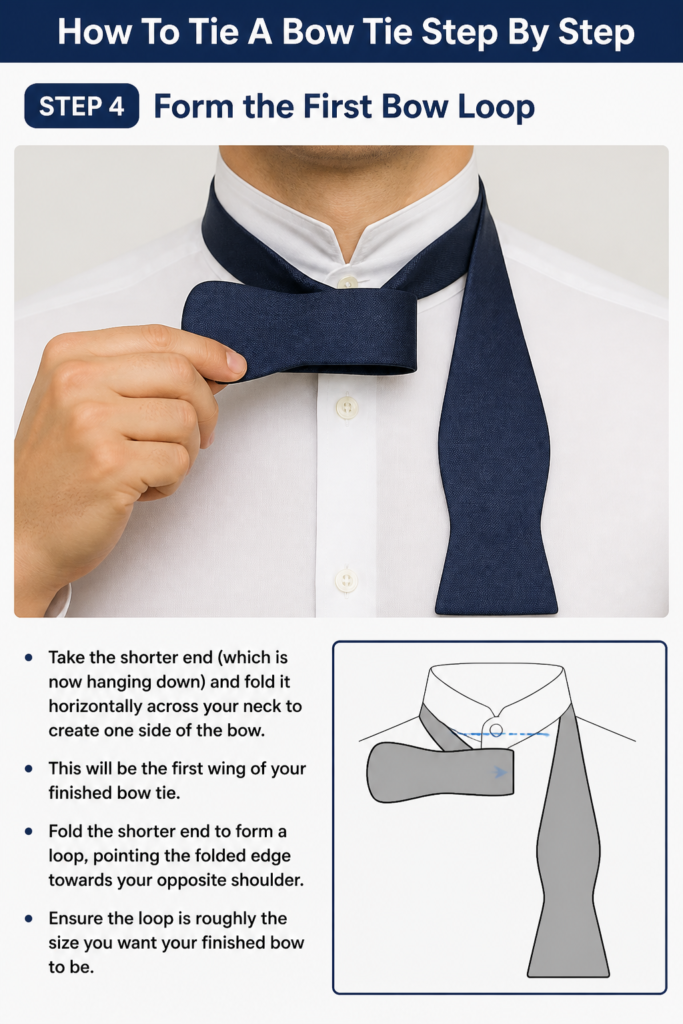
This will be the first “wing” of your finished bow tie.
- Fold the shorter end to form a loop, pointing the folded edge towards your opposite shoulder.
- Ensure the loop is roughly the size you want your finished bow to be.
Step 5: Drop the Longer End Over the First Loop
Bring the longer end down over the center of the loop you just formed.
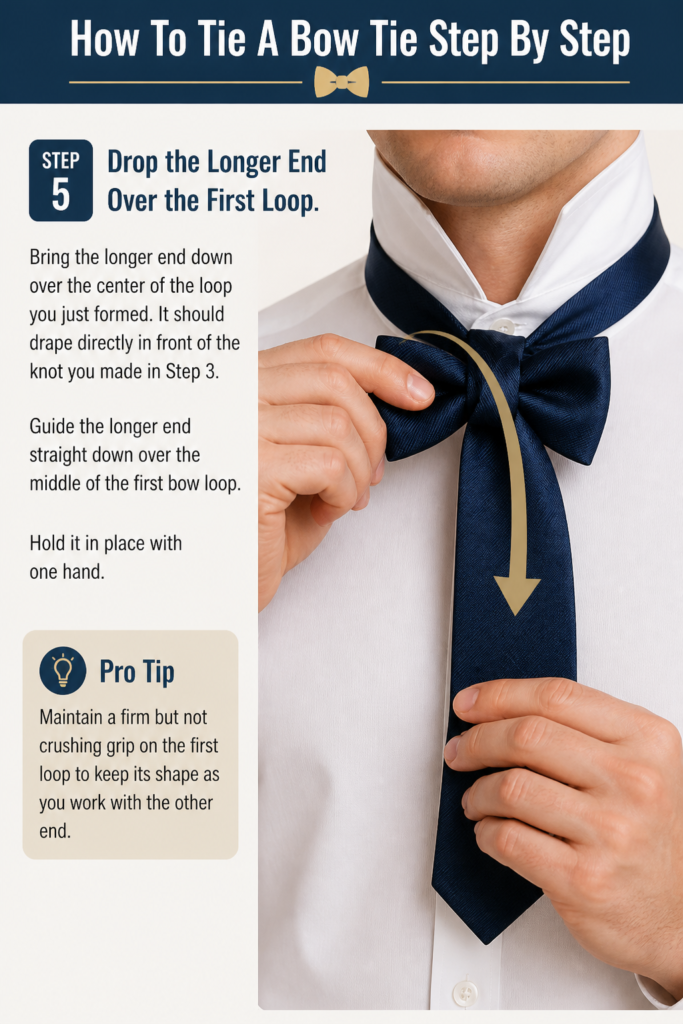
It should drape directly in front of the knot you made in Step 3.
- Guide the longer end straight down over the middle of the first bow loop.
- Hold it in place with one hand.
Pro Tip: Maintain a firm but not crushing grip on the first loop to keep its shape as you work with the other end.
Step 6: Create the Second Bow Loop
Now, you’ll use the longer end to form the second bow loop.
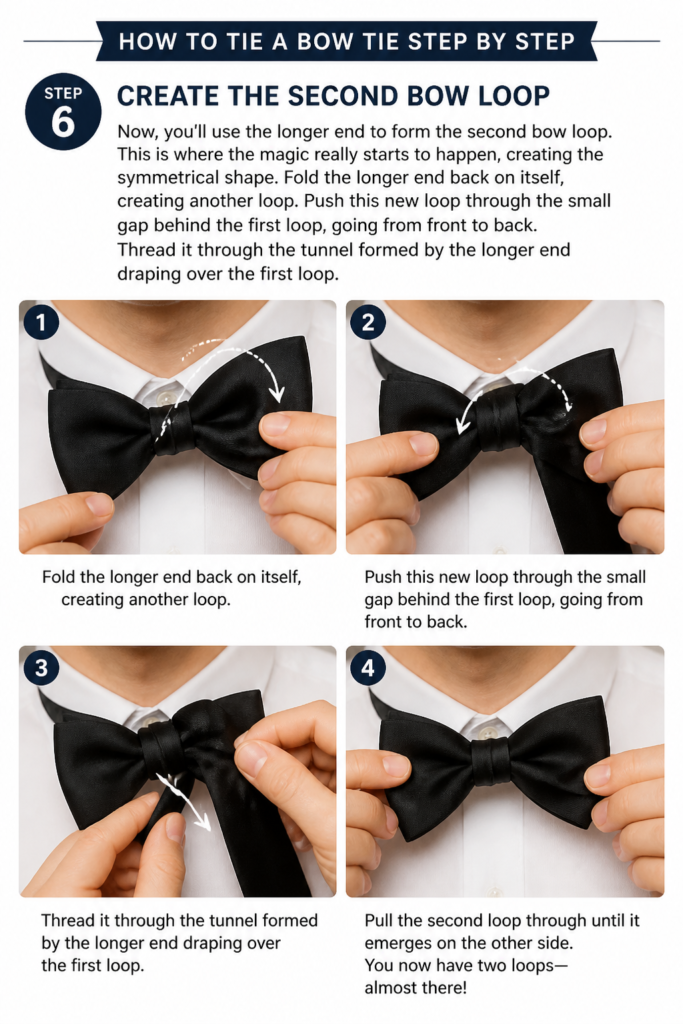
This is where the magic really starts to happen, creating the symmetrical shape.
- Fold the longer end back on itself, creating another loop.
- Push this new loop through the small gap behind the first loop, going from front to back.
- Thread it through the “tunnel” formed by the longer end draping over the first loop.
Step 7: Adjust and Tighten
You now have two loops, one on each side, with the knot in the middle.
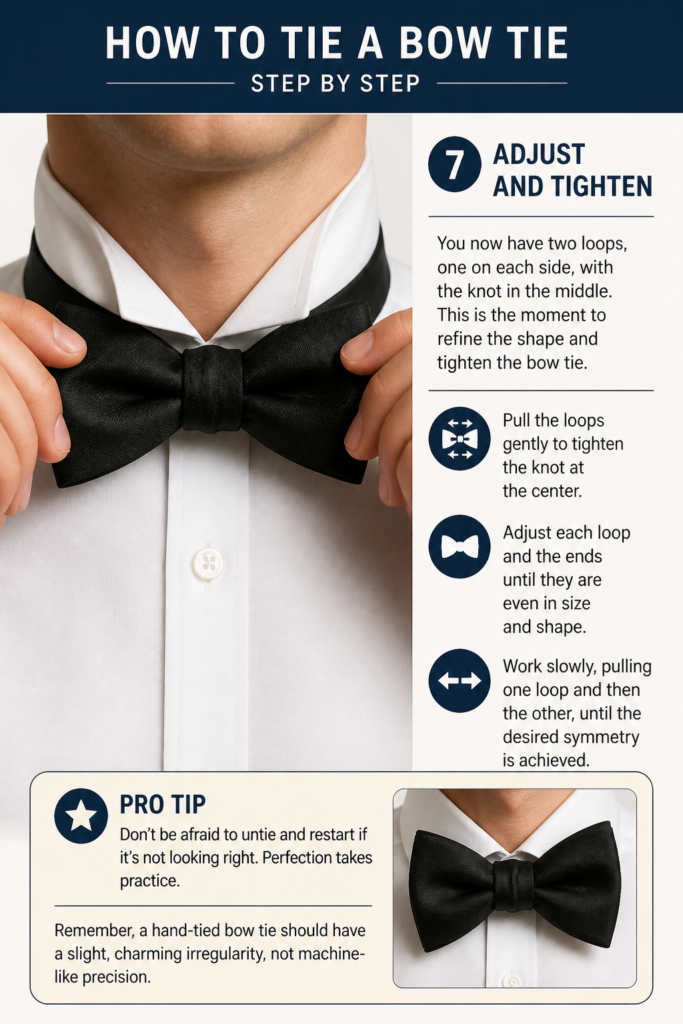
This is the moment to refine the shape and tighten the bow tie.
- Pull the loops gently to tighten the knot at the center.
- Adjust each loop and the ends until they are even in size and shape.
- Work slowly, pulling one loop and then the other, until the desired symmetry is achieved.
Pro Tip: Don’t be afraid to untie and restart if it’s not looking right. Perfection takes practice. Remember, a hand-tied bow tie should have a slight, charming irregularity, not machine-like precision.
Common Mistakes to Avoid
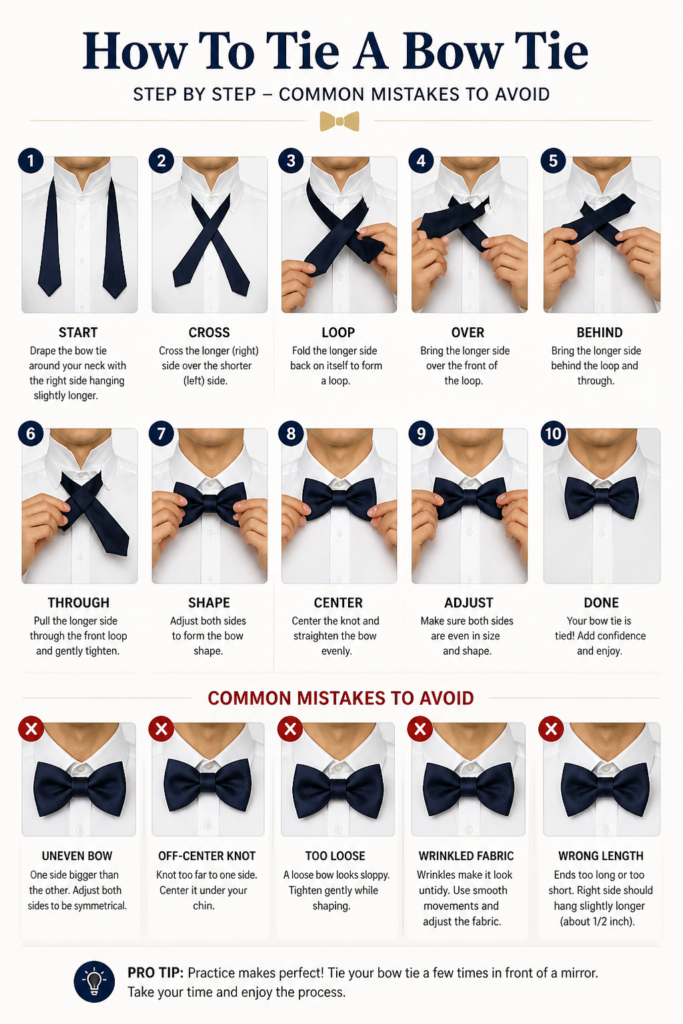
Tying Too Tightly Early On
Many beginners pull the knot too tight in the initial stages. This leaves no room to maneuver the fabric for the loops, making it difficult to achieve a proper shape.
Keep the initial crosses and loops relatively loose until you begin the final tightening and shaping in Step 7. You need enough slack to work the fabric.
Uneven Starting Lengths
If your initial starting lengths are too far off, you’ll end up with an imbalanced bow tie, or worse, run out of fabric on one side.
Aim for one end to be about 1-2 inches longer than the other. This usually provides enough extra fabric for the loop that goes over and through the knot.
Rushing the Shaping Process
Tying a bow tie is an art that requires a moment of calm. Rushing through the final adjustments often results in a crooked or lopsided bow.
Take your time in Step 7. Gently pull and push the loops and ends, observing the symmetry in the mirror. Small adjustments make a big difference.
Ignoring Fabric Direction
Sometimes, the fabric can twist or flip during the process, especially with certain materials. This can make the bow tie look messy or prevent it from sitting flat.
Pay attention to keeping the fabric flat as you fold and thread it. Ensure the “right” side of the fabric is always facing outwards where it should be visible.
Troubleshooting
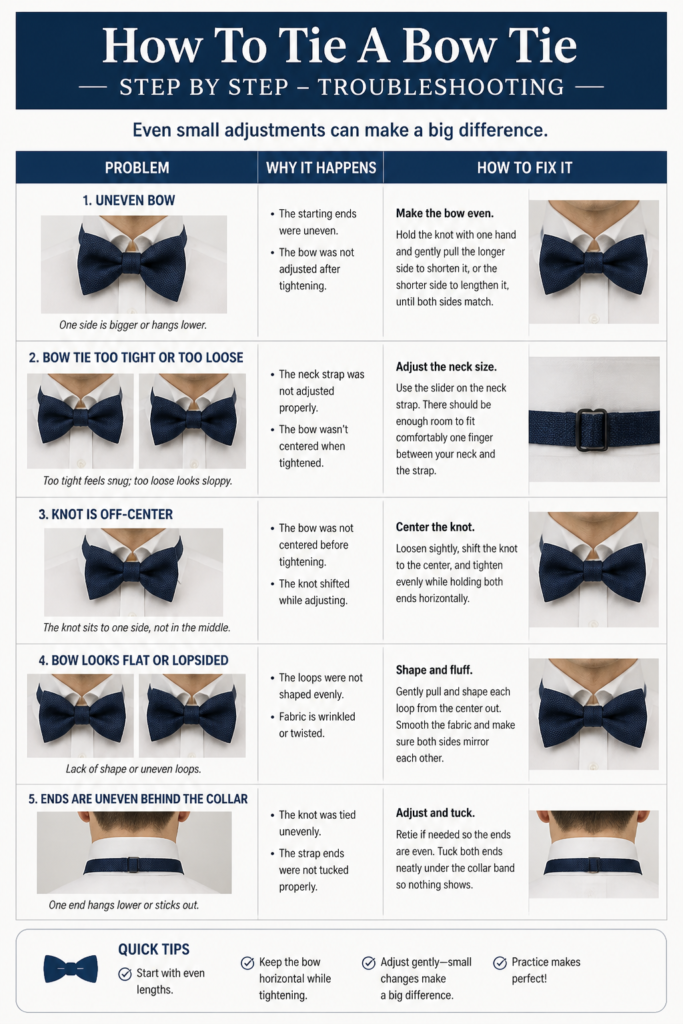
My Bow Tie Looks Lopsided
A lopsided bow tie is a common issue, often caused by uneven tension during the final tightening or disproportionate loop sizes.
To fix this, gently loosen the central knot by pulling on the loops. Then, pull each loop individually, adjusting its size and the tension until both sides appear balanced. Think of it as fine-tuning with small, deliberate tugs.
The Knot is Too Loose and Falls Apart
If your bow tie feels like it’s unraveling, the central knot likely wasn’t secured properly, or the fabric is too slippery.
Ensure that after you’ve pulled the longer end up and through (Step 3), you give a firm, but not excessive, tug to secure that initial cross. When tightening the final bow, pull the loops in opposite directions to lock the knot in place more securely.
The Bow Is Too Big or Too Small
The size of your bow tie is determined by how large you make your initial loops in Step 4 and Step 6.
If it’s too big, untie and start again, making smaller folds for your loops. If it’s too small, make those initial folds a bit larger. Practice will help you gauge the ideal loop size for your preference and the tie’s dimensions.
Key Takeaways
- Practice is essential for mastering the bow tie.
- Start with one end slightly longer than the other for balance.
- Avoid overtightening in the early stages; allow for slack.
- Form the first loop carefully, as it sets the bow’s size.
- Thread the second loop through the “tunnel” from front to back.
- Take your time with final adjustments to achieve symmetry.
Frequently Asked Questions
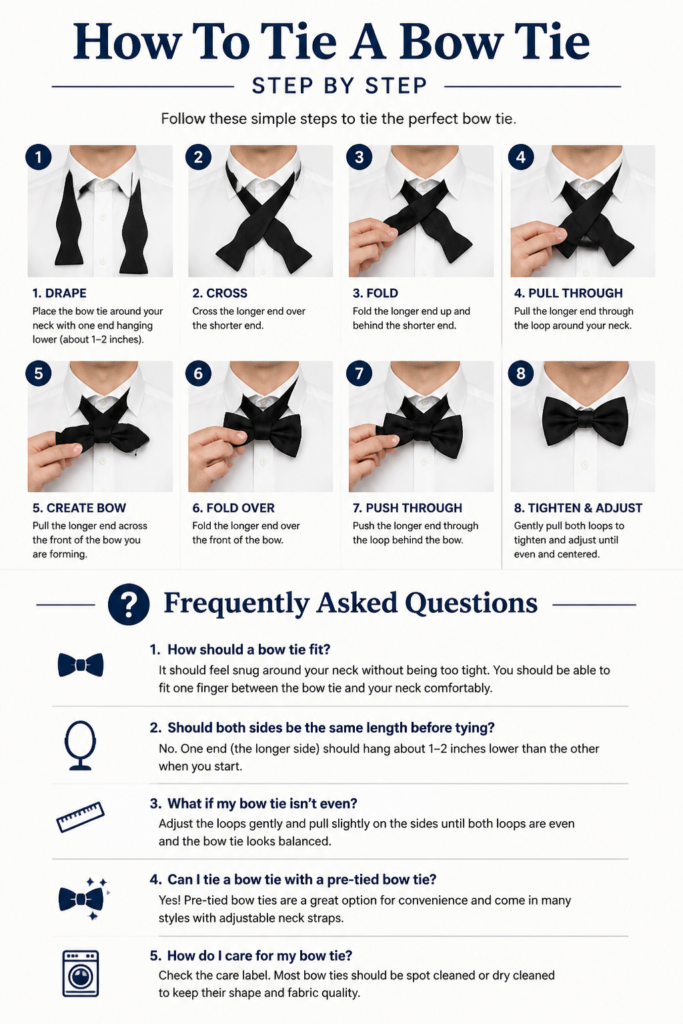
Is a self-tie bow tie always better than a pre-tied one?
For true elegance, a self-tie bow tie is generally preferred. Its slight imperfections and unique character signal a discerning wearer. Pre-tied bow ties, while convenient, often look too perfect and lack the natural drape of a hand-tied knot.
How do I choose the right size bow tie for my neck?
Most self-tie bow ties are adjustable, typically ranging from 14 to 18 inches, or even up to 20 inches. You’ll find a small clasp or hook on the neckband to adjust the length. Ensure it fits snugly but comfortably around your collar once tied.
What type of fabric is easiest to learn with?
Satin silk bow ties can be a bit slippery, making them slightly challenging for beginners. Cotton or wool bow ties often have more grip and are easier to handle, providing a good starting point for learning the technique before moving on to silk.
Can I leave my bow tie tied after wearing it?
It’s best to untie your bow tie after each wear. This helps preserve the fabric, prevents creases from setting permanently, and allows the tie to rest. Plus, the ritual of tying it fresh each time is part of the charm.
Our Top Recommended Finds
- Adjustable Cotton Bow Tie: Great for practice, as the fabric offers more grip and is less prone to slipping than silk.
- Full-Length Mirror: Crucial for observing your progress from multiple angles and making precise adjustments.
- Bow Tie Storage Box: Keeps your collection neatly organized and protects them from dust and creases when not in use.
Embrace Your Inner Dandy
Now that you have this step-by-step guide, there’s nothing stopping you from mastering the art of the self-tied bow tie.
It’s a skill that adds undeniable sophistication and confidence to any formal or semi-formal ensemble, a true mark of personal style.
Grab a bow tie today, stand in front of that mirror, and give it a try. Each attempt brings you closer to effortless elegance.