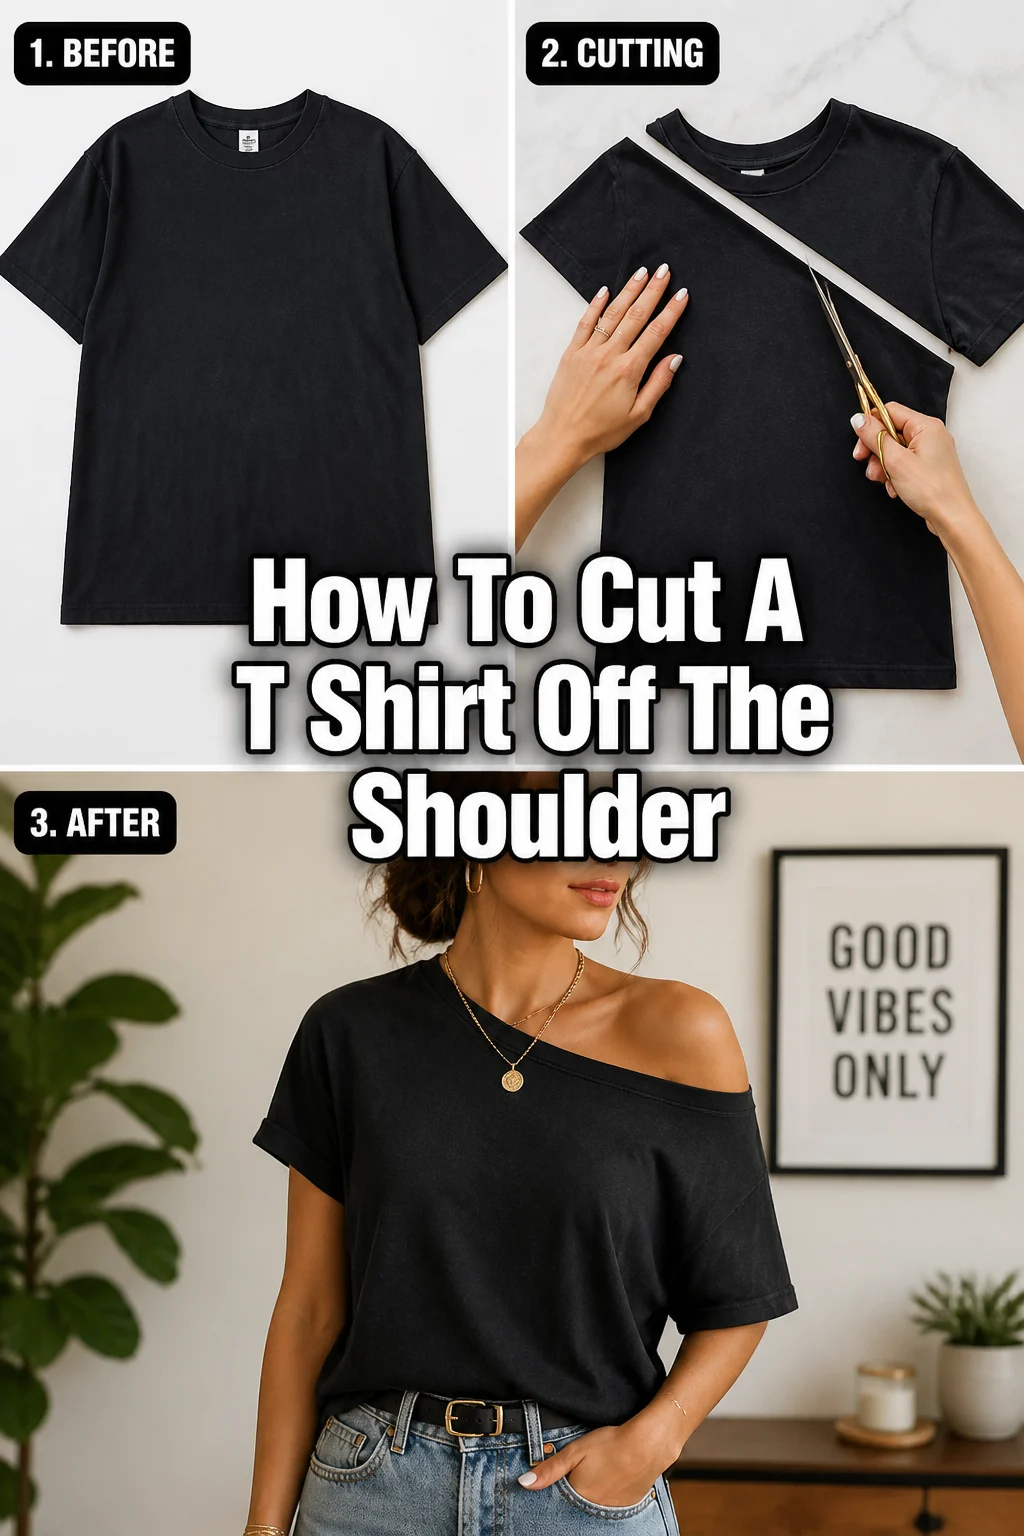
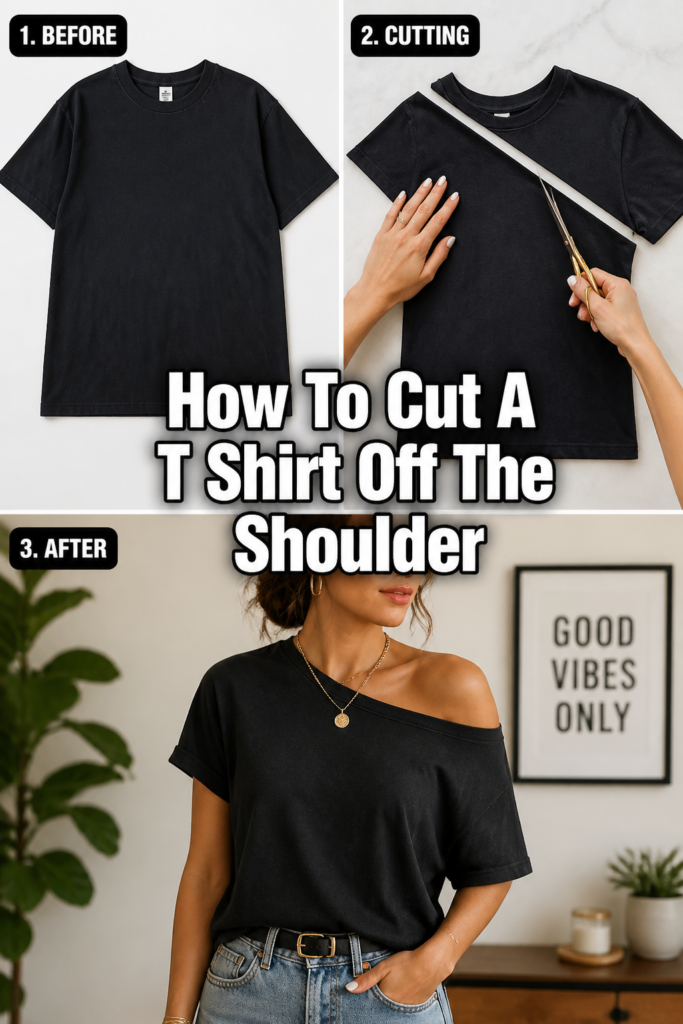
👚 How To Cut A T Shirt Off The Shoulder
Ever wanted that effortlessly chic, off-the-shoulder look without buying a new top? You absolutely can transform an old tee into a stylish fashion statement. I’ve personally revamped countless shirts this way, turning forgotten items into my favorite weekend wear. This guide will show you exactly how to achieve that perfect, relaxed fit with confidence.
Quick Overview
This project lets you customize your wardrobe and breathe new life into existing t-shirts. You’ll learn the precise steps to create a flattering off-the-shoulder top, perfect for casual outings or a relaxed evening.
- Time needed: 20-45 minutes (including marking and refining)
- Difficulty: Beginner
- What you’ll need: T-shirt, sharp fabric scissors, fabric chalk/marker, ruler, safety pins (optional)
Step-by-Step Instructions
Step 1: Gather Your Tools and Choose Your T-Shirt
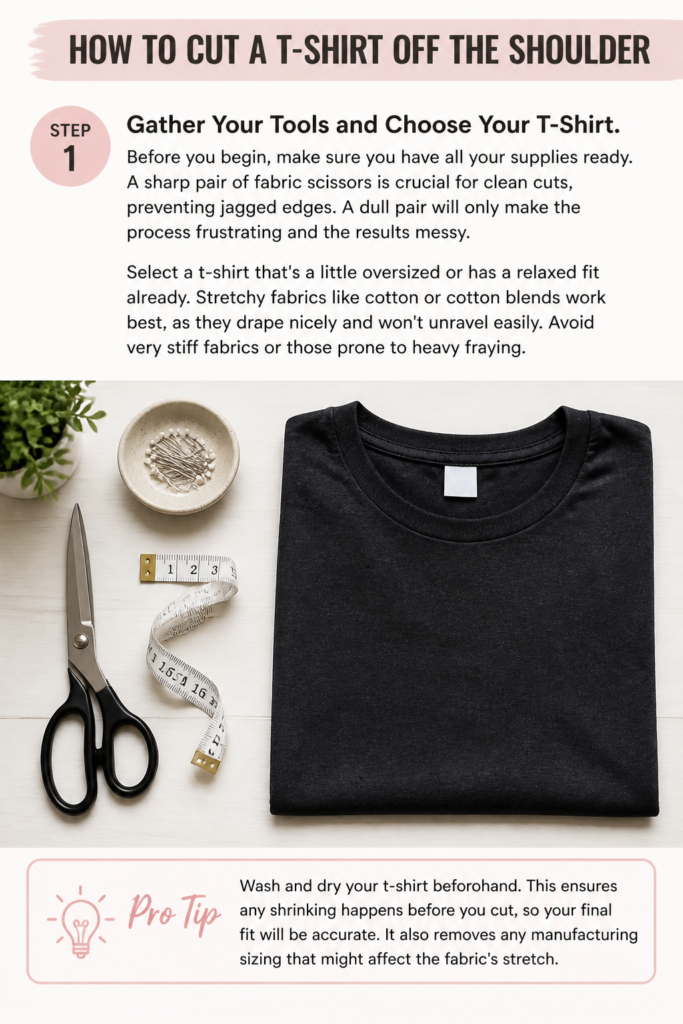
Before you begin, make sure you have all your supplies ready. A sharp pair of fabric scissors is crucial for clean cuts, preventing jagged edges. A dull pair will only make the process frustrating and the results messy.
Select a t-shirt that’s a little oversized or has a relaxed fit already. Stretchy fabrics like cotton or cotton blends work best, as they drape nicely and won’t unravel easily. Avoid very stiff fabrics or those prone to heavy fraying.
Pro Tip: Wash and dry your t-shirt beforehand. This ensures any shrinking happens before you cut, so your final fit will be accurate. It also removes any manufacturing sizing that might affect the fabric’s stretch.
Step 2: Try On and Mark Your Desired Neckline

Put the t-shirt on as you normally would. Stand in front of a mirror to visualize where you want the new neckline to sit. This is the most critical step for achieving the right look.
Use your fabric chalk or marker to draw a line across the shirt, indicating your desired off-the-shoulder placement. Think about how much shoulder you want to expose. Generally, this line will run from just below one collarbone, across the chest, to just below the other collarbone.
Ensure the line is symmetrical and flattering to your body. You can also mark how far down your arm you want the sleeve to start, if you plan to cut the sleeves as well. Take your time with this marking phase.
Step 3: Lay the T-Shirt Flat and Smooth
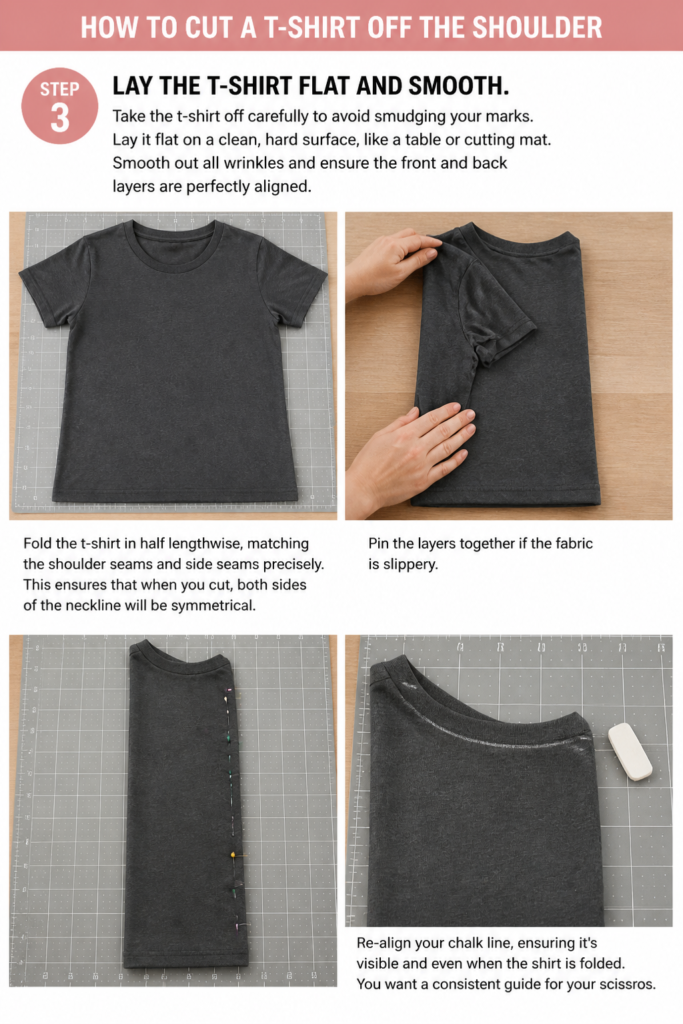
Take the t-shirt off carefully to avoid smudging your marks. Lay it flat on a clean, hard surface, like a table or cutting mat. Smooth out all wrinkles and ensure the front and back layers are perfectly aligned.
Fold the t-shirt in half lengthwise, matching the shoulder seams and side seams precisely. This ensures that when you cut, both sides of the neckline will be symmetrical. Pin the layers together if the fabric is slippery.
Re-align your chalk line, ensuring it’s visible and even when the shirt is folded. You want a consistent guide for your scissors.
Step 4: Start Cutting the Front Neckline
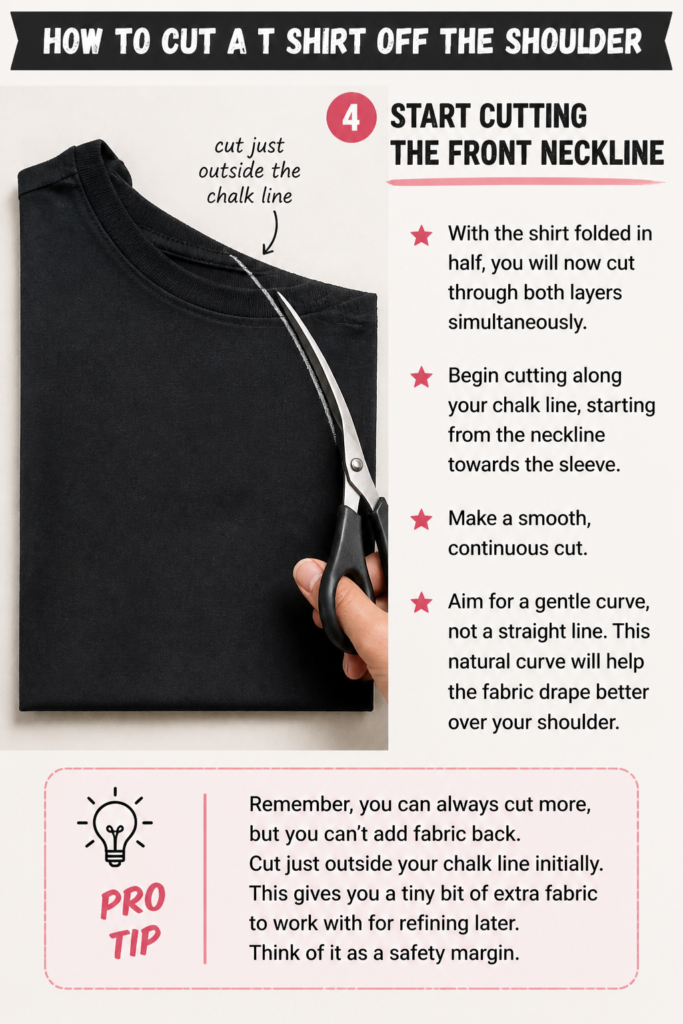
With the shirt folded in half, you will now cut through both layers simultaneously. Begin cutting along your chalk line, starting from the neckline towards the sleeve. Make a smooth, continuous cut.
Aim for a gentle curve, not a straight line. This natural curve will help the fabric drape better over your shoulder. Remember, you can always cut more, but you can’t add fabric back.
Cut just outside your chalk line initially. This gives you a tiny bit of extra fabric to work with for refining later. Think of it as a safety margin.
Step 5: Cut the Back Neckline (if applicable)

For a more dramatic off-the-shoulder look that exposes more of your upper back, you’ll extend the cut. Unfold the shirt after cutting the front. Now, you’ll need to decide on the back neckline.
Re-fold the shirt, this time focusing on how the back will lay. You can choose to make the back neckline slightly higher than the front, or continue the curve all the way around for a very wide opening. Typically, the back cut will mirror the front for a balanced drape.
Draw a new chalk line for the back, connecting it smoothly to your existing front cut. Then, carefully cut along this new line. Ensure the curve is consistent with the front portion.
Step 6: Refine the Neckline Edges
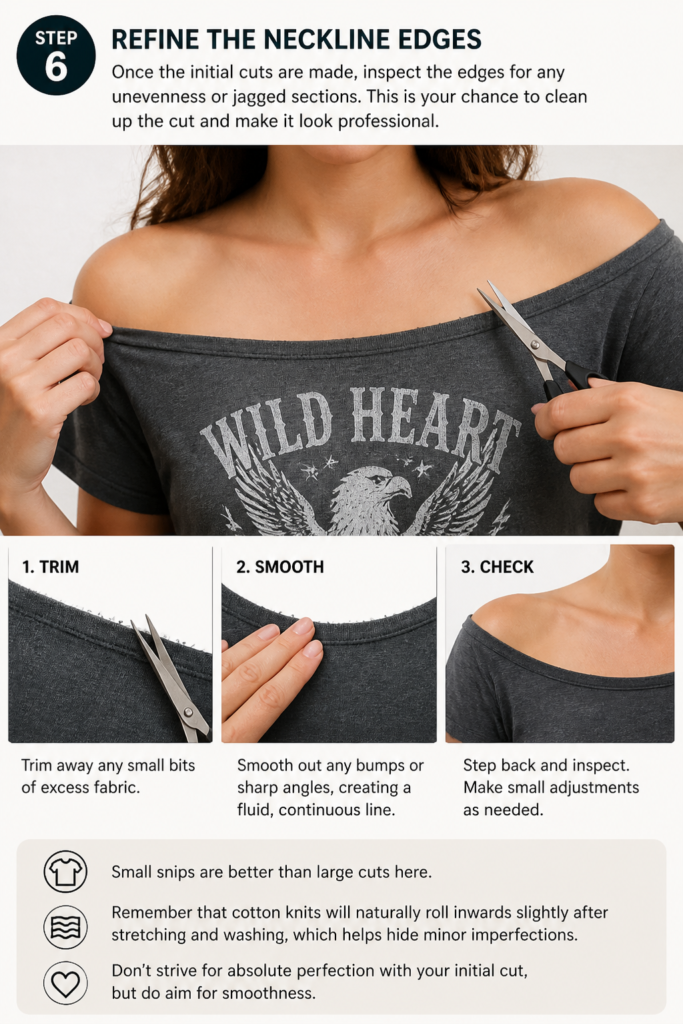
Once the initial cuts are made, inspect the edges for any unevenness or jagged sections. This is your chance to clean up the cut and make it look professional.
Trim away any small bits of excess fabric. Smooth out any bumps or sharp angles, creating a fluid, continuous line. Small snips are better than large cuts here.
Remember that cotton knits will naturally roll inwards slightly after stretching and washing, which helps hide minor imperfections. Don’t strive for absolute perfection with your initial cut, but do aim for smoothness.
Step 7: Consider Cutting the Sleeves (Optional)
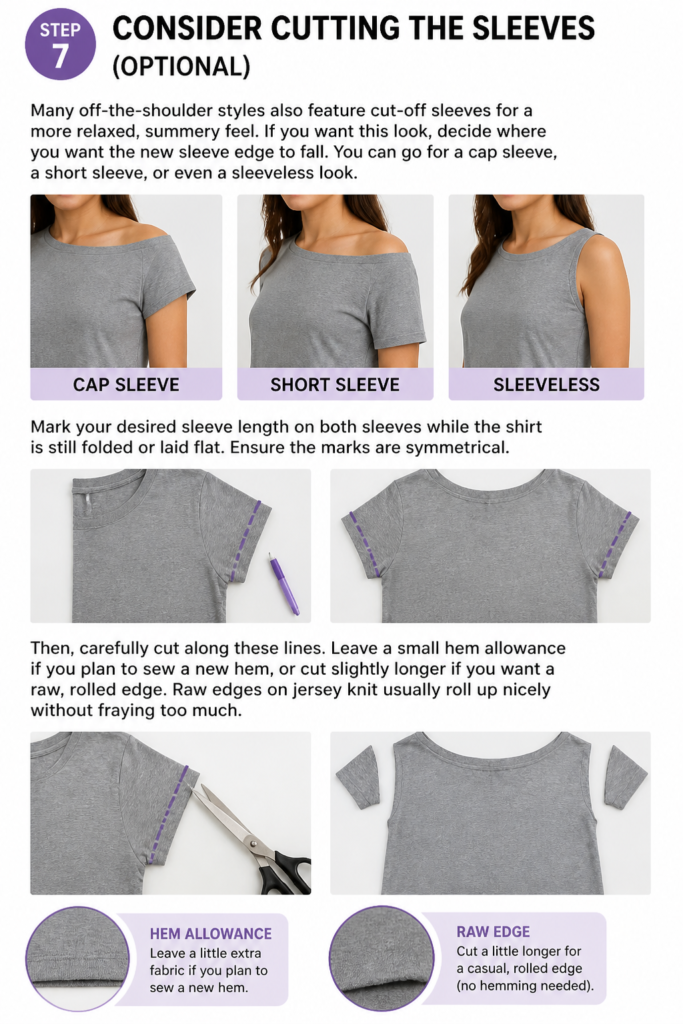
Many off-the-shoulder styles also feature cut-off sleeves for a more relaxed, summery feel. If you want this look, decide where you want the new sleeve edge to fall. You can go for a cap sleeve, a short sleeve, or even a sleeveless look.
Mark your desired sleeve length on both sleeves while the shirt is still folded or laid flat. Ensure the marks are symmetrical. Then, carefully cut along these lines.
Leave a small hem allowance if you plan to sew a new hem, or cut slightly longer if you want a raw, rolled edge. Raw edges on jersey knit usually roll up nicely without fraying too much.
Step 8: Stretch and Distressing (Optional)
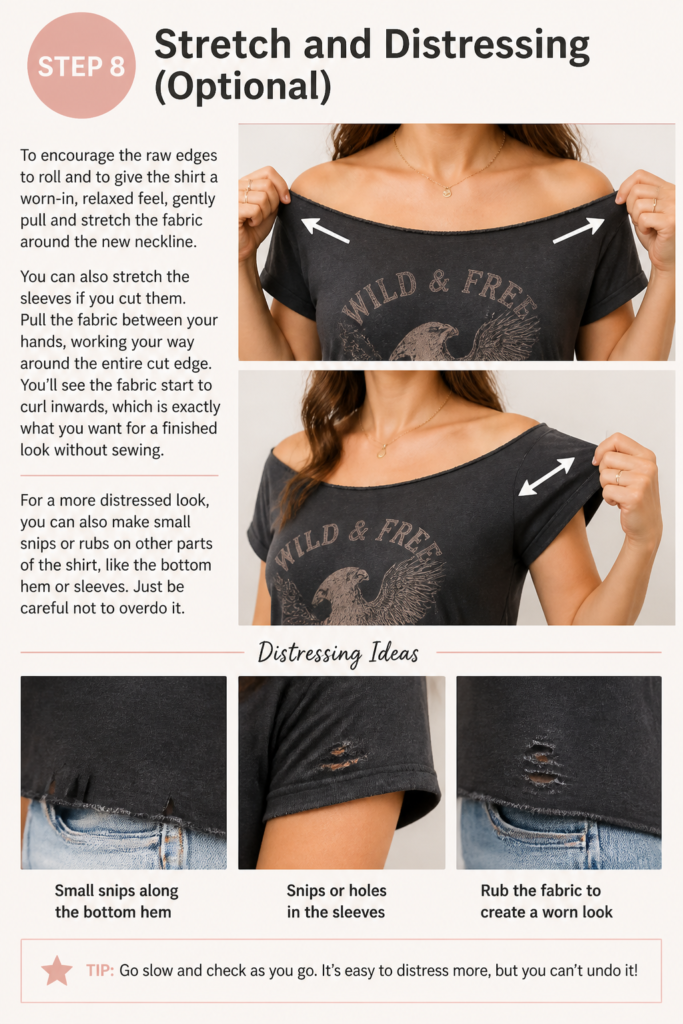
To encourage the raw edges to roll and to give the shirt a worn-in, relaxed feel, gently pull and stretch the fabric around the new neckline. You can also stretch the sleeves if you cut them.
Pull the fabric between your hands, working your way around the entire cut edge. You’ll see the fabric start to curl inwards, which is exactly what you want for a finished look without sewing.
For a more distressed look, you can also make small snips or rubs on other parts of the shirt, like the bottom hem or sleeves. Just be careful not to overdo it.
Step 9: Try On and Final Adjustments
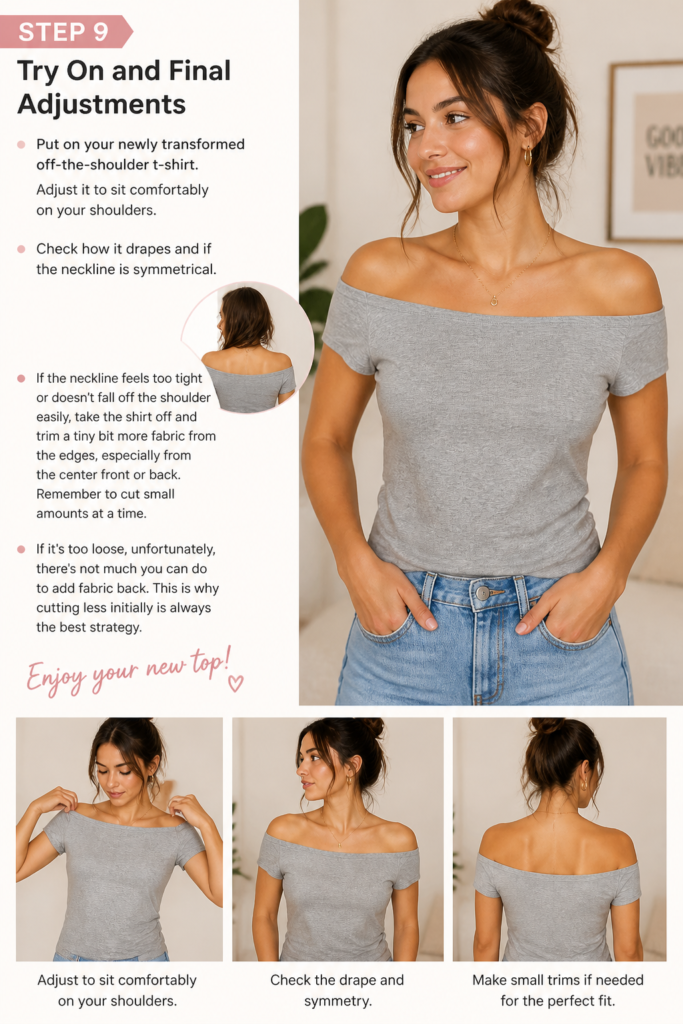
Put on your newly transformed off-the-shoulder t-shirt. Adjust it to sit comfortably on your shoulders. Check how it drapes and if the neckline is symmetrical.
If the neckline feels too tight or doesn’t fall off the shoulder easily, take the shirt off and trim a tiny bit more fabric from the edges, especially from the center front or back. Remember to cut small amounts at a time.
If it’s too loose, unfortunately, there’s not much you can do to add fabric back. This is why cutting less initially is always the best strategy. Enjoy your new top!
Common Mistakes to Avoid
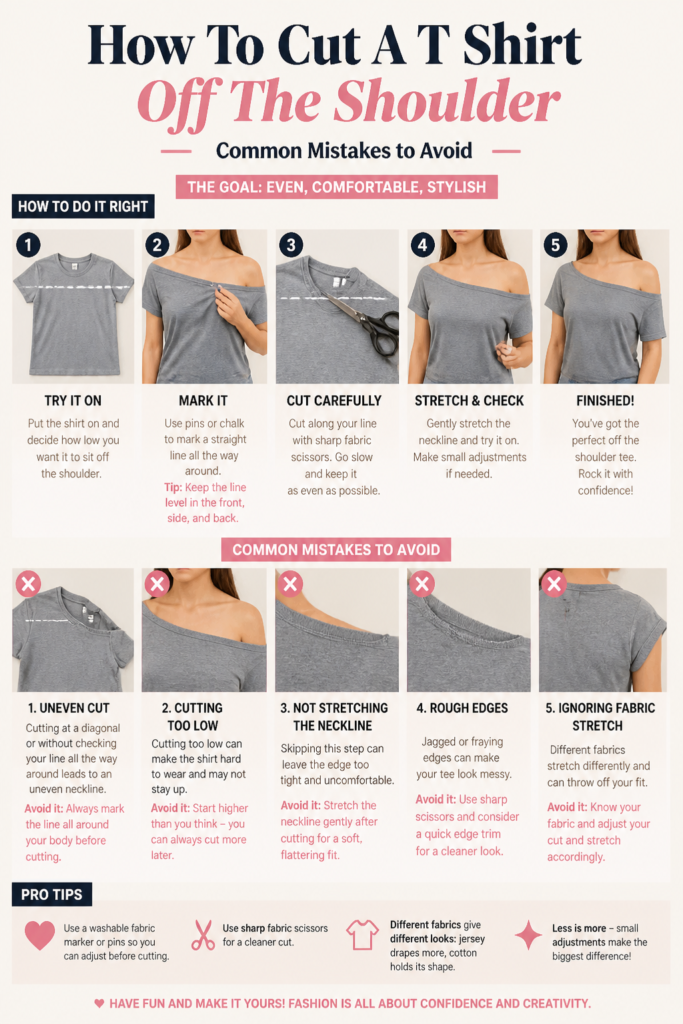
Cutting Too Much Too Soon
A common pitfall is getting overzealous with the scissors and making the neckline too wide or too deep from the start. This can lead to a shirt that constantly falls down or exposes more than you intended. Always err on the side of caution; you can always trim more fabric, but you cannot add it back once cut. Make small, incremental cuts.
Uneven Cuts
Failing to fold the shirt perfectly in half or rushing the cutting process often results in a lopsided neckline. An uneven cut will be noticeable and can make the shirt uncomfortable to wear. Take your time to align the shirt and make smooth, deliberate cuts, ensuring symmetry. Using a ruler for straight sections and a steady hand for curves helps immensely.
Forgetting to Stretch the Fabric
After cutting, especially with knit fabrics, the raw edges can look a bit stiff and unfinished. Many people skip the crucial step of gently stretching the newly cut edges. Stretching encourages the fabric to naturally roll inwards, giving a soft, finished look without the need for sewing. This step truly elevates the DIY project from homemade to custom.
Choosing the Wrong T-Shirt Material
Not all t-shirts are created equal when it comes to this modification. Very stiff cotton or fabrics that fray easily (like some linen blends) are poor choices. These materials won’t drape well and the raw edges will unravel, creating a messy finish. Opt for soft, stretchy knits like cotton, rayon, or modal blends for the best results and a comfortable drape.
Troubleshooting
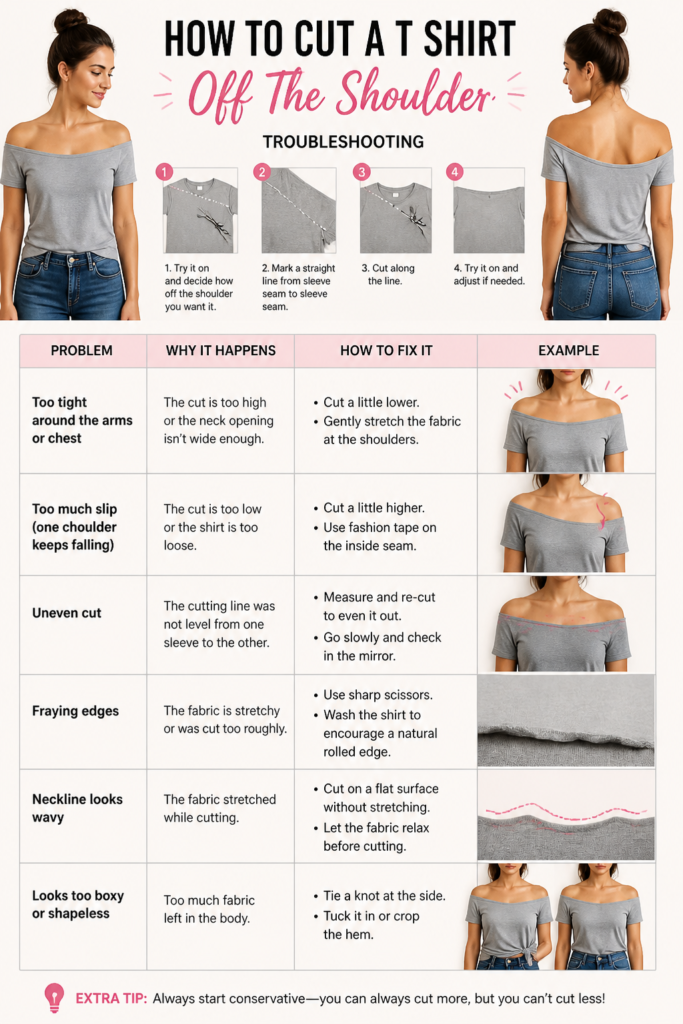
Neckline Too Wide / Falls Off Constantly
If your newly cut neckline is too wide and struggles to stay on your shoulders, you might have cut too much fabric. Unfortunately, adding fabric back is difficult. A temporary fix could be to add a small stitch at the shoulder seams on the inside, pulling the fabric slightly tighter. For a more permanent solution, you could try adding a drawstring channel or elastic casing to the neckline, which allows you to gather and adjust the width.
Neckline Too Tight / Doesn’t Sit Right
If the shirt doesn’t comfortably fall off your shoulders or feels restrictive, your initial cut wasn’t wide enough. The good news is this is an easy fix. Take the shirt off, lay it flat, and carefully trim a small, even amount of fabric from the entire neckline. Try it on again after each small trim until you achieve your desired drape and comfort. Remember to trim evenly around the whole opening.
Edges Fraying Excessively
While some natural rolling of knit fabric edges is expected and desired, excessive fraying indicates the wrong fabric choice or a dull pair of scissors. If fraying is a major issue, you have a few options. You can use fabric glue along the raw edge to seal it, or, for a more professional finish, you can sew a very narrow rolled hem or a zigzag stitch around the entire neckline. Using very sharp fabric scissors from the start helps minimize initial fraying.
Key Takeaways
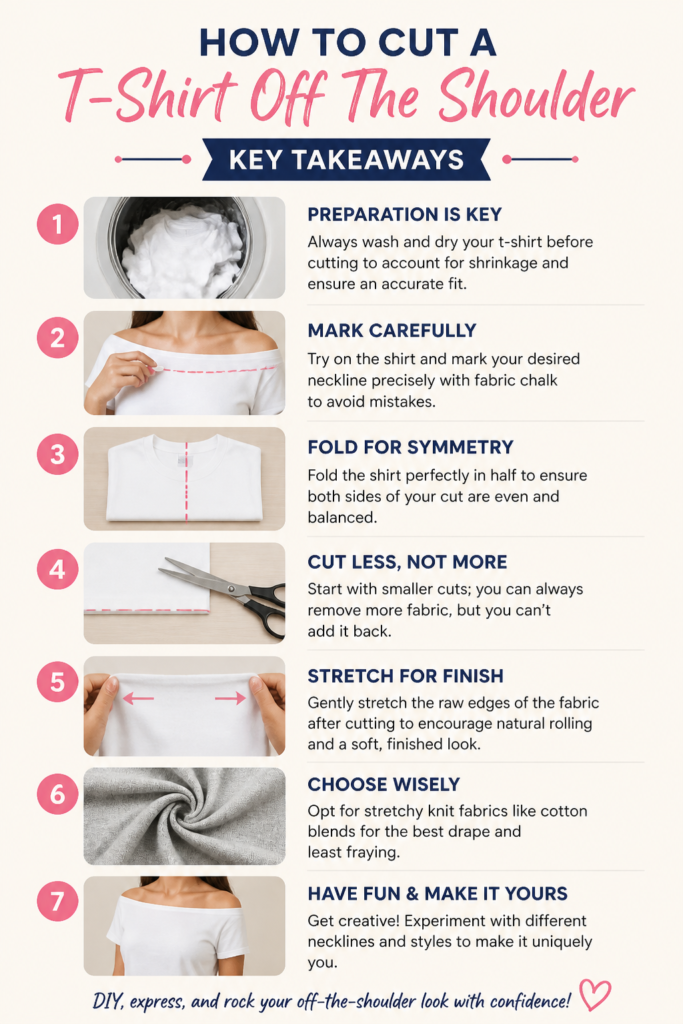
- Preparation is Key: Always wash and dry your t-shirt before cutting to account for shrinkage and ensure an accurate fit.
- Mark Carefully: Try on the shirt and mark your desired neckline precisely with fabric chalk to avoid mistakes.
- Fold for Symmetry: Fold the shirt perfectly in half to ensure both sides of your cut are even and balanced.
- Cut Less, Not More: Start with smaller cuts; you can always remove more fabric, but you can’t add it back.
- Stretch for Finish: Gently stretch the raw edges of the fabric after cutting to encourage natural rolling and a soft, finished look.
- Choose Wisely: Opt for stretchy knit fabrics like cotton blends for the best drape and least fraying.
Frequently Asked Questions
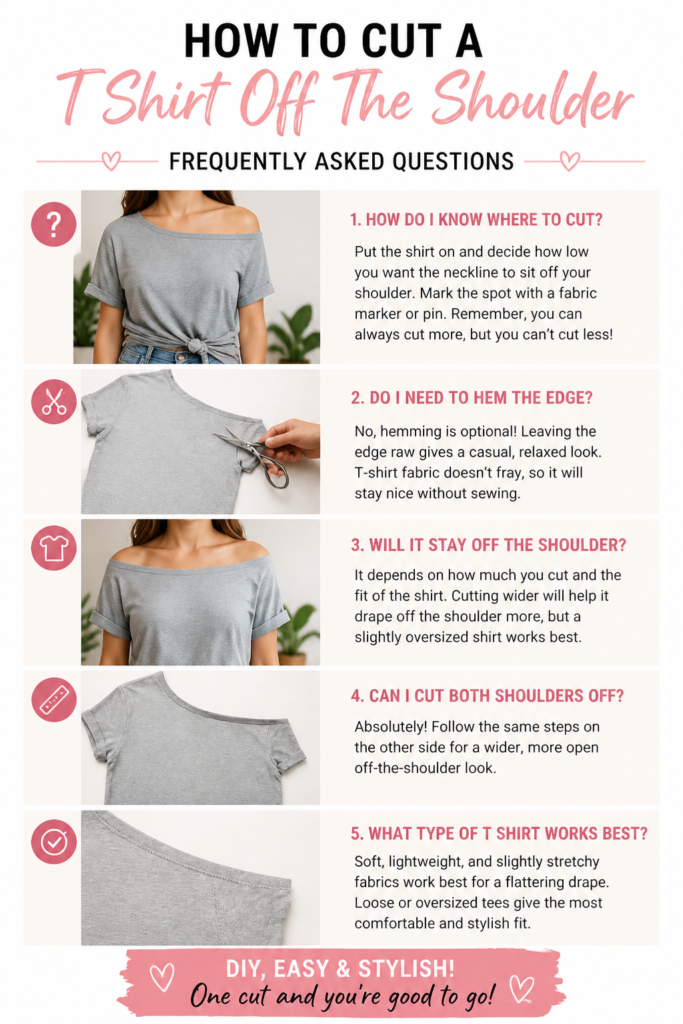
Can I do this with any type of t-shirt?
While you can technically cut any t-shirt, results vary greatly depending on the fabric. Stretchy, soft knits like cotton, rayon, or modal blends work best because they drape well and their raw edges naturally roll without fraying excessively. Stiffer fabrics like heavy cotton or woven materials will not drape as nicely and may fray.
Do I need to hem the new neckline?
For most stretchy knit t-shirts, hemming is not necessary. The nature of these fabrics causes the raw edges to naturally roll inwards when stretched and worn, creating a soft, finished look. If you prefer a very clean, crisp edge or are working with a fabric prone to fraying, you can sew a narrow zigzag stitch or a rolled hem.
What if my cut is uneven?
If your cut is slightly uneven, don’t panic. Lay the shirt flat, identify the longer or wider side, and carefully trim small amounts from that side until it matches the other. Use a ruler to help guide your trimming. Minor imperfections often become less noticeable once the shirt is worn and the fabric stretches and rolls.
How do I make sure the shirt doesn’t fall off my shoulders completely?
The key is in your initial marking. When you try on the shirt, mark the line slightly higher than where you want the final edge to sit. Remember, the fabric will stretch a bit, and the raw edge will roll, making the opening slightly larger. If it still feels too loose, you can add a small, discreet stitch at the shoulder seam on the inside to hold it in place.
Our Top Recommended Finds
- Fiskars Fabric Scissors: Super sharp blades are a game-changer for clean, precise cuts, reducing fraying and frustration.
- Tailor’s Chalk or Fabric Marker: Essential for accurate marking that washes out easily, ensuring your cuts are exactly where you want them.
- Self-Healing Cutting Mat: Protects your work surface and provides a stable, grid-lined base for measuring and cutting straight lines.
Unleash Your Inner Fashion Designer
You now have the power to transform a basic t-shirt into a stylish, custom off-the-shoulder top. This simple DIY project offers a fantastic way to refresh your wardrobe without spending a fortune. Imagine all the possibilities with your existing tees!
Why wait? Grab that forgotten t-shirt from your closet today and give it a brand new life. Embrace your creativity and enjoy the satisfaction of wearing something you’ve customized yourself. You might just discover a new favorite outfit.