👔 How To Put On A Tie Step By Step
Learning to tie a necktie feels like a rite of passage for many. It’s a skill that adds a polished touch to your appearance, whether for a job interview, a wedding, or an important event. I remember the first time I tried, fumbling with fabric in front of a mirror, feeling utterly lost.
This guide will walk you through the process, making it simple and straightforward. You’ll gain the confidence to knot your own tie perfectly every time.
Quick Overview
This guide will empower you to master the classic Four-in-Hand knot. You’ll learn to create a neat, professional tie that complements your shirt collar and personal style.
It’s a foundational skill that will serve you well for years to come.
- Time needed: 5-10 minutes (first few attempts), 1-2 minutes (once practiced)
- Difficulty: Beginner
- What you’ll need: A necktie, a collared shirt, a mirror (optional but helpful)
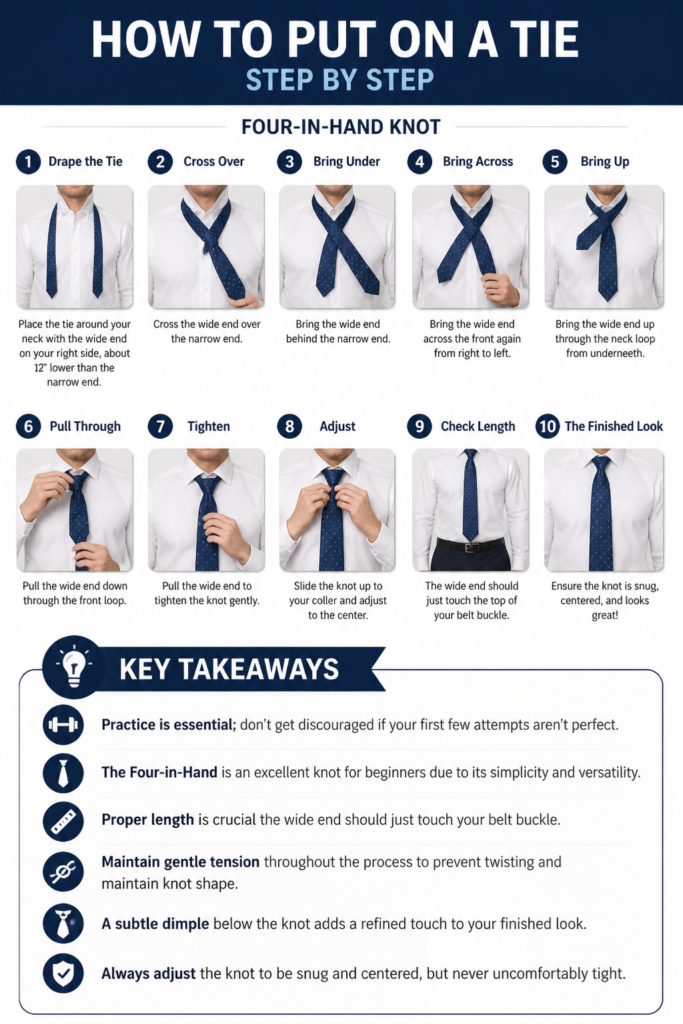
Step-by-Step Instructions
We’ll focus on the Four-in-Hand knot, a versatile and easy-to-learn option perfect for most occasions. It creates a slim, slightly asymmetrical knot that suits a variety of collar styles.
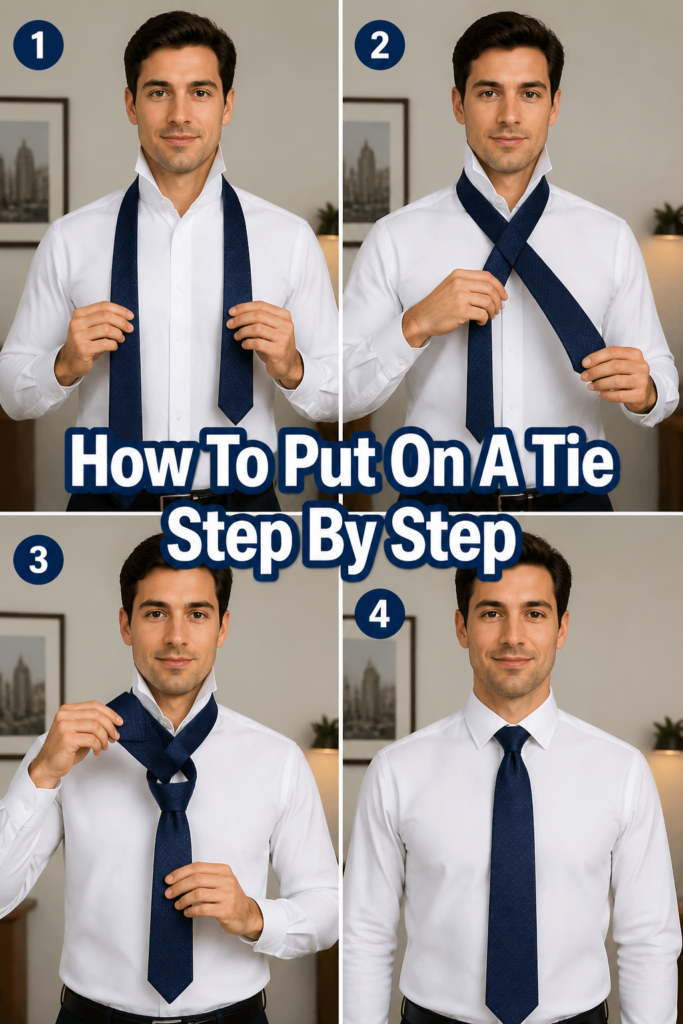
Step 1: Drape the Tie
Begin by placing the tie around your neck, under your shirt collar. Ensure the wider end hangs on your right side. The narrow end should be on your left.
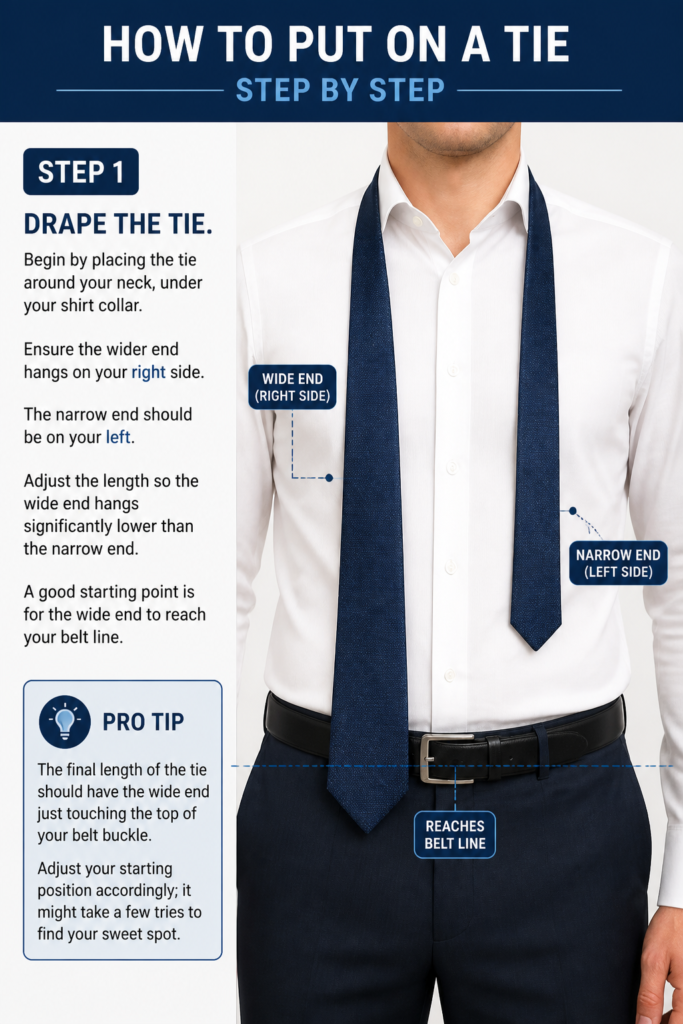
Adjust the length so the wide end hangs significantly lower than the narrow end. A good starting point is for the wide end to reach your belt line.
Pro Tip: The final length of the tie should have the wide end just touching the top of your belt buckle. Adjust your starting position accordingly; it might take a few tries to find your sweet spot.
Step 2: Cross the Wide Over the Narrow
Take the wide end of the tie. Cross it over the narrow end, moving it from right to left. This forms the initial “X” shape at your collar.
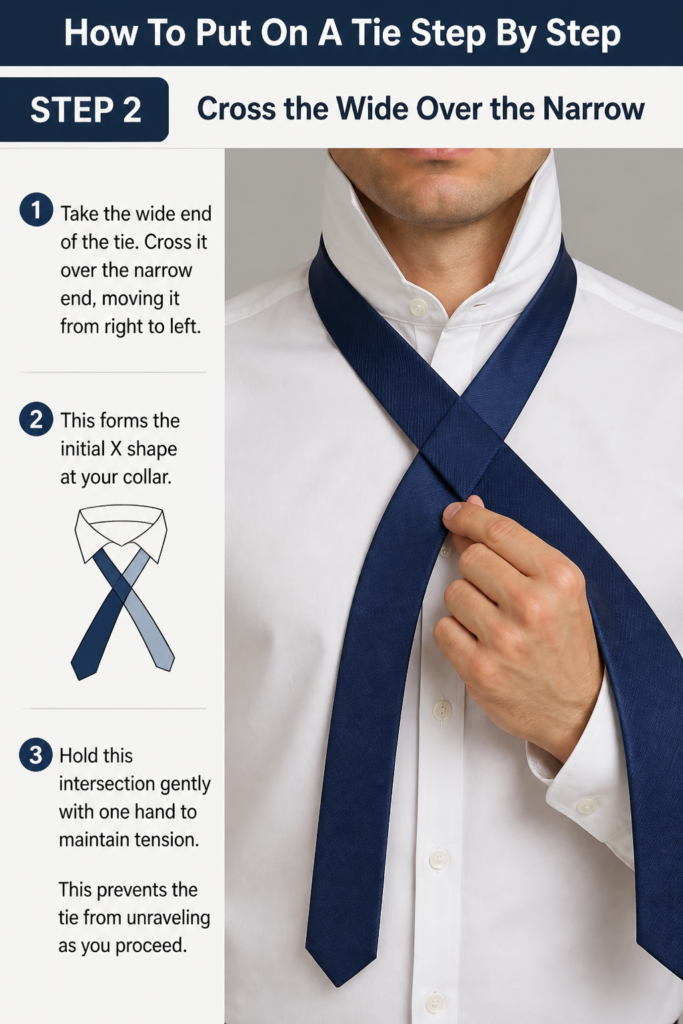
Hold this intersection gently with one hand to maintain tension. This prevents the tie from unraveling as you proceed.
Step 3: Bring the Wide End Underneath
Slide the wide end underneath the narrow end. Move it from left to right. This brings the wide end back to its original side, but now it’s behind the narrow end.
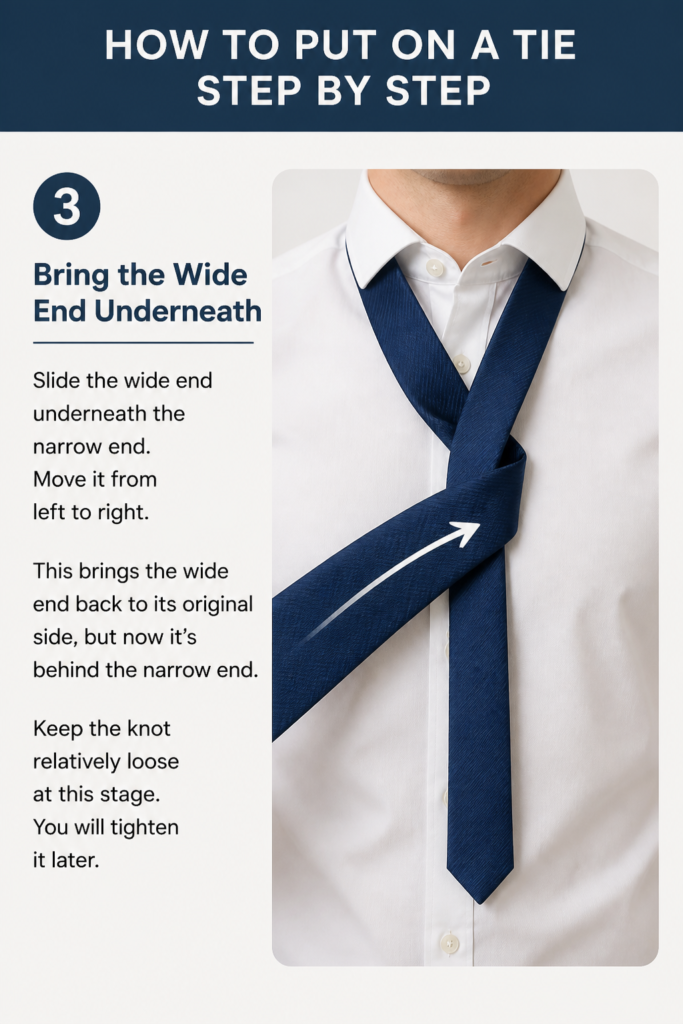
Keep the knot relatively loose at this stage. You will tighten it later.
Step 4: Cross Over Again
Bring the wide end across the front of the narrow end once more. This time, move it from right to left again. You are essentially creating a loop around the narrow end.

This forms the visible part of the knot’s front face. Keep it snug but not overly tight against your collar.
Step 5: Push Up Through the Neck Loop
Guide the wide end upwards. Push it through the neck loop you created around your collar. It should emerge from underneath, pointing towards your chin.
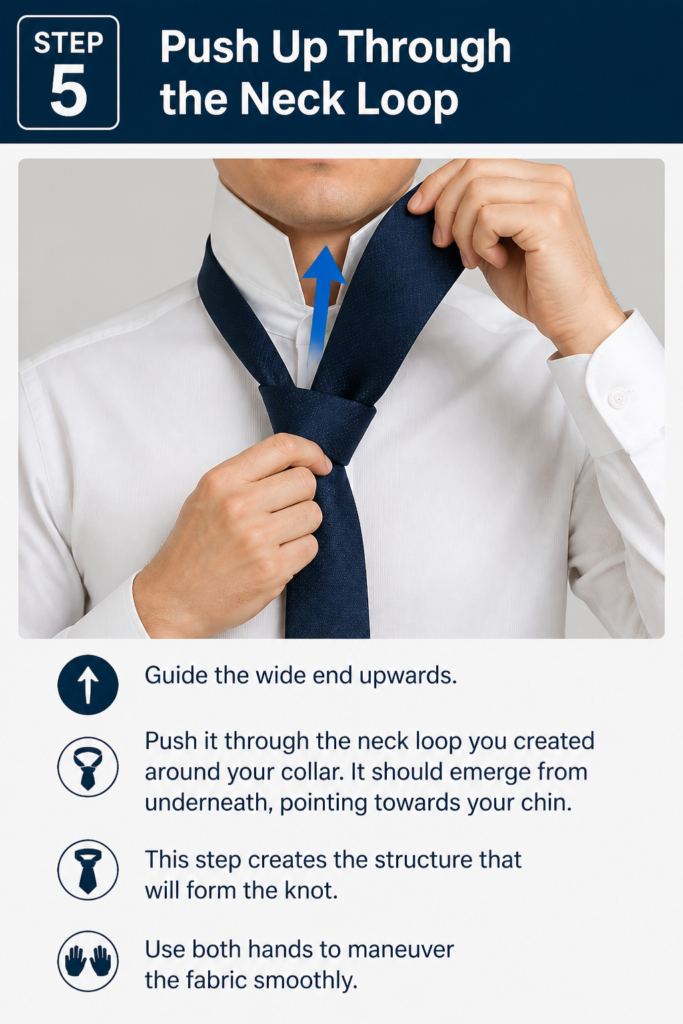
This step creates the structure that will form the knot. Use both hands to maneuver the fabric smoothly.
Step 6: Thread Down Through the Front Loop
Take the wide end you just pushed through the neck loop. Now, thread it downwards through the front loop you made in Step 4. This is the loop on the face of the knot.
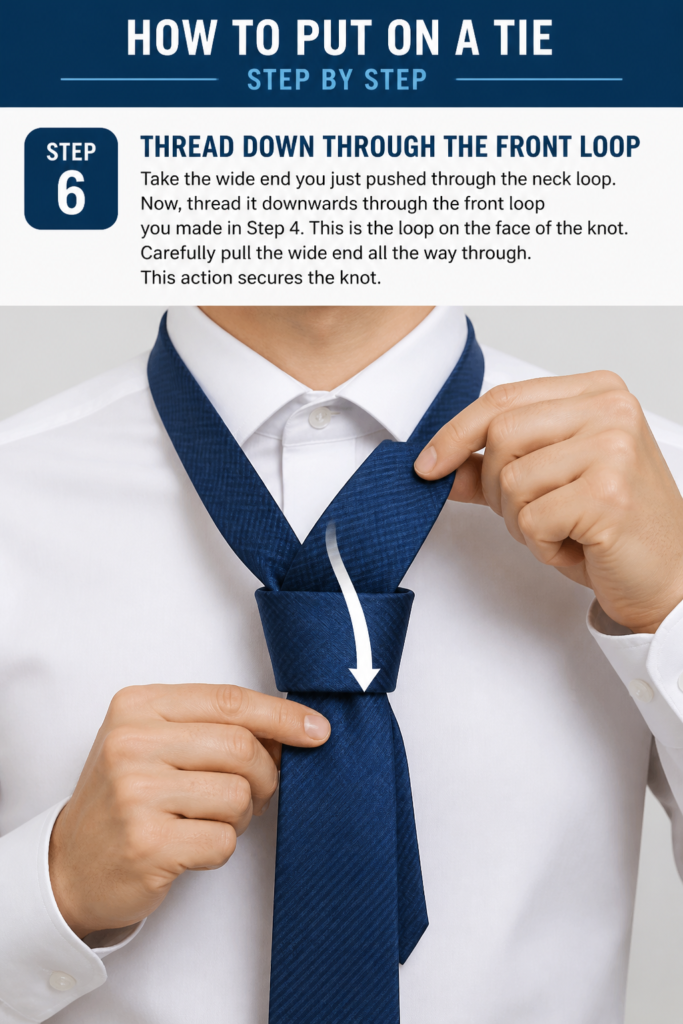
Carefully pull the wide end all the way through. This action secures the knot.
Step 7: Tighten and Adjust
Hold the narrow end of the tie with one hand. With the other, gently slide the knot upwards towards your neck. Pull the wide end downwards to tighten.
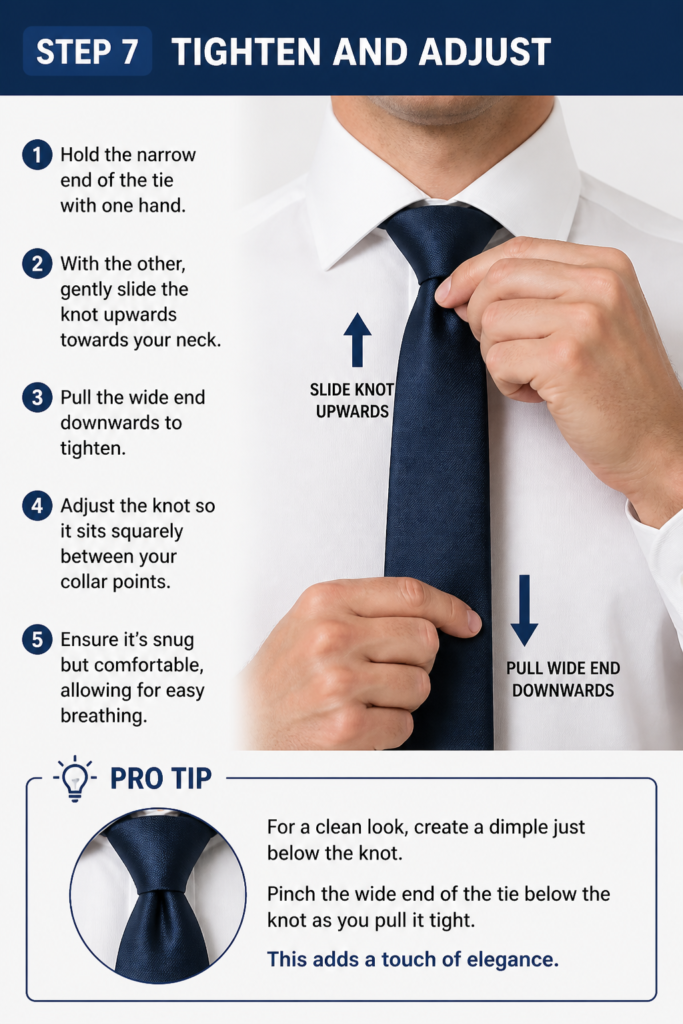
Adjust the knot so it sits squarely between your collar points. Ensure it’s snug but comfortable, allowing for easy breathing.
Pro Tip: For a clean look, create a dimple just below the knot. Pinch the wide end of the tie below the knot as you pull it tight. This adds a touch of elegance.
Common Mistakes to Avoid
Tying a tie can be tricky at first. Knowing common pitfalls helps you achieve a perfect knot faster.
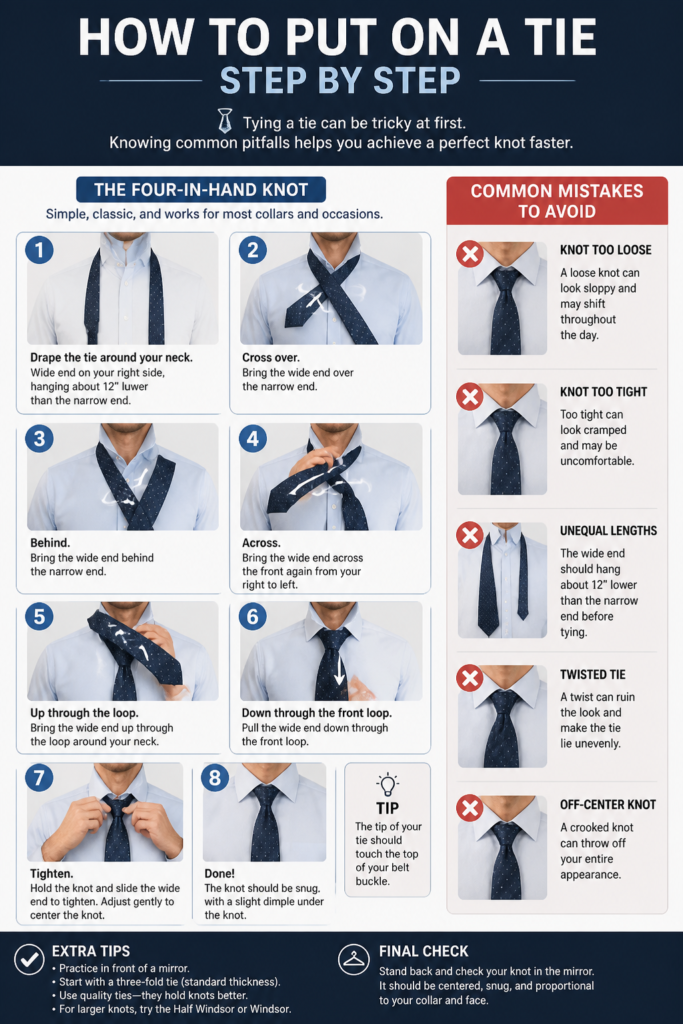
Too Loose or Too Tight
A tie that is too loose looks sloppy and unprofessional. Conversely, a tie that is too tight can be uncomfortable and restrict breathing.
Aim for a snug fit where the knot sits firmly against your collar without choking you. You should be able to comfortably slip one finger between the knot and your neck.
Incorrect Length
The tip of your tie’s wide end should just graze the top of your belt buckle. A tie that is too long or too short disrupts the balance of your outfit.
Practice adjusting the starting position of the tie’s wide end in Step 1 to achieve the ideal final length. It might take a few attempts to get it right.
Asymmetrical Knot
While the Four-in-Hand is naturally slightly asymmetrical, a severely lopsided knot looks untidy. This often happens when one side is pulled too much during tightening.
Ensure you pull both the wide and narrow ends evenly when adjusting. Gently guide the knot to center it between your collar points.
Forgetting the Dimple
A dimple is a small crease just below the knot, adding a stylish touch. Many beginners overlook this detail.
As you tighten the knot, gently pinch the wide end of the tie below the knot to create this subtle fold. It elevates the look of your tied tie.
Troubleshooting
Even with a step-by-step guide, you might encounter small issues. Here are solutions to common tie-tying problems.
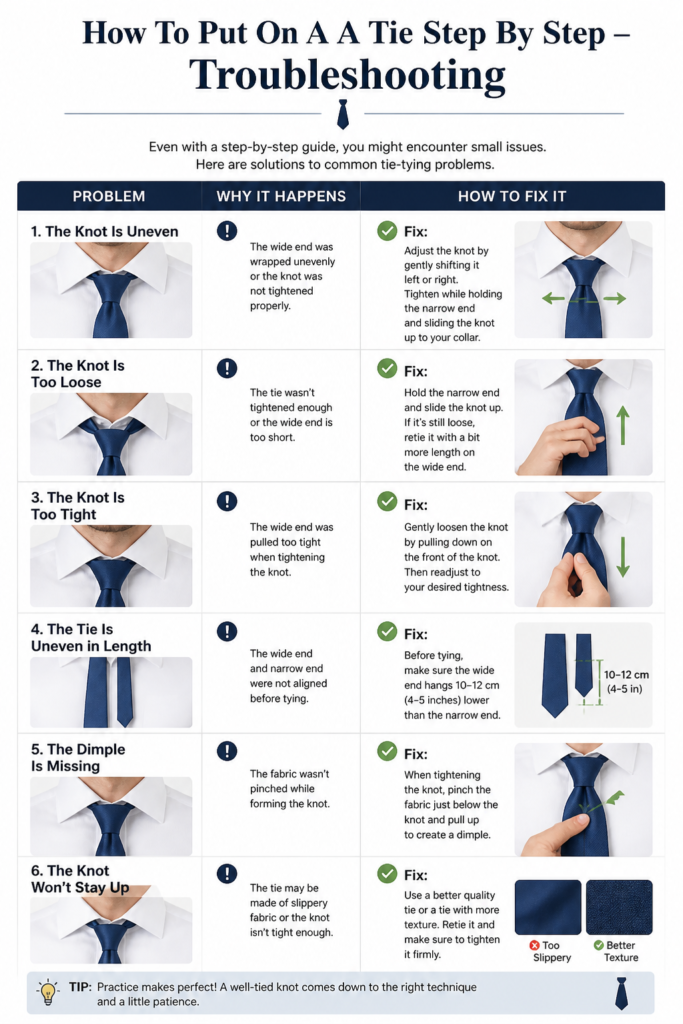
Knot is Too Bulky
A bulky knot often results from using too much fabric or not pulling the layers tight enough as you form the knot. Some tie fabrics are also naturally thicker.
Try to keep the fabric flat and smooth as you wrap it around the narrow end. Ensure each wrap is snug. If your tie is very thick, consider a smaller knot like the Four-in-Hand.
Tie Keeps Twisting
If your tie fabric twists or turns, it usually means you’re not keeping enough tension throughout the process. The fabric needs to be held firmly but gently.
Maintain a light grip on the knot’s base with one hand while you maneuver the wide end with the other. This prevents unwanted rotation.
Difficulty Getting the Length Right
Achieving the perfect tie length is a common struggle. It’s almost always about the initial positioning.
Experiment with how much lower the wide end hangs in Step 1. If the tie is too short, start with the wide end even lower. If it’s too long, start with the wide end higher.
Key Takeaways
- Practice is essential; don’t get discouraged if your first few attempts aren’t perfect.
- The Four-in-Hand is an excellent knot for beginners due to its simplicity and versatility.
- Proper length is crucial: the wide end should just touch your belt buckle.
- Maintain gentle tension throughout the process to prevent twisting and maintain knot shape.
- A subtle dimple below the knot adds a refined touch to your finished look.
- Always adjust the knot to be snug and centered, but never uncomfortably tight.
Frequently Asked Questions
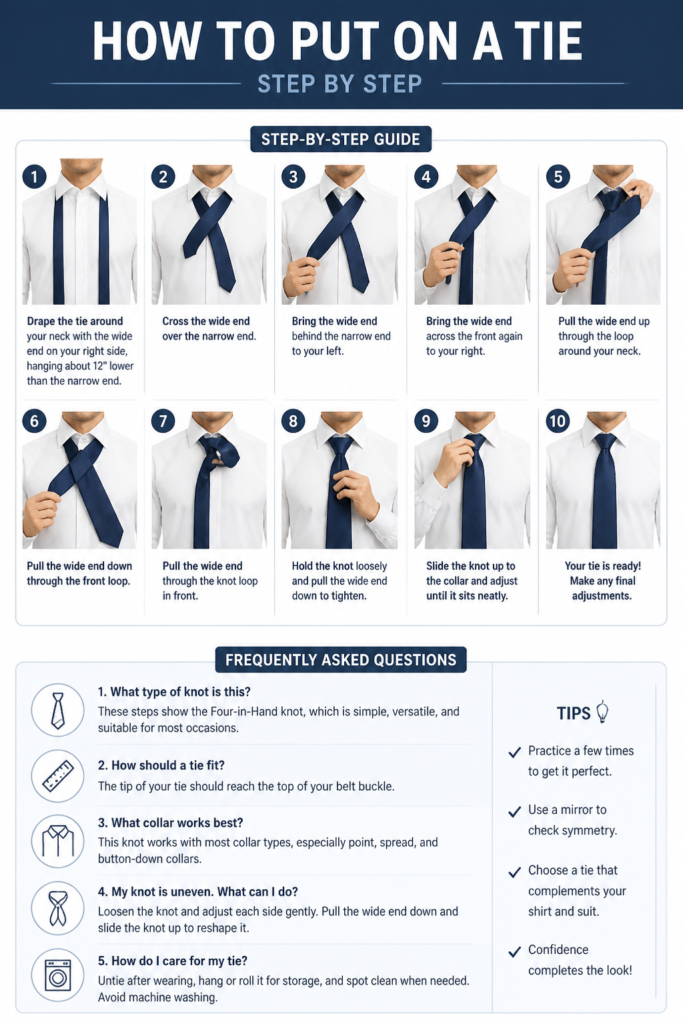
What’s the easiest tie knot for beginners?
The Four-in-Hand knot, which this guide covers, is widely considered the easiest and most practical knot for beginners. It requires fewer steps and creates a relatively slim, versatile look.
How do I know if my tie is the right length?
The tip of the wide end of your tie should just reach the top of your belt buckle when you are standing naturally. A tie that is too long or too short looks disproportionate.
Can I untie my tie and re-tie it without taking it off completely?
While you technically can, it’s generally best to fully untie your tie and start fresh each time. This helps prevent creasing the fabric and ensures a crisp, clean knot.
What’s the best way to store ties?
To prevent wrinkles and maintain their shape, hang your ties on a tie rack or roll them up loosely. Avoid folding them or leaving them crumpled in a drawer.
Our Top Recommended Finds
- Quality Silk Tie: A good quality silk tie drapes beautifully and is easier to knot smoothly than cheaper synthetic options. Look for a classic solid color or subtle pattern.
- Tie Rack: A dedicated tie rack keeps your ties organized and prevents them from getting wrinkled or damaged. Choose one that hangs easily in your closet.
- Full-Length Mirror: While optional, a full-length mirror allows you to see the entire tie and how it complements your outfit, making adjustments much easier.
Master Your Style, One Knot at a Time
Tying a tie might seem daunting initially, but with a little practice, it quickly becomes second nature. It’s a fundamental skill that elevates your personal presentation, projecting confidence and attention to detail.
Don’t wait for a special occasion to try this out. Grab a tie right now and follow these steps. The more you practice, the more natural it will feel. Soon, you’ll be knotting ties with effortless grace, ready for any event that comes your way.