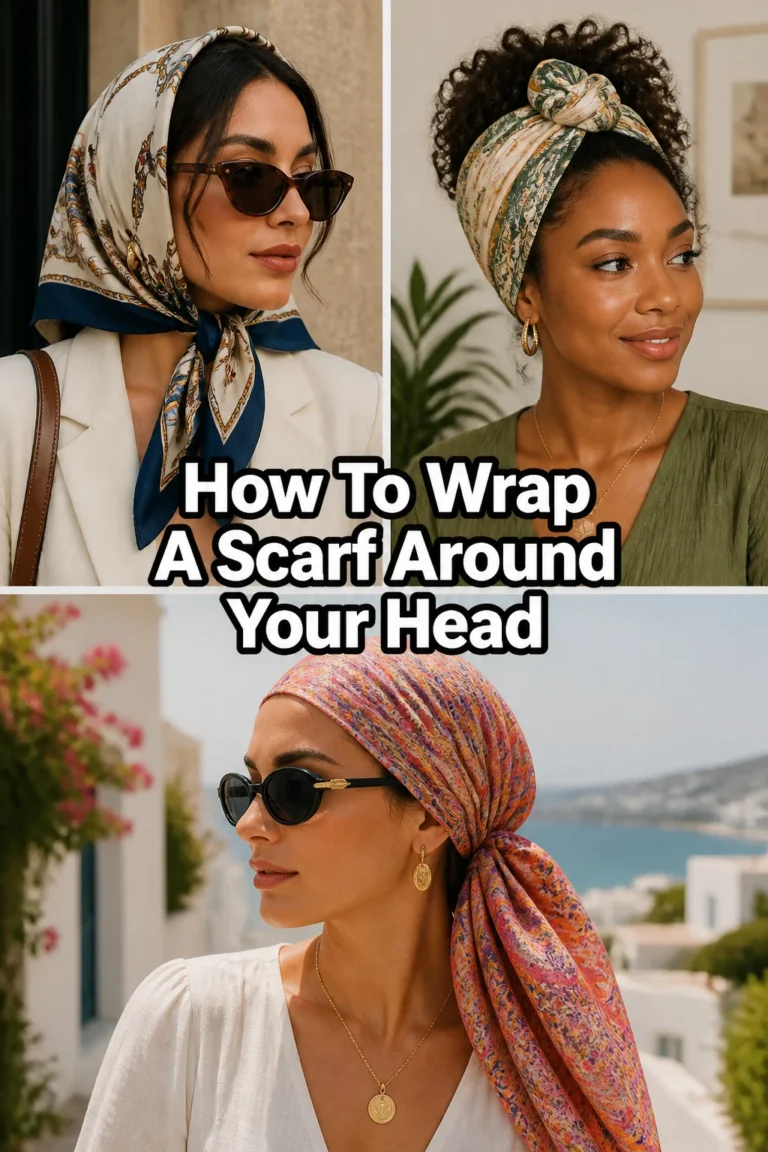
bandana How To Tie A Bandana On Your Head
Tying a bandana on your head is more than just a fashion statement; it’s a practical skill for bad hair days, sunny adventures, or adding a touch of personal flair.
I’ve experimented with countless folds and knots over the years, from hiking trails to city streets, perfecting the balance of style and staying power.
This guide distills that hands-on experience, ensuring you get a comfortable, secure, and stylish look every time.
Quick Overview
Ready to master the art of the head bandana? This guide will walk you through every step, from selecting your fabric to securing the perfect knot, helping you achieve a look that’s both chic and practical.
- Time needed: 2-5 minutes
- Difficulty: Beginner
- What you’ll need: One square bandana, a mirror (optional but helpful)
Step-by-Step Instructions
Step 1: Choose Your Bandana Wisely
The journey to a perfect bandana begins with selection. Consider the material, as cotton offers breathability and grip, while silk provides a smoother, more elegant drape. A standard square bandana usually measures 20×20 to 22×22 inches.
Think about the pattern and color too. A vibrant print can add a pop of personality, while a solid color offers versatile styling options. Your choice sets the tone for your entire look.
Pro Tip: For better grip and less slipping, opt for a bandana made of 100% cotton. It provides natural friction against your hair.
Step 2: Lay Your Bandana Flat
Find a clean, flat surface like a table or bed. Carefully unfold your bandana completely, smoothing out any wrinkles. This step ensures an even and neat fold, which is crucial for a polished final look.
A well-prepared surface allows you to see the true square shape. It also makes the subsequent folding steps much easier to execute accurately.
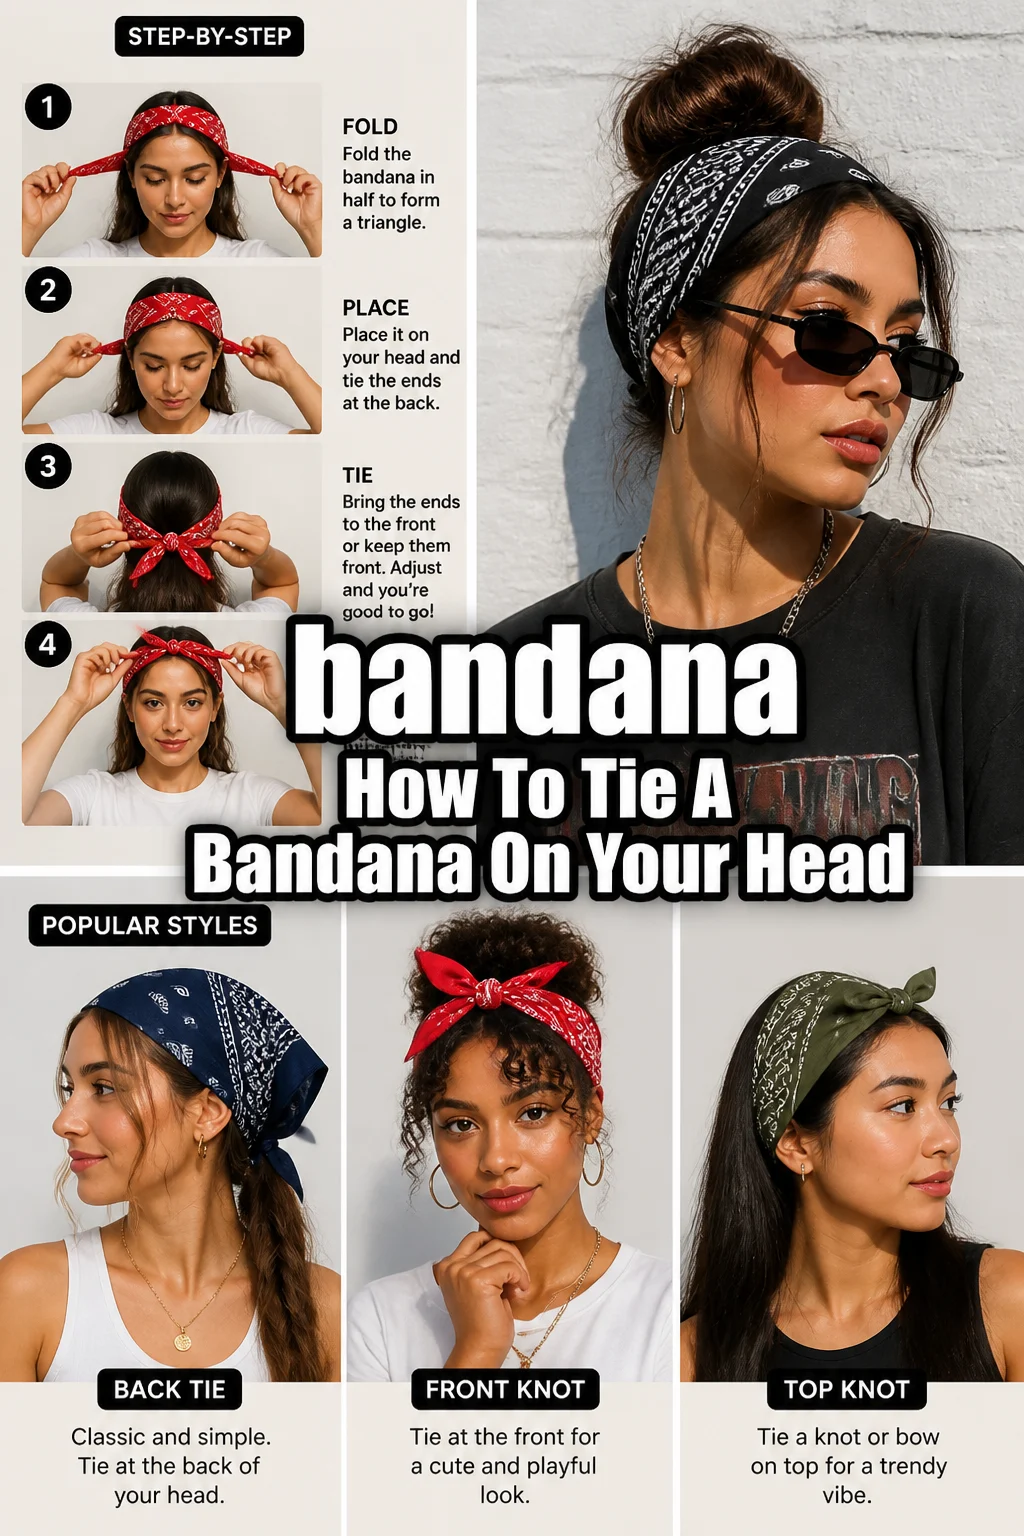
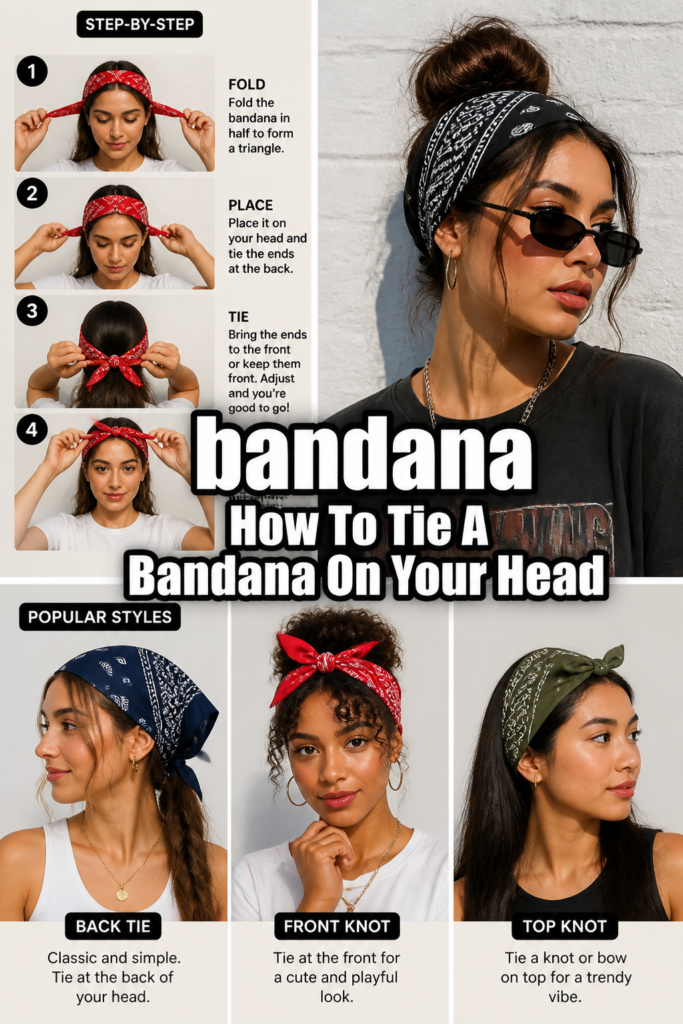
Step 3: Fold into a Triangle
Take one corner of the square bandana and bring it diagonally across to meet the opposite corner. This action will create a large triangle. Align the edges precisely to avoid any unevenness.
Press down along the folded edge to create a soft crease. This initial triangle is the foundation for most head-tying styles.
Step 4: Create a Strip
Now, you need to transform your triangle into a strip. Take the long, folded edge of the triangle and fold it upwards, about 2-3 inches. Continue to fold or roll the bandana from this edge, working your way towards the pointed tip of the triangle.
Each fold should be consistent in width. This creates a neat, manageable band. The width of your strip will determine how much of your head the bandana covers.
Pro Tip: For a wider headband look, make your folds broader. For a thinner, more subtle band, roll it more tightly. Experiment to find your preferred width.
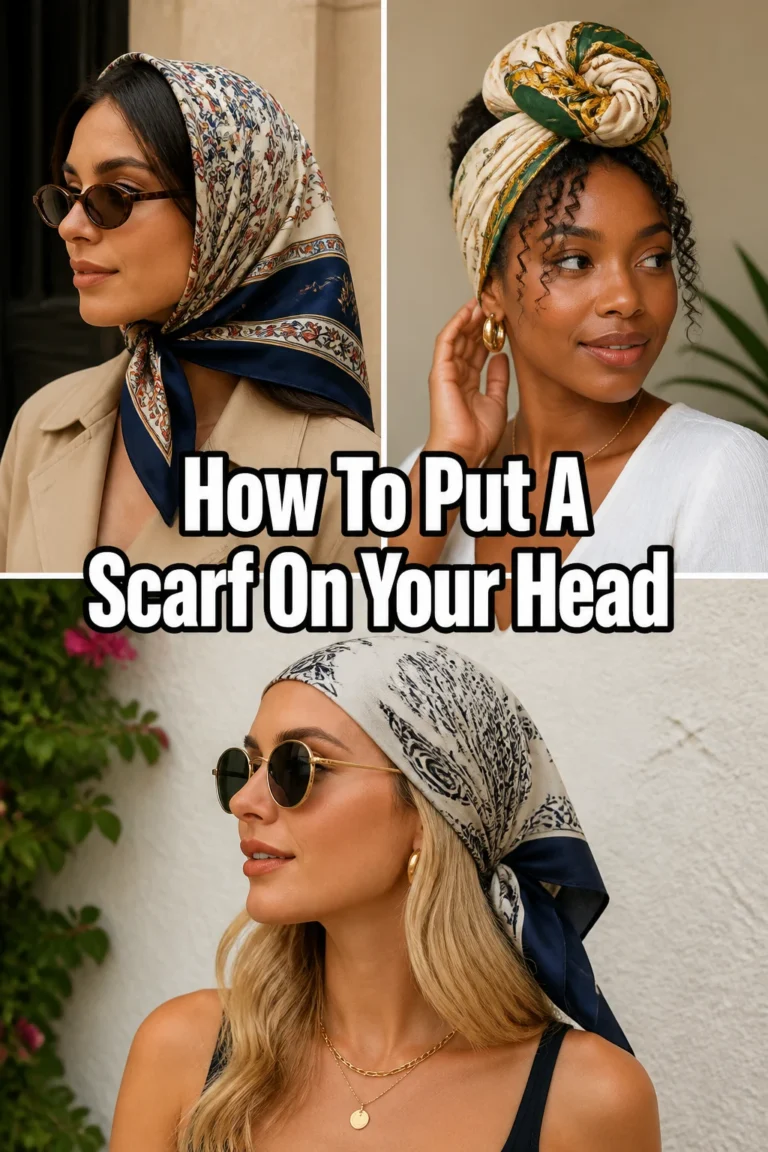
Step 5: Position on Your Head
Decide where you want the bandana to sit on your head. For a classic look, place the center of the folded strip at your hairline, covering your forehead slightly. You can also position it further back on your crown for a headband style, or lower on your forehead for a more bohemian vibe.
Hold the two ends of the bandana strip firmly, one in each hand, letting them hang down on either side of your face. Ensure the strip feels centered and balanced.
Step 6: Bring Ends Together
With the bandana positioned, bring the two loose ends of the strip around the back of your head. They should meet either at the nape of your neck or slightly above it, depending on your preferred knot placement.
Make sure the main body of the bandana remains smooth and unbunched over your head. Keep a gentle tension, not too tight, as you bring the ends together.
Step 7: Tie the Knot
This is where you secure your bandana. Tie the two ends together in a simple square knot. Cross one end over the other and tuck it underneath, then cross the same end over the other again and pull through.
Pull the knot gently but firmly to secure it. Avoid pulling too tightly, as this can cause discomfort or leave marks. A double knot offers extra security, especially if you plan to be active.
Pro Tip: For a more discreet look, tie the knot underneath your hair at the nape of your neck. For a visible, playful knot, tie it on top of your head or slightly to the side.
Step 8: Adjust and Style
Once the knot is tied, it’s time for the finishing touches. Gently adjust the bandana to ensure it’s comfortable and symmetric. Tuck in any stray ends of the knot or loose hair beneath the bandana.
Fluff out the top part of the bandana if you want more volume, or smooth it down for a sleeker appearance. Check your reflection from all angles to confirm the look is just right.
Step 9: Experiment with Placement and Flair
Don’t be afraid to try different placements. Wear it as a full head covering, a simple headband, or even styled like a pirate’s wrap. The beauty of a bandana lies in its versatility.
Consider leaving some front pieces of hair out to frame your face, or tucking everything in for a clean, pulled-back look. Your personal style dictates the final outcome.
Common Mistakes to Avoid
Tying Too Tightly or Too Loosely
One common error is pulling the bandana too tight, which can cause headaches and leave red marks on your skin. It also makes the style look stiff and uncomfortable. Conversely, tying it too loosely means it will slip and slide throughout the day, requiring constant readjustment.
Aim for a snug but comfortable fit. You should be able to slide a finger easily under the band, but it shouldn’t feel like it’s about to fall off. A well-tied bandana stays put without being restrictive.
Incorrect Folding Technique
Many people rush the folding process, resulting in a bulky, uneven strip. This leads to a lumpy look on your head and makes the bandana harder to tie securely. Improper folding also affects how the bandana lays against your head, creating awkward gaps or bulges.
Always take the time to lay the bandana flat and fold it neatly into a consistent strip. Precision in folding ensures a smooth, sleek foundation for your headwear.
Ignoring Hair Type and Texture
Not all hair types interact with bandanas in the same way. Those with very fine or silky hair might find bandanas slip easily, while thick or curly hair can create bulk that’s hard to manage. Failing to account for your hair’s unique characteristics can lead to frustration and a less-than-ideal look.
Consider using bobby pins for extra security on slippery hair, or adjusting the bandana’s width to accommodate volume. Tailoring your approach to your hair type will significantly improve the outcome.
Troubleshooting
Bandana Keeps Slipping Off
If your bandana constantly slides, the fabric might be too smooth or your hair too fine. Try folding the bandana with a slight twist in the strip before tying it. This adds a bit more grip against your hair.
Using a few bobby pins to secure the bandana to your hair, especially near the temples or behind the ears, can also provide essential stability. A light spritz of hairspray on the underside of the bandana can also help it adhere better.
Feels Uncomfortable or Too Tight
A bandana that feels too tight can cause pressure points or headaches. This usually means you’ve pulled the knot too hard or chosen a strip width that’s too narrow for your head. Immediately untie and retie the bandana with less tension.
Ensure the strip isn’t digging into your skin. You might also want to try a slightly wider fold, as a broader band distributes pressure more evenly across your head, enhancing comfort.
Looks Bulky or Messy
If your bandana appears lumpy or unkempt, the issue likely stems from uneven folding or improper adjustment. Revisit Step 4 and ensure your strip is folded or rolled consistently. A messy knot can also contribute to a bulky look.
After tying, take extra time in Step 8 to smooth out any wrinkles and tuck in loose fabric. A mirror is invaluable here for checking the back and sides, ensuring a polished finish.
Key Takeaways
- Always begin by laying your bandana flat and creating a neat, consistent strip.
- Position the bandana carefully at your desired spot, whether at the hairline or further back.
- Tie a secure, comfortable knot, avoiding excessive tightness or looseness.
- Adjust and smooth the bandana thoroughly to achieve a polished, symmetrical look.
- Don’t hesitate to experiment with different styles and placements to find what suits you best.
- Consider your hair type and bandana fabric for optimal grip and comfort.
Frequently Asked Questions
What size bandana is best for tying on your head?
A standard square bandana, typically measuring 20×20 to 22×22 inches, is ideal for most head-tying styles. This size provides enough fabric to create a comfortable strip and tie a secure knot without excessive bulk. Smaller bandanas might be too short, while larger ones can be more challenging to manage.
Can I wear a bandana with short hair?
Absolutely! Bandanas look fantastic with short hair and can add a stylish touch. For very short hair, you might need to use bobby pins to secure the bandana in place, as there’s less hair for it to grip onto. Experiment with different placements, like a simple headband style, to find what works best for your cut.
How do I keep my bandana from sliding off all day?
Several tricks can help prevent slipping. Opt for a cotton bandana, as its texture provides more grip than silk. You can also lightly backcomb the hair where the bandana sits or use a few bobby pins to anchor it. A light spritz of hairspray on the underside of the bandana can also enhance its staying power.
Can bandanas protect my hair from the elements?
Yes, bandanas offer a degree of protection. They can shield your hair from sun exposure, reducing UV damage and color fading. They also help keep hair contained on windy days, preventing tangles and frizz. For added protection in harsh conditions, choose a bandana made from a tightly woven fabric.
Our Top Recommended Finds
- Soft Cotton Bandanas (Multi-Pack): These provide excellent grip and breathability, perfect for everyday wear and experimenting with different styles.
- Hair Grips / Bobby Pins: Essential for securing the bandana, especially if you have fine hair or want extra stability for an active day.
- Light Hold Hairspray: A subtle mist can help keep the bandana in place and tame any flyaways around the edges for a polished finish.
Unleash Your Inner Style Icon
You now have all the tools and knowledge to confidently tie a bandana on your head. This simple accessory offers endless possibilities for expressing your unique style, protecting your hair, and adding a touch of effortless cool to any outfit.
Don’t let your bandanas sit unused in a drawer. Take one out right now, follow these steps, and discover the transformative power of this versatile piece. Experiment with different colors, patterns, and placements. Your head is your canvas; embrace the art of the bandana today!