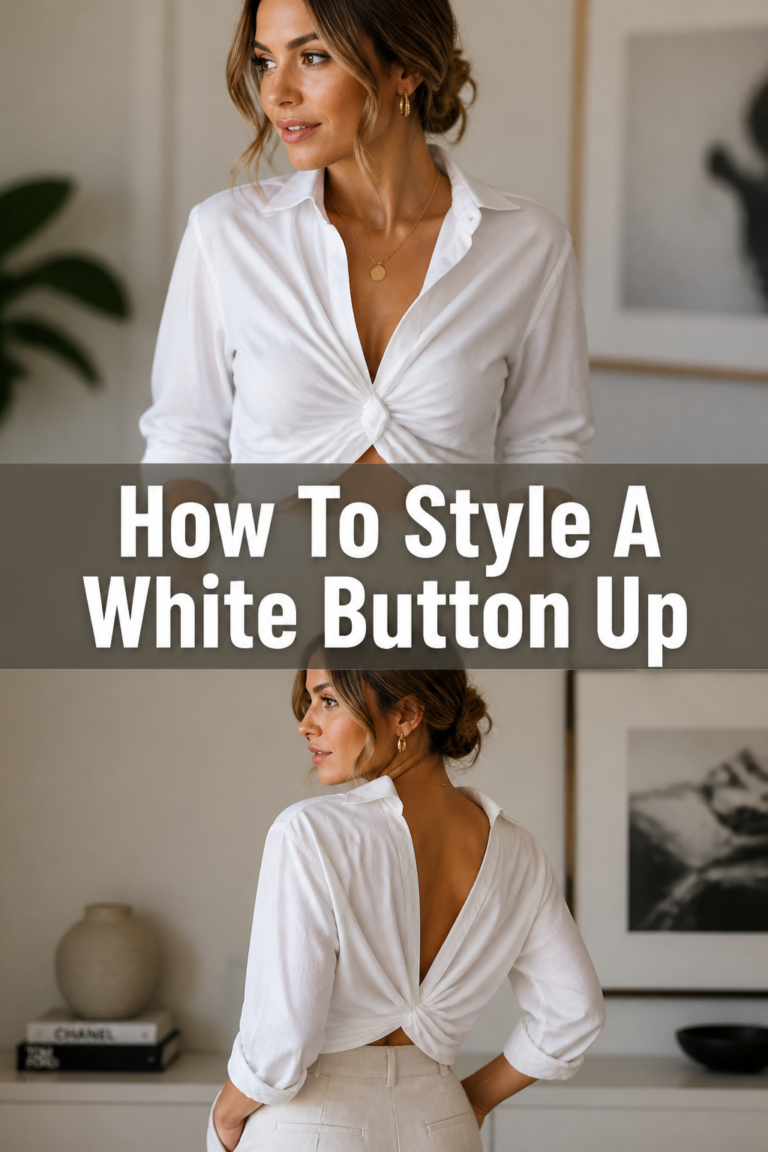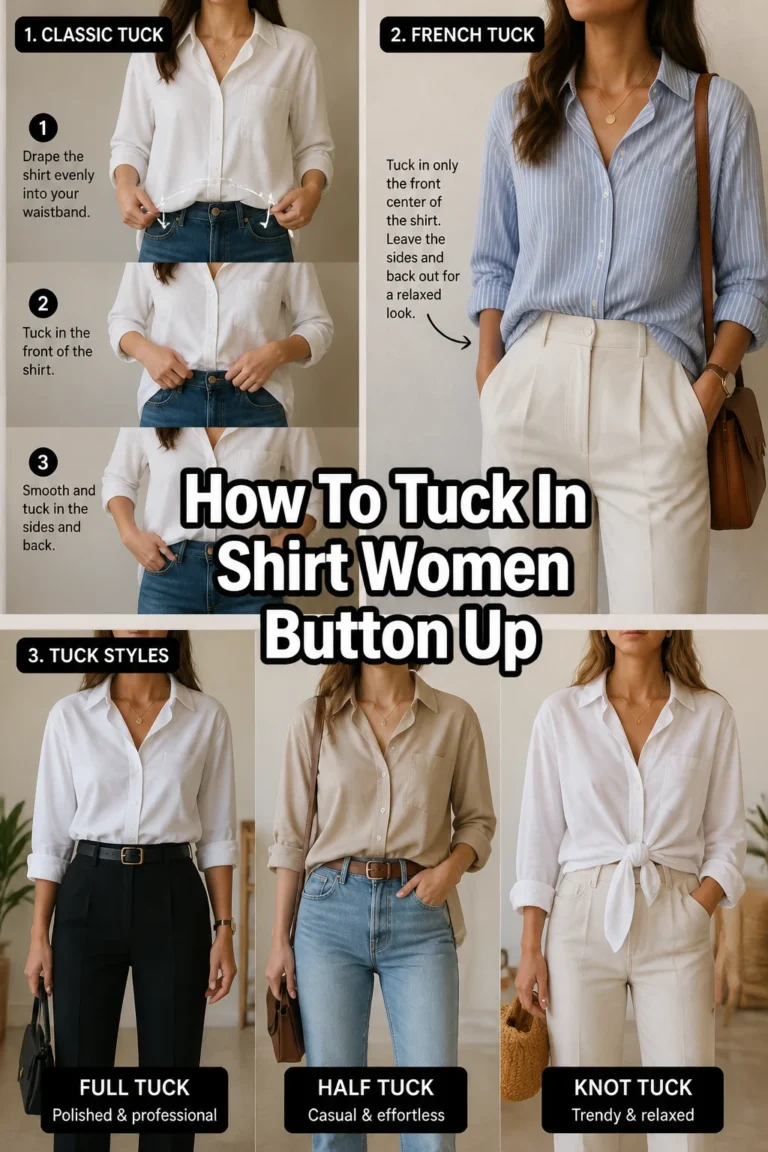
👕 How To Tie A Shirt Knot In The Back
Have you ever admired someone’s effortlessly chic look, only to realize their shirt had a perfectly placed knot in the back? It’s a subtle detail that transforms an ordinary top into a statement piece. I used to struggle with achieving that polished, secure knot myself.
After much trial and error, I discovered the simple techniques that make all the difference. This guide shares those exact methods, ensuring you can master this stylish trick with ease. You’ll soon be adding a touch of tailored flair to all your favorite shirts.
Quick Overview
This guide will walk you through the process of creating a neat, stylish knot in the back of your shirt. You’ll learn how to choose the right shirt, position the knot, and secure it for a polished finish. Get ready to elevate your wardrobe with this simple yet impactful styling technique.
- Time needed: 5-10 minutes
- Difficulty: Beginner
- What you’ll need: A button-down shirt or a relaxed-fit top, a mirror
Step-by-Step Instructions
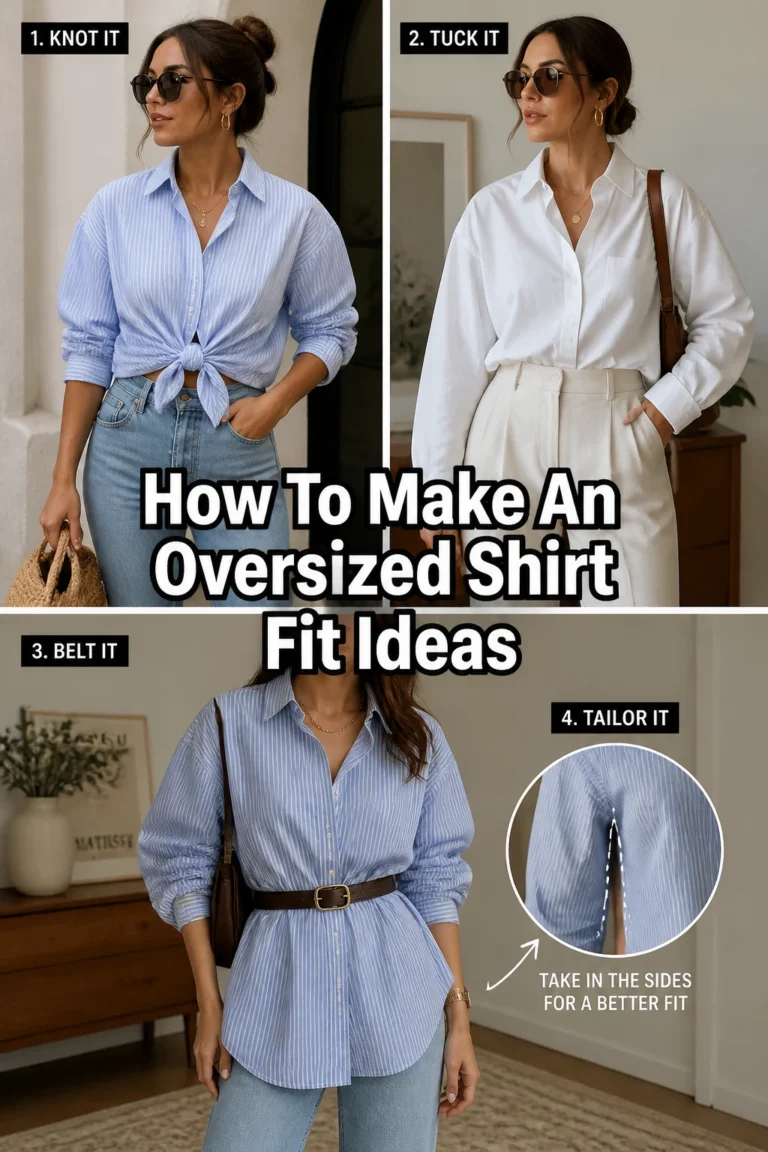
Step 1: Choose Your Shirt Wisely
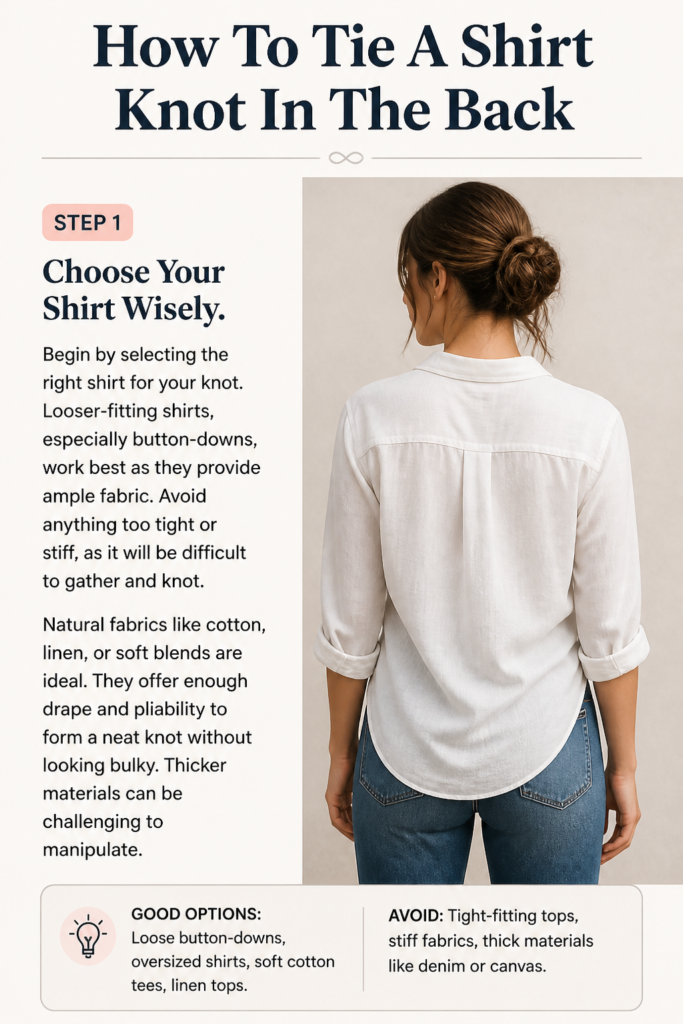
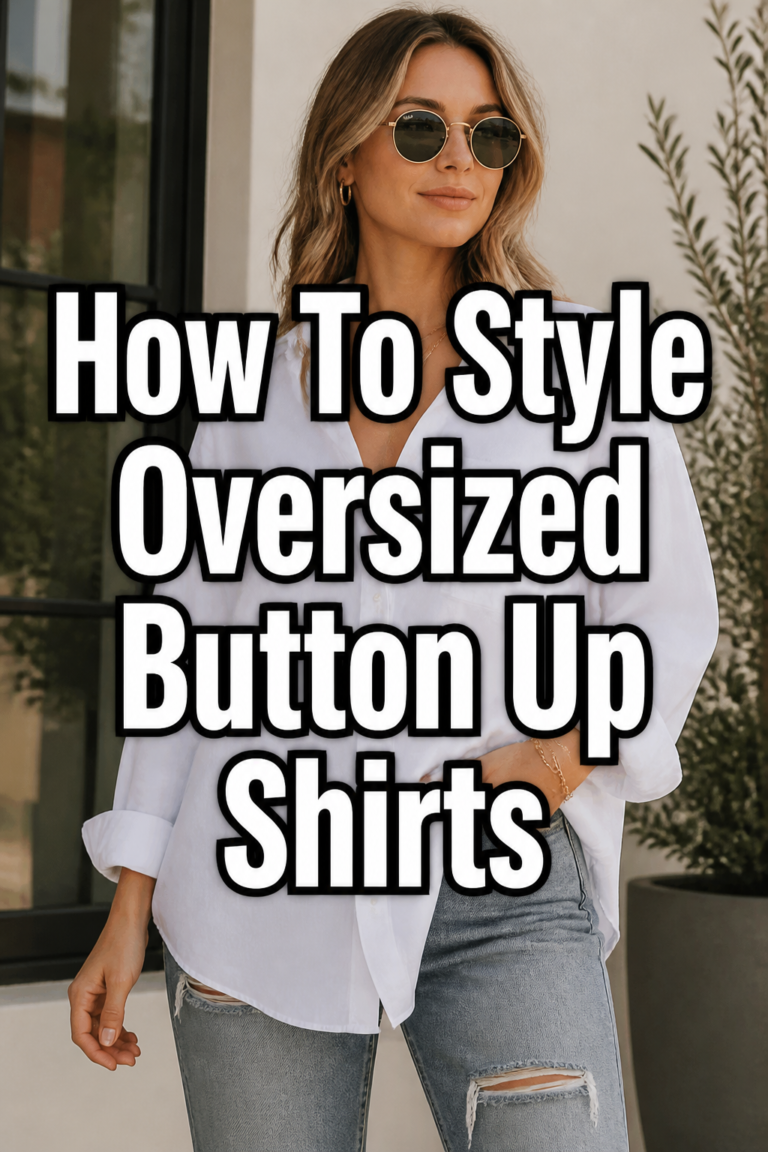
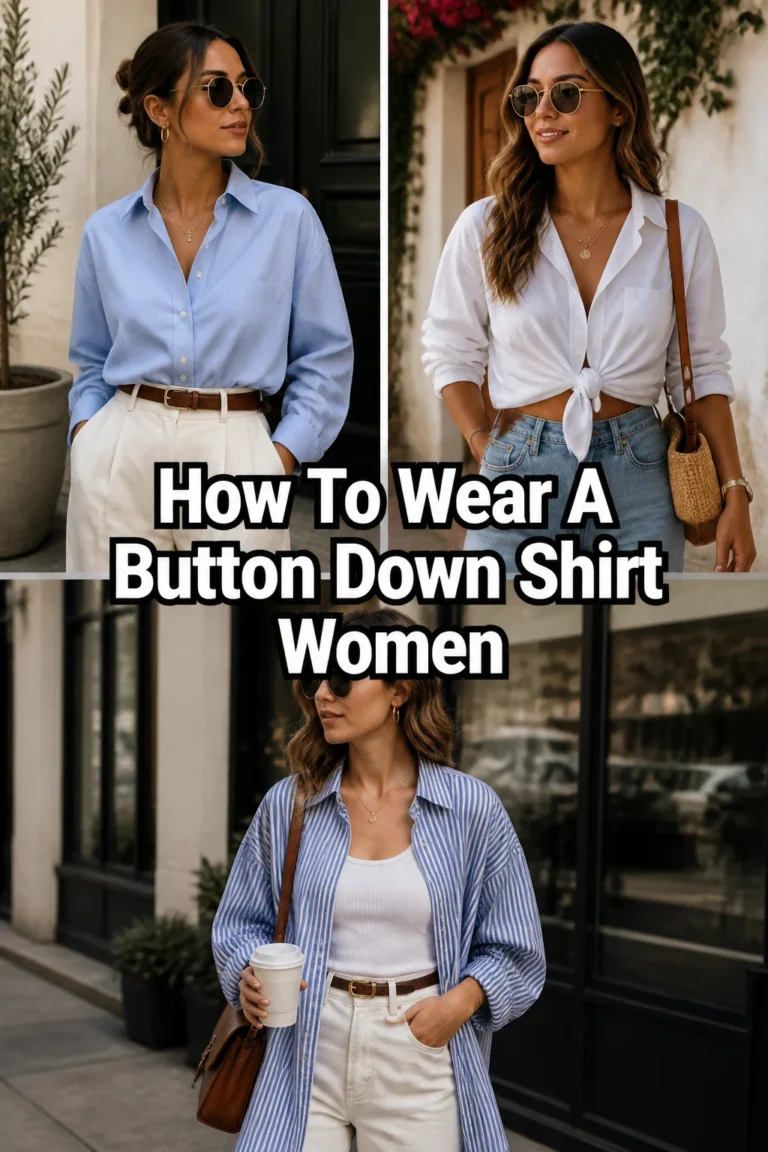
Begin by selecting the right shirt for your knot. Looser-fitting shirts, especially button-downs, work best as they provide ample fabric. Avoid anything too tight or stiff, as it will be difficult to gather and knot.
Natural fabrics like cotton, linen, or soft blends are ideal. They offer enough drape and pliability to form a neat knot without looking bulky. Thicker materials can be challenging to manipulate.
Step 2: Put On Your Shirt and Button Up
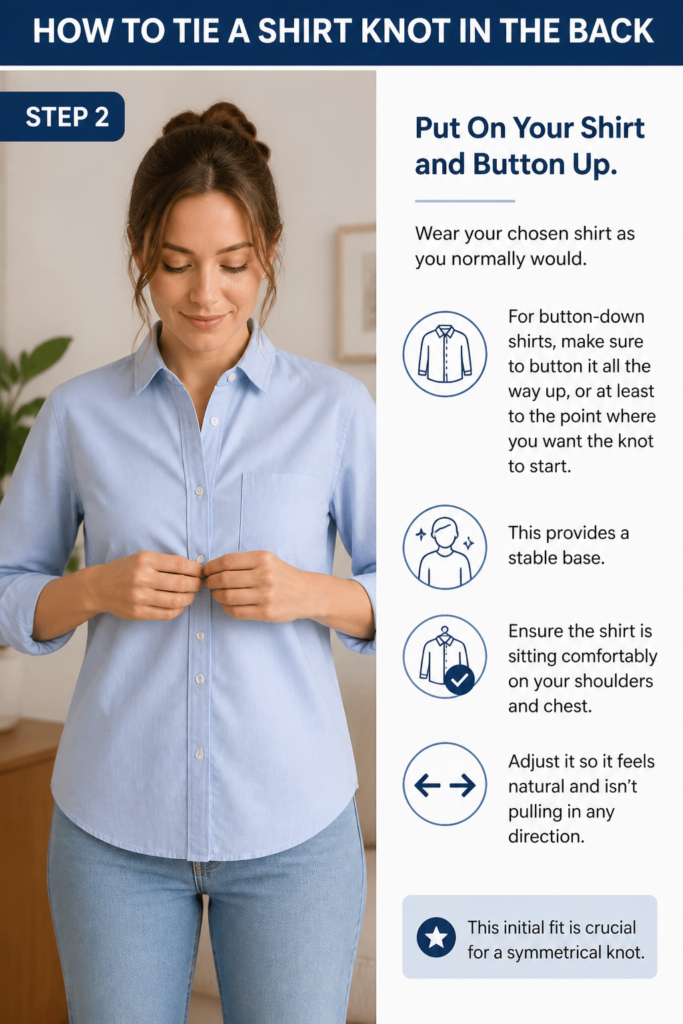
Wear your chosen shirt as you normally would. For button-down shirts, make sure to button it all the way up, or at least to the point where you want the knot to start. This provides a stable base.
Ensure the shirt is sitting comfortably on your shoulders and chest. Adjust it so it feels natural and isn’t pulling in any direction. This initial fit is crucial for a symmetrical knot.
Step 3: Determine Your Knot Placement
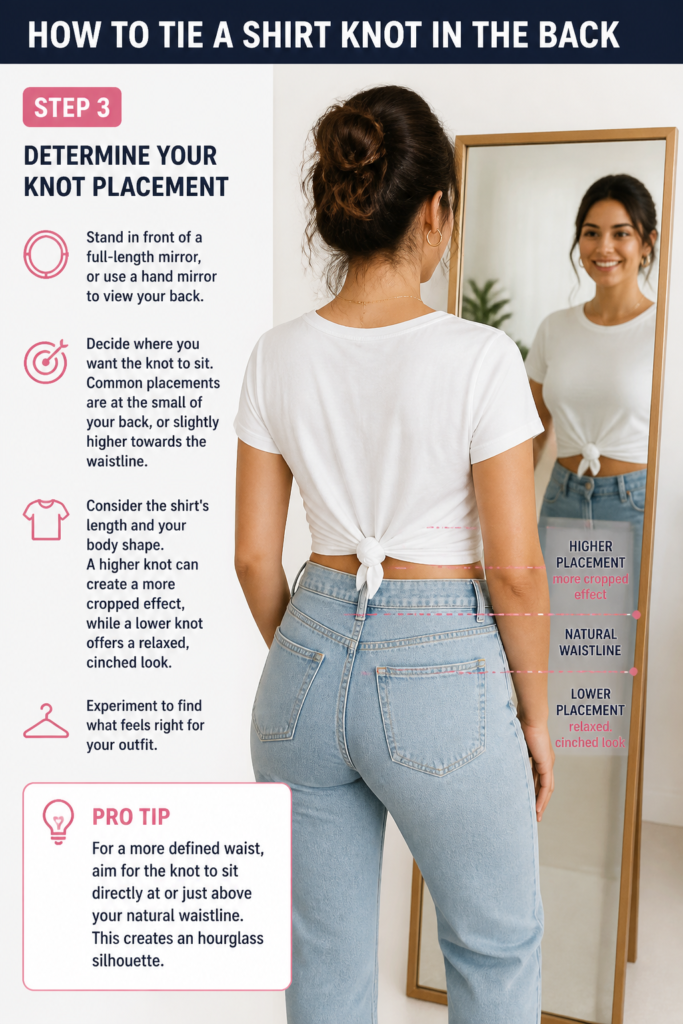
Stand in front of a full-length mirror, or use a hand mirror to view your back. Decide where you want the knot to sit. Common placements are at the small of your back, or slightly higher towards the waistline.
Consider the shirt’s length and your body shape. A higher knot can create a more cropped effect, while a lower knot offers a relaxed, cinched look. Experiment to find what feels right for your outfit.
Pro Tip: For a more defined waist, aim for the knot to sit directly at or just above your natural waistline. This creates an hourglass silhouette.
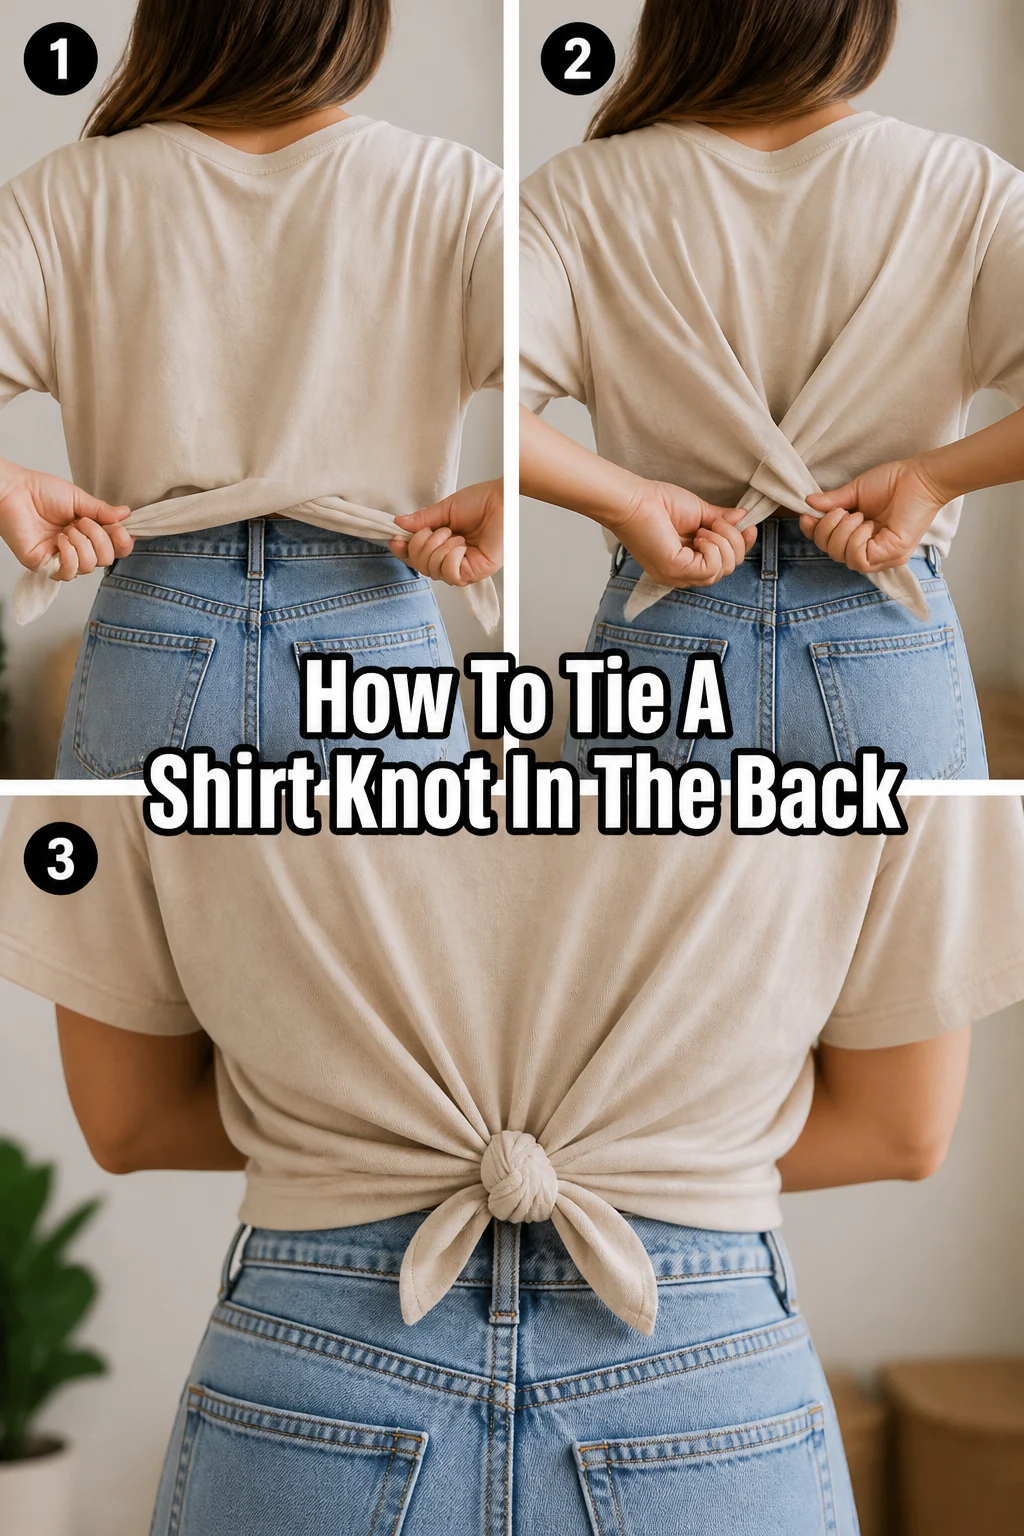
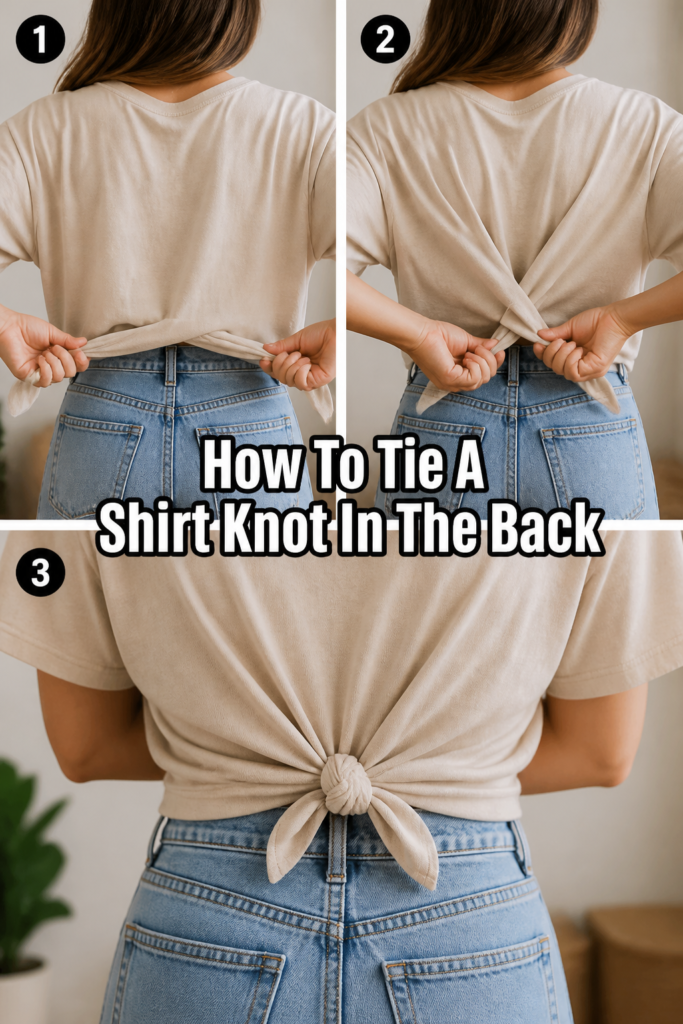
Step 4: Gather the Fabric
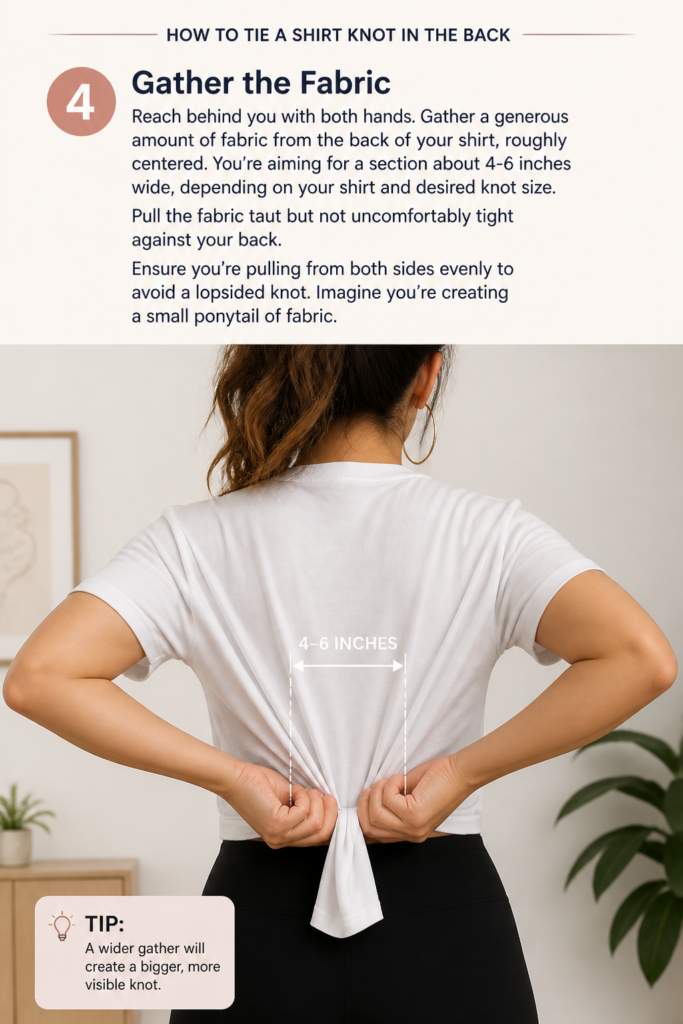
Reach behind you with both hands. Gather a generous amount of fabric from the back of your shirt, roughly centered. You’re aiming for a section about 4-6 inches wide, depending on your shirt and desired knot size.
Pull the fabric taut but not uncomfortably tight against your back. Ensure you’re pulling from both sides evenly to avoid a lopsided knot. Imagine you’re creating a small ponytail of fabric.
Step 5: Twist the Gathered Fabric
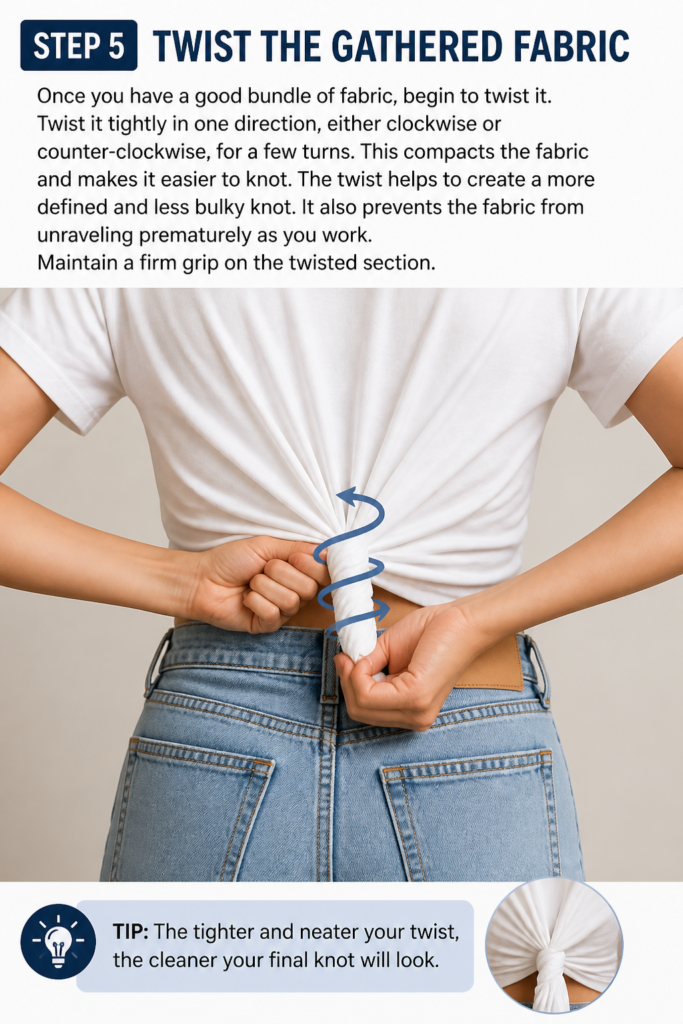
Once you have a good bundle of fabric, begin to twist it. Twist it tightly in one direction, either clockwise or counter-clockwise, for a few turns. This compacts the fabric and makes it easier to knot.
The twist helps to create a more defined and less bulky knot. It also prevents the fabric from unraveling prematurely as you work. Maintain a firm grip on the twisted section.
Step 6: Form the First Loop
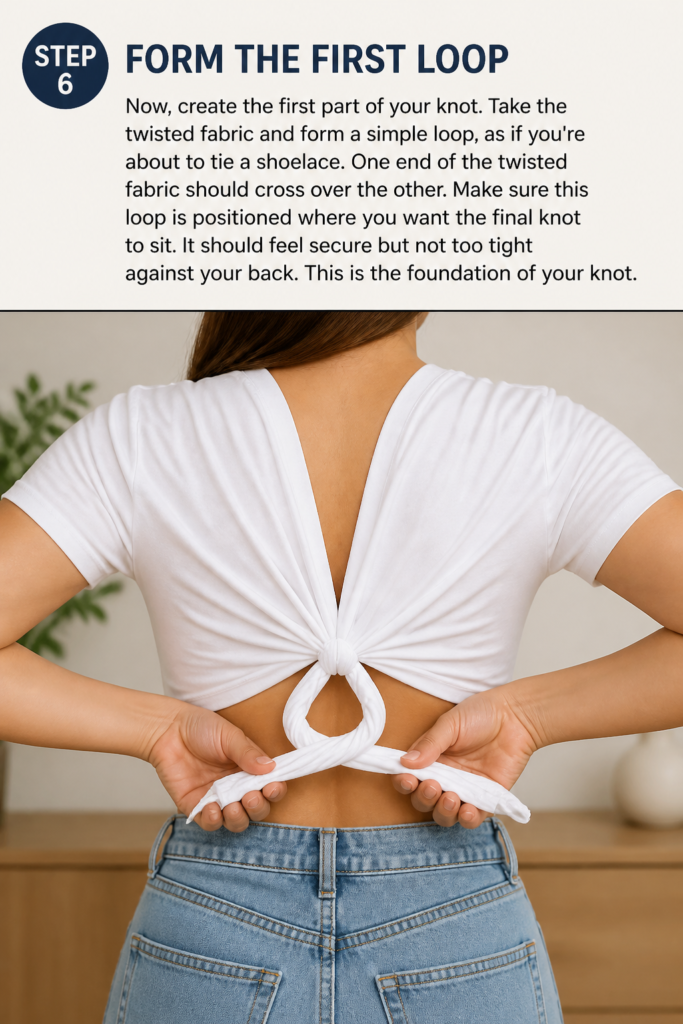
Now, create the first part of your knot. Take the twisted fabric and form a simple loop, as if you’re about to tie a shoelace. One end of the twisted fabric should cross over the other.
Make sure this loop is positioned where you want the final knot to sit. It should feel secure but not too tight against your back. This is the foundation of your knot.
Step 7: Pull Through to Create the Knot

Take the end of the twisted fabric that is now underneath the loop. Thread it up and through the loop you just created. This is exactly like the first step of tying a basic shoelace knot.
Guide the fabric through gently. It might take a moment to maneuver your hands behind your back, so don’t rush. The goal is a clean pass-through.
Step 8: Tighten and Adjust the Knot

Once the fabric is pulled through, begin to tighten the knot. Pull both ends of the twisted fabric firmly but carefully. You want the knot to be snug against your back, holding the shirt in place.
Look in the mirror and adjust the knot as needed. Ensure it’s centered and not pulling the shirt awkwardly. You can gently tug on different parts of the shirt to smooth out any wrinkles around the knot.
Pro Tip: If the knot feels too loose, untie it slightly, twist the fabric more tightly, and retie. A tighter twist leads to a more secure and compact knot.
Step 9: Refine the Look
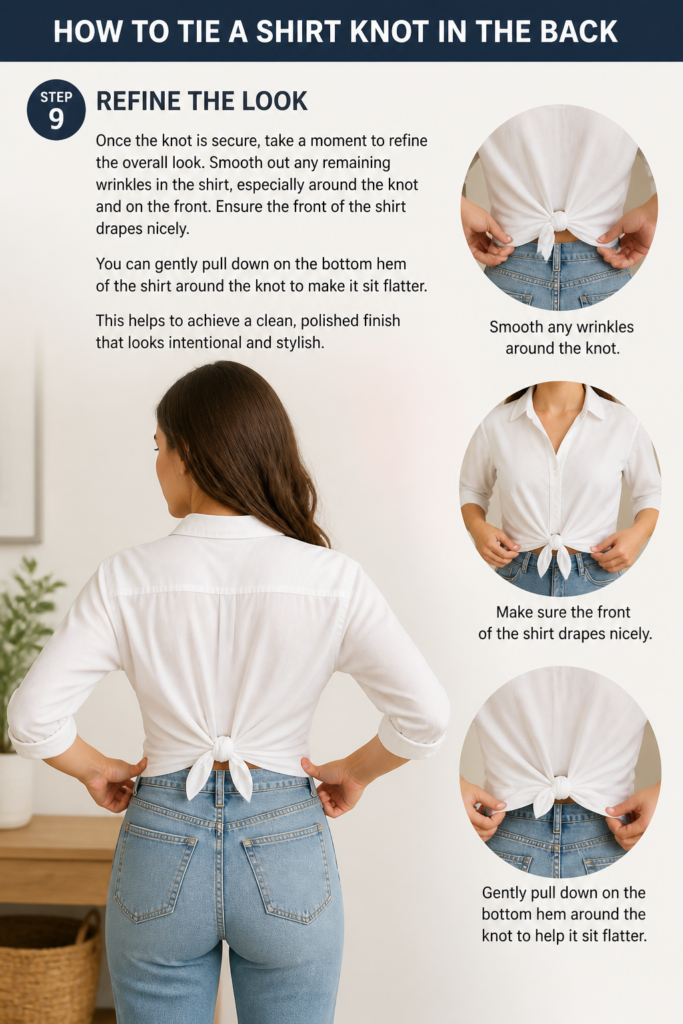
Once the knot is secure, take a moment to refine the overall look. Smooth out any remaining wrinkles in the shirt, especially around the knot and on the front. Ensure the front of the shirt drapes nicely.
You can gently pull down on the bottom hem of the shirt around the knot to make it sit flatter. This helps to achieve a clean, polished finish that looks intentional and stylish.
Step 10: Check for Comfort and Security
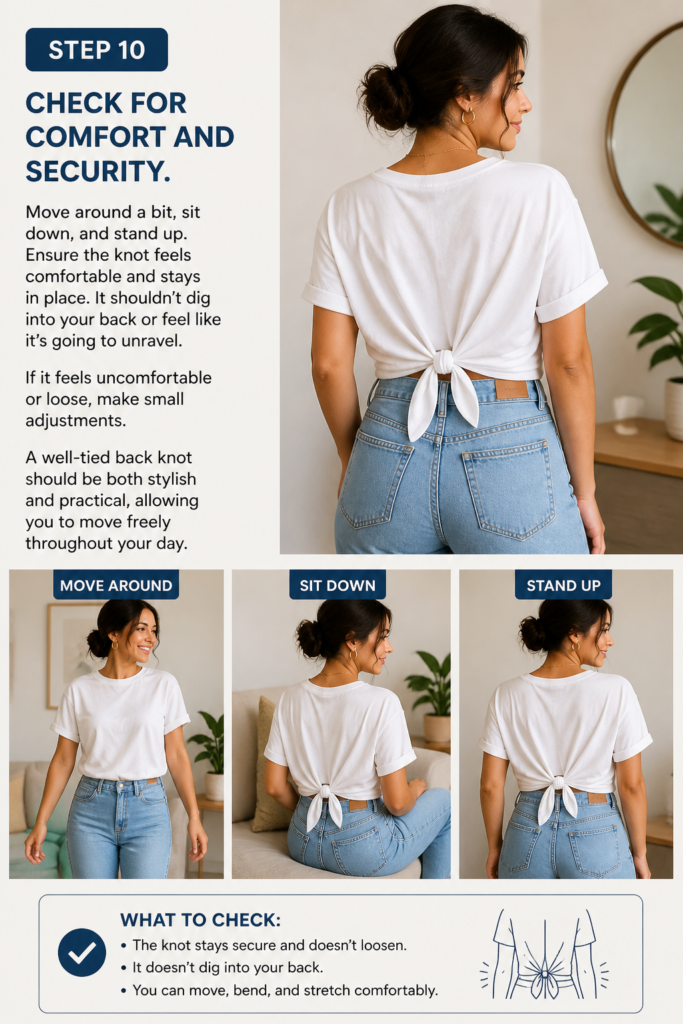
Move around a bit, sit down, and stand up. Ensure the knot feels comfortable and stays in place. It shouldn’t dig into your back or feel like it’s going to unravel.
If it feels uncomfortable or loose, make small adjustments. A well-tied back knot should be both stylish and practical, allowing you to move freely throughout your day.
Common Mistakes to Avoid
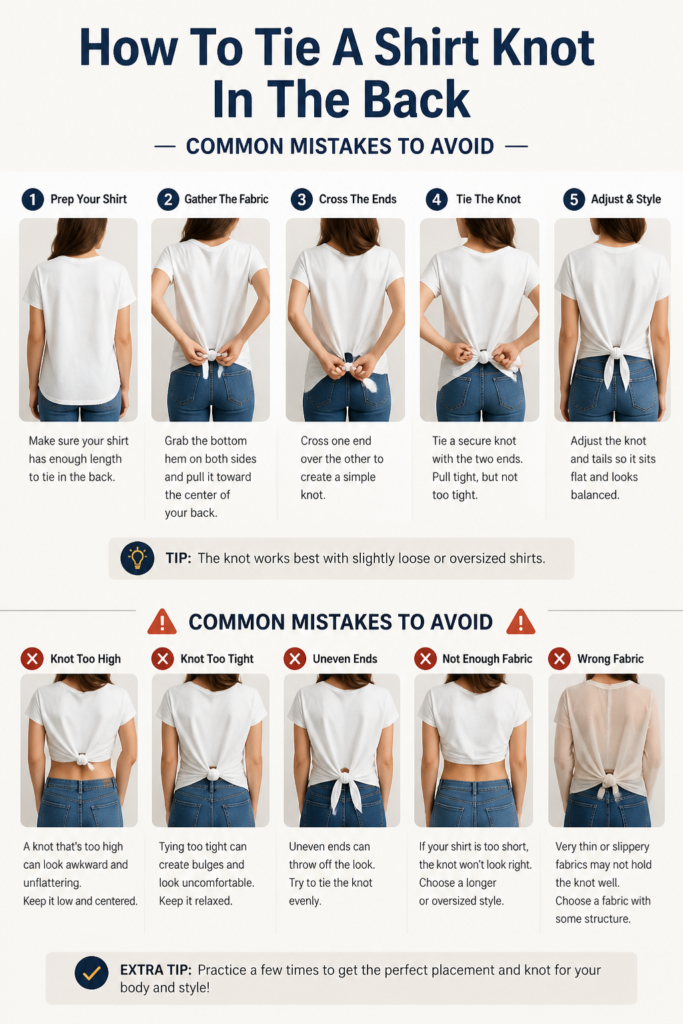
Tying the Knot Too Loosely
A common error is not tightening the knot enough. When the knot is too loose, it tends to unravel easily throughout the day, leaving your shirt looking disheveled. It also won’t provide the desired cinched effect.
To correct this, ensure you twist the fabric firmly before forming the knot. Then, pull both ends of the knot tightly and evenly in opposite directions to secure it. A snug knot holds its shape and keeps your shirt styled perfectly.
Using the Wrong Fabric Type
Attempting a back knot with stiff or overly thick fabrics can lead to a bulky, unflattering result. Materials like heavy denim or thick flannel are often too rigid to drape nicely once knotted. This can create an awkward lump on your back.
Opt for softer, more pliable fabrics such as cotton, linen, rayon, or silk blends. These materials gather and knot smoothly, creating a much more elegant and comfortable finish. Always consider the fabric’s drape before you begin.
Incorrect Knot Placement
Placing the knot too high or too low can throw off your entire outfit’s balance. A knot too high might make the shirt look like it’s riding up, while one too low can create an odd saggy appearance. This can disrupt your silhouette.
Experiment in front of a mirror to find the sweet spot, typically around your natural waistline or slightly above. This placement accentuates your figure and complements the shirt’s style. Adjusting the placement makes a significant difference.
Not Centering the Knot
A knot that is off-center can make your entire look appear lopsided and unintentional. It draws attention to the asymmetry rather than the stylish detail. This small detail can detract from an otherwise well-put-together outfit.
Always gather the fabric from the exact center of your back before twisting and knotting. Use a mirror to confirm your hands are pulling evenly from both sides. A perfectly centered knot provides a clean, balanced aesthetic.
Troubleshooting
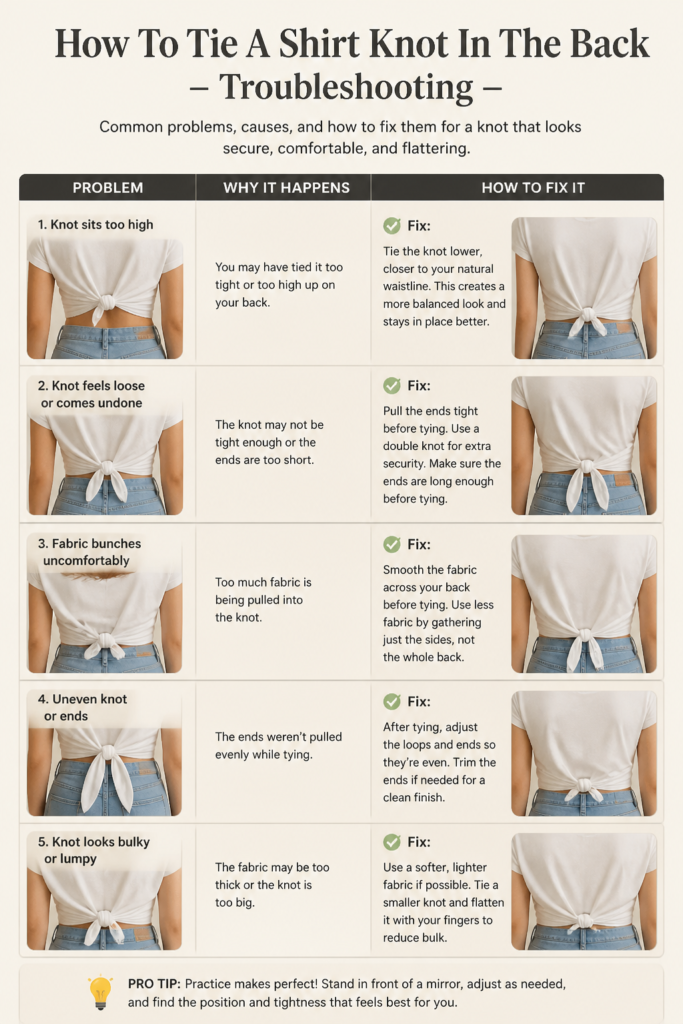
Knot Feels Bulky or Lumpy
If your back knot feels or looks bulky, it’s often due to too much fabric or insufficient twisting. A large, uncompacted knot can be uncomfortable and unflattering under a jacket or cardigan. It might also push out your clothing.
Try gathering less fabric initially. Also, ensure you twist the gathered section very tightly before forming the knot. This compresses the fabric, resulting in a much smaller and neater knot that lays flatter against your back.
Knot Keeps Coming Undone
An unraveling knot is frustrating and defeats the purpose of the style. This usually indicates the knot wasn’t tied securely enough, or the fabric is too slippery. A loose knot won’t hold its position for long.
When tying, pull both ends of the knot firmly and evenly. For slippery fabrics like silk, consider a double knot or an extra twist in the fabric to add friction. You can also discreetly use a small safety pin to secure the knot’s ends to the shirt underneath.
Shirt Doesn’t Drape Nicely in Front
Sometimes, cinching the back of the shirt can cause the front to pull awkwardly or create unwanted wrinkles. This can make the front of your shirt look messy or ill-fitting. The front should still look relaxed and stylish.
After tying the knot, gently pull down on the front hem of your shirt. Adjust the fabric around your chest and waist to smooth out any tension or creases. You might need to loosen the back knot slightly to allow for better front drape, then retighten.
Key Takeaways
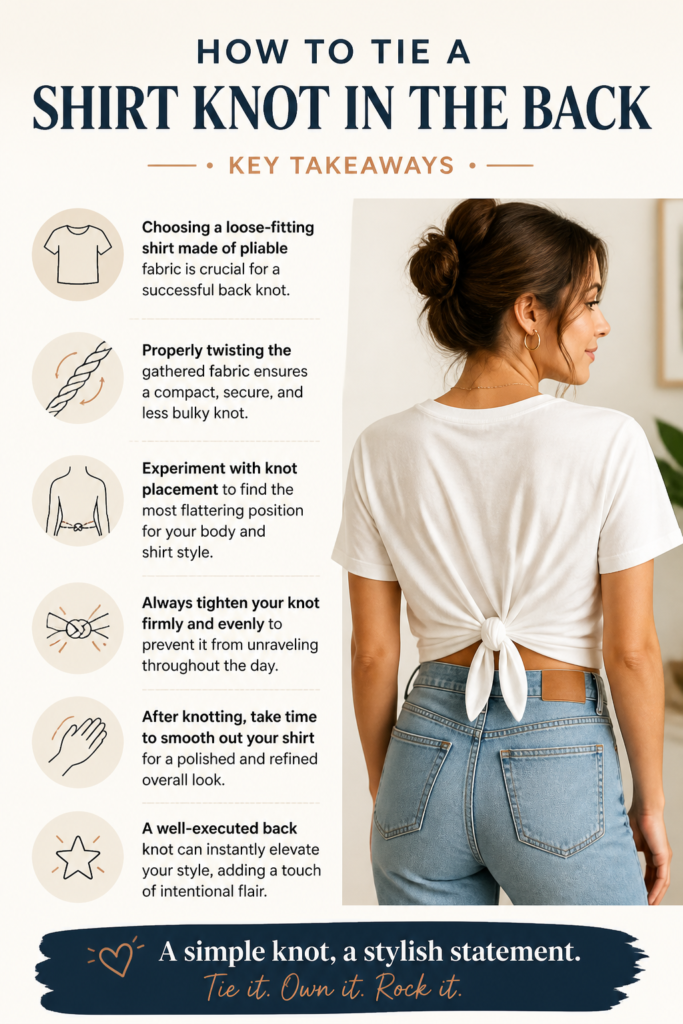
- Choosing a loose-fitting shirt made of pliable fabric is crucial for a successful back knot.
- Properly twisting the gathered fabric ensures a compact, secure, and less bulky knot.
- Experiment with knot placement to find the most flattering position for your body and shirt style.
- Always tighten your knot firmly and evenly to prevent it from unraveling throughout the day.
- After knotting, take time to smooth out your shirt for a polished and refined overall look.
- A well-executed back knot can instantly elevate your style, adding a touch of intentional flair.
Frequently Asked Questions
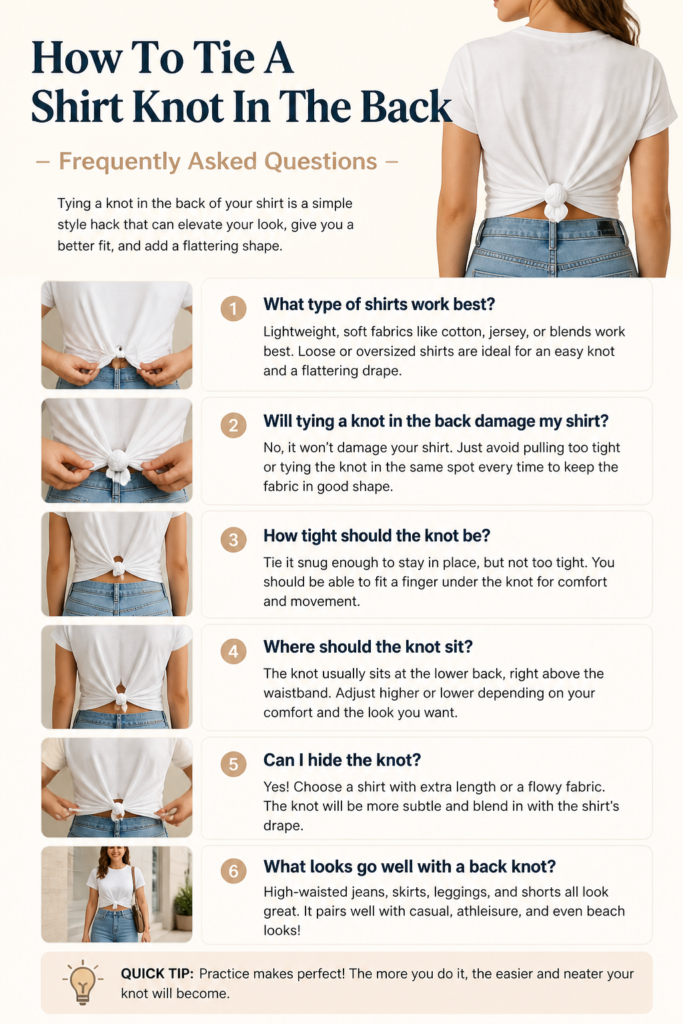
Can I tie a back knot with any type of shirt?
While you can technically attempt it with many shirts, the best results come from looser-fitting tops made of soft, pliable fabrics like cotton, linen, or rayon. Stiff or very fitted shirts won’t gather well and will likely create a bulky or uncomfortable knot.
Will the knot damage my shirt?
When tied correctly and not excessively tight, a back knot should not damage your shirt. However, repeatedly tying a very tight knot in the exact same spot on delicate fabrics might cause slight stress over time. Use common sense and don’t over-tighten.
How do I make sure the knot is centered?
Stand in front of a mirror and use both hands to gather the fabric from the middle of your back. Imagine a vertical line running down your spine; gather equally from both sides of that line. Adjust as you twist and tie, checking your reflection frequently.
Can I wear a jacket or blazer over a back knot?
Yes, you can. For a seamless look, ensure your knot is flat and compact. Thicker or bulkier knots might create an uncomfortable bump under fitted outerwear. Choose a jacket with a slightly looser fit around the back for optimal comfort and drape.
Our Top Recommended Finds
- Full-Length Mirror: Essential for precise knot placement and overall outfit assessment.
- Fabric Steamer: Perfect for quickly smoothing out any wrinkles that might appear around the knot or on the shirt’s front.
- Small Safety Pins: Handy for discreetly securing the ends of a knot on very slippery fabrics, ensuring it stays put all day.
Transform Your Style with This Simple Detail
Mastering the back shirt knot is more than just a styling trick; it’s about unlocking new potential within your existing wardrobe. This small adjustment can completely redefine a shirt’s silhouette, adding a bespoke touch that feels both effortless and chic. It’s a fantastic way to personalize your look without buying new clothes.
Imagine taking a simple oversized shirt and instantly transforming it into a fashion-forward piece, perfect for a casual outing or even a smart-casual office environment. This technique offers versatility and creative freedom. Don’t let another day pass by wearing your shirts the same old way. Embrace this easy method and start experimenting with your style today.