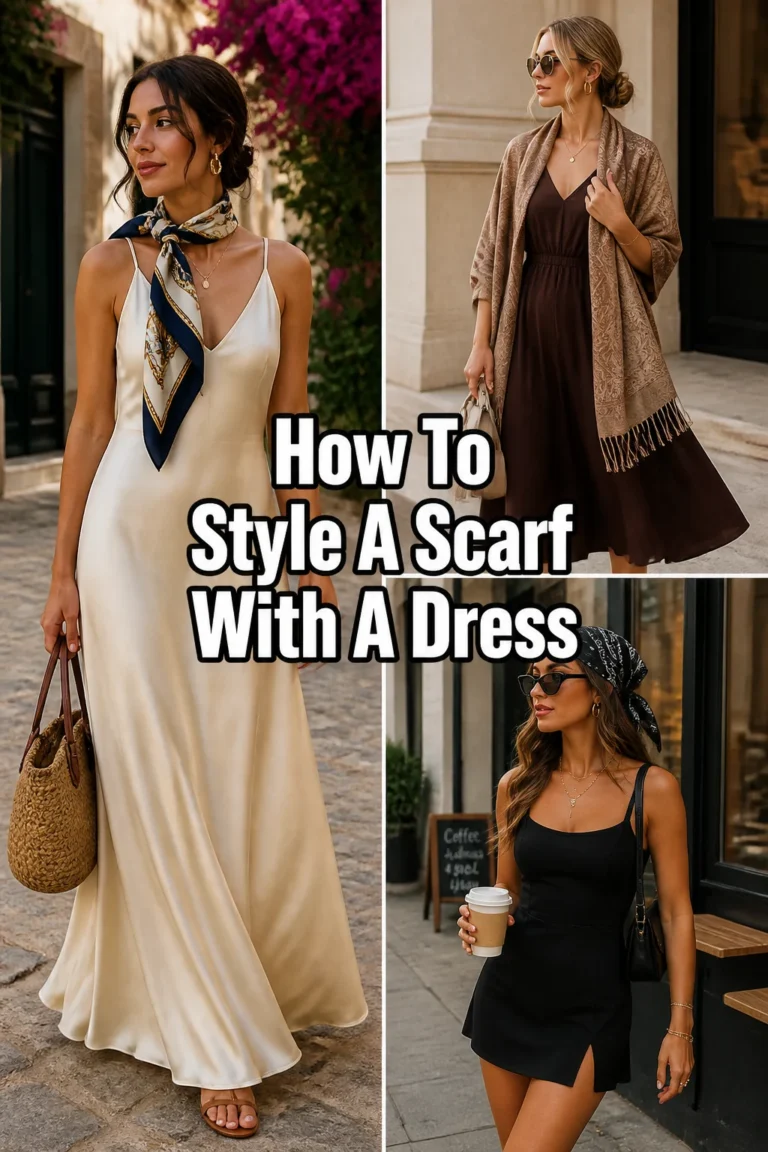
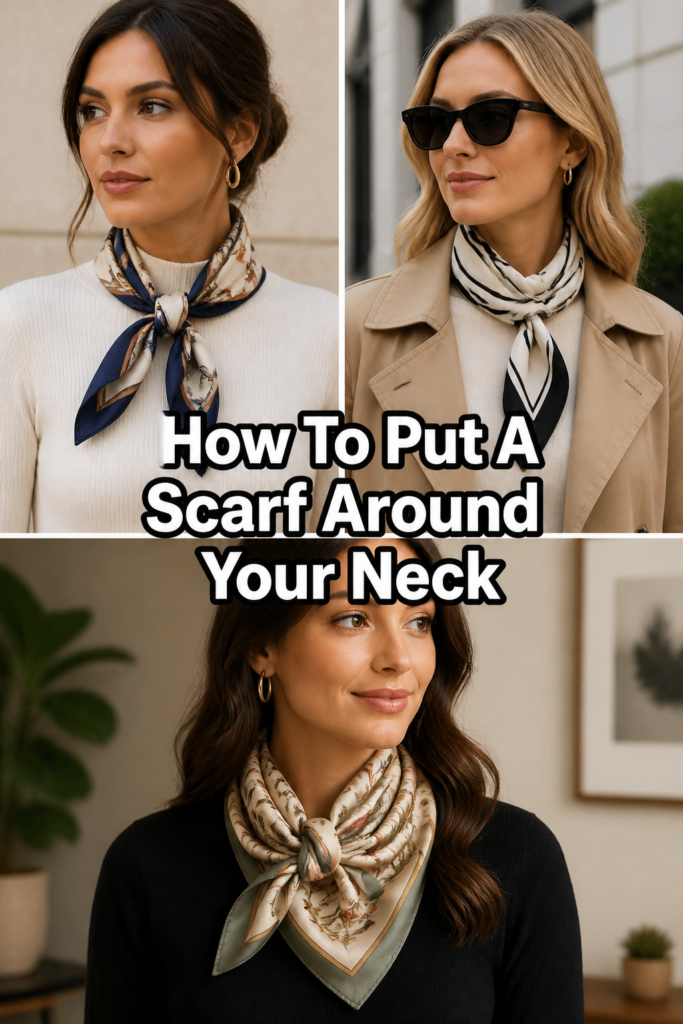
🧣 How To Put A Scarf Around Your Neck
Wearing a scarf can transform any outfit, adding warmth, texture, and a touch of personal style. I’ve spent years experimenting with different fabrics and techniques, learning what works best for various occasions and weather conditions. This guide will share my practical insights, making scarf-wearing simple and stylish for everyone.
You’ll quickly master the art of draping and tying, ensuring your scarf always looks effortlessly chic.
Quick Overview
Discover how to confidently style a scarf, adding a polished touch to your everyday look. You’ll learn the foundational techniques that make wearing a scarf easy and comfortable.
- Time needed: 5-10 minutes (initially), 1 minute (once mastered)
- Difficulty: Beginner
- What you’ll need: Any scarf (rectangular or square works best for these techniques)
Step-by-Step Instructions
Step 1: Choose Your Scarf
Selecting the right scarf is the first crucial step. Consider the material, length, and weight based on the weather and your outfit. A lighter silk scarf is perfect for spring, while a chunky wool knit offers cozy warmth in winter.
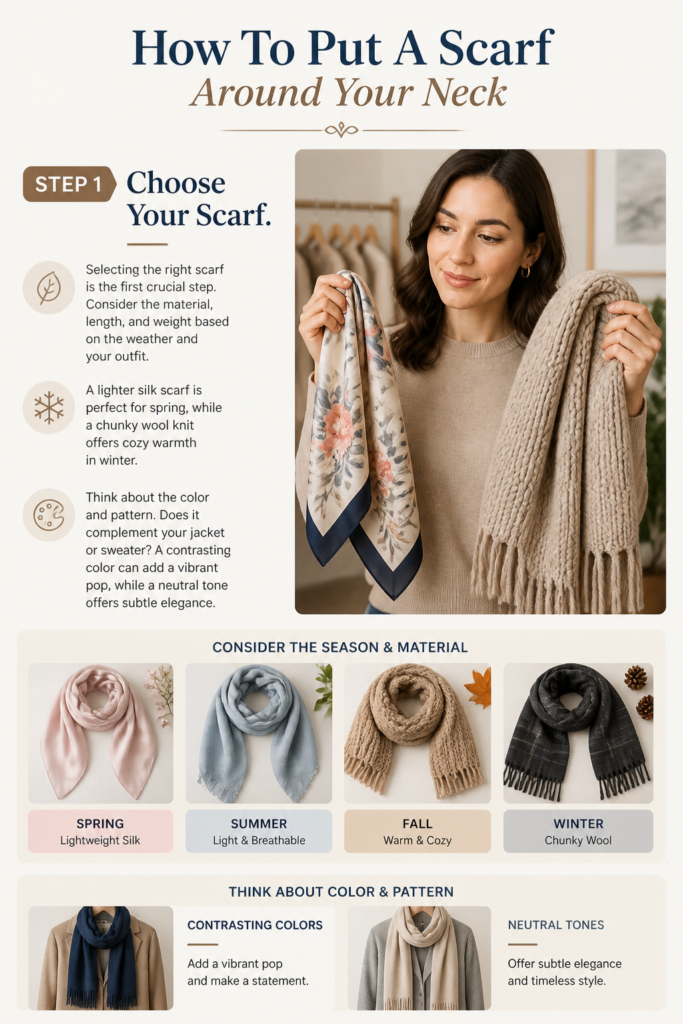
Think about the color and pattern. Does it complement your jacket or sweater? A contrasting color can add a vibrant pop, while a neutral tone offers subtle elegance.
Step 2: Prepare the Scarf
Lay your chosen scarf flat on a clean surface or hold it out fully. This helps remove any twists and gives you a clear view of its full length and width. Ensure there are no snags or loose threads that might interfere with its drape.
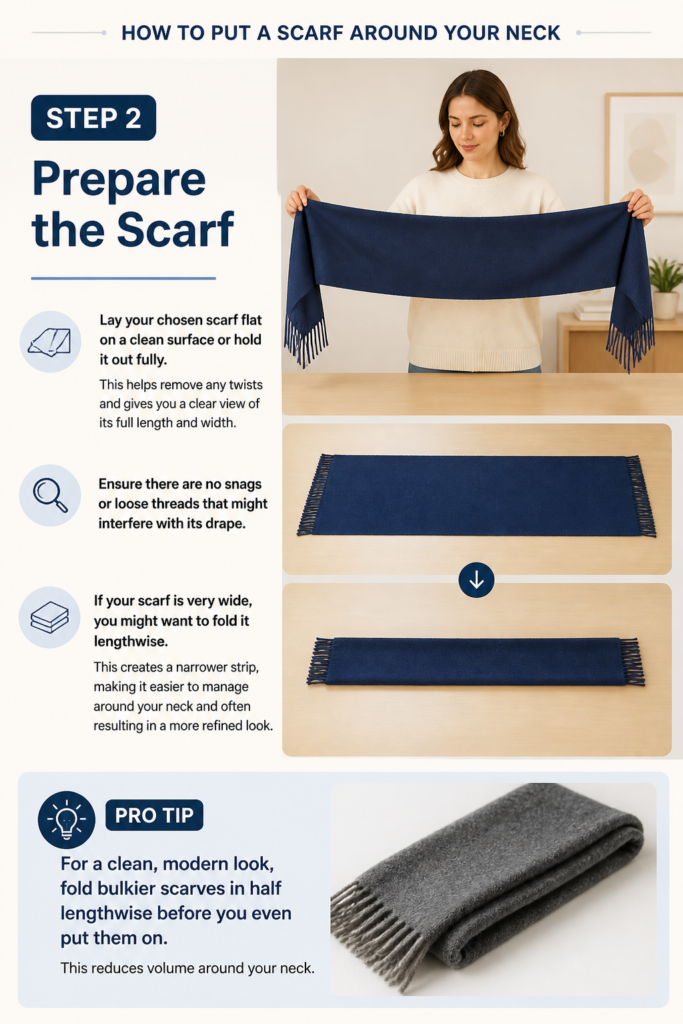
If your scarf is very wide, you might want to fold it lengthwise. This creates a narrower strip, making it easier to manage around your neck and often resulting in a more refined look.
Pro Tip: For a clean, modern look, fold bulkier scarves in half lengthwise before you even put them on. This reduces volume around your neck.
Step 3: Drape It Evenly
Hold the scarf by its ends and drape it over the back of your neck. The goal here is to have both ends hanging down in front of your chest. Make sure the center of the scarf rests comfortably on the nape of your neck.
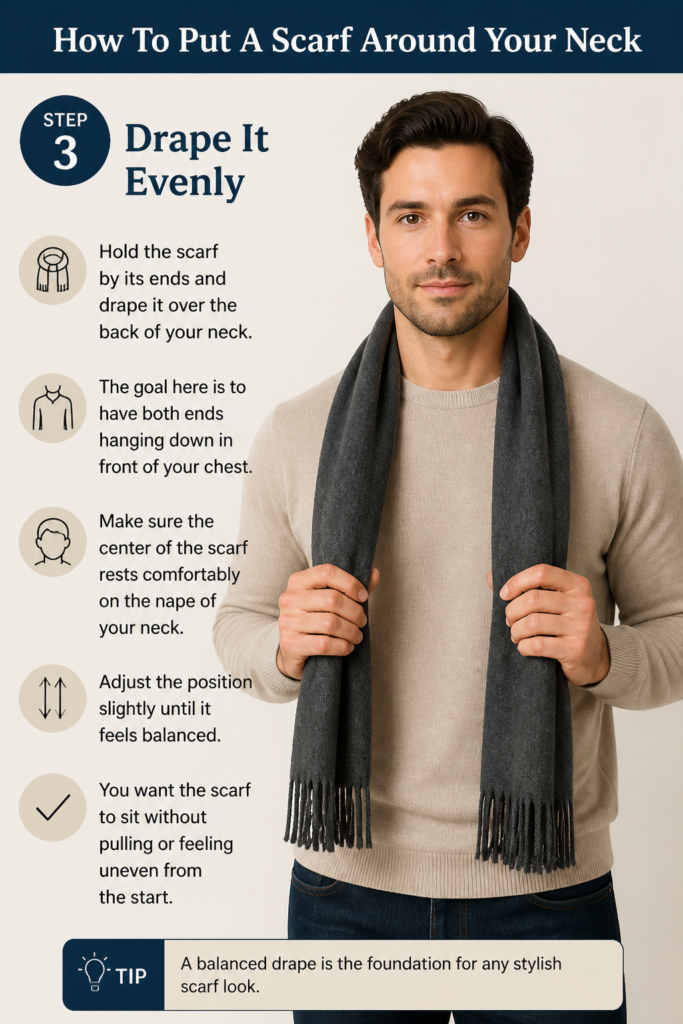
Adjust the position slightly until it feels balanced. You want the scarf to sit without pulling or feeling uneven from the start.
Step 4: Assess the Length
Now, look at the two ends hanging in front. For many styles, you’ll want one end to be significantly longer than the other. This longer end will do most of the work in creating your chosen knot or loop.
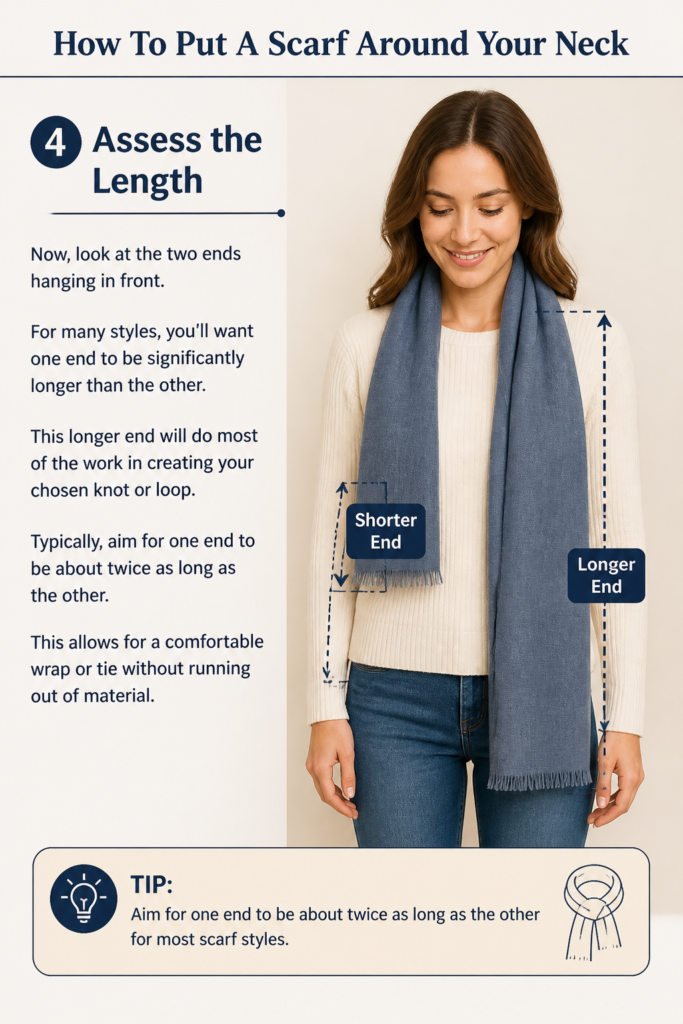
Typically, aim for one end to be about twice as long as the other. This allows for a comfortable wrap or tie without running out of material.
Step 5: Execute the “Once Around” Loop
Take the longer end of the scarf. Bring it around your neck and let it fall over your shoulder, back down to the front. This creates a simple, warm loop around your neck.
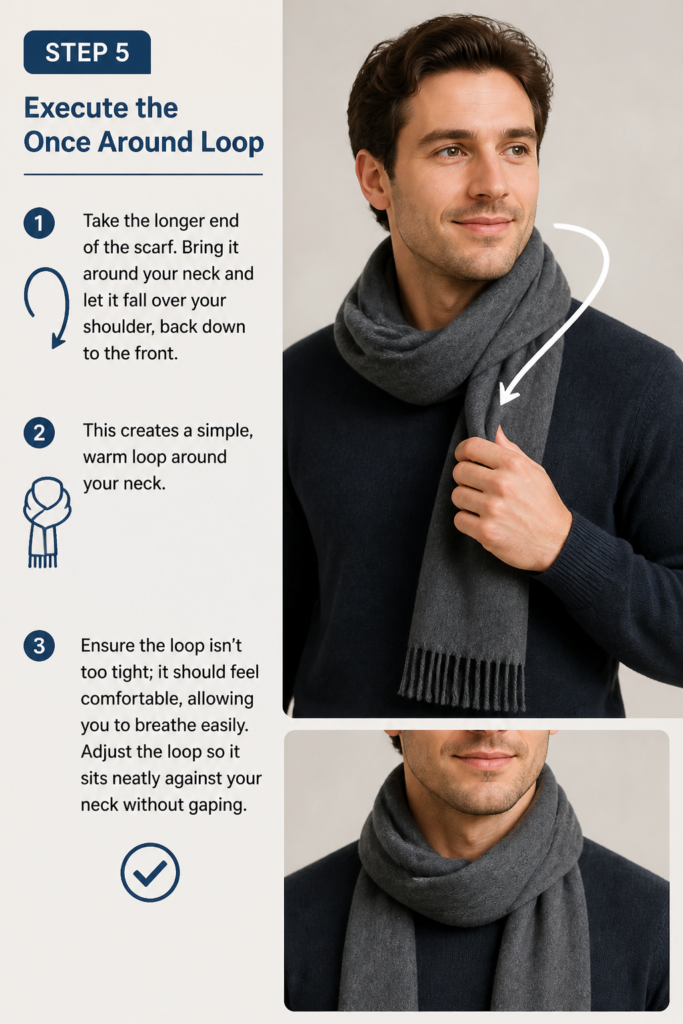
Ensure the loop isn’t too tight; it should feel comfortable, allowing you to breathe easily. Adjust the loop so it sits neatly against your neck without gaping.
Step 6: Adjust for the Parisian Knot (Optional)
If you prefer the classic Parisian knot, fold your scarf in half lengthwise first. Drape the folded scarf over your neck, so you have a loop on one side and two loose ends on the other.
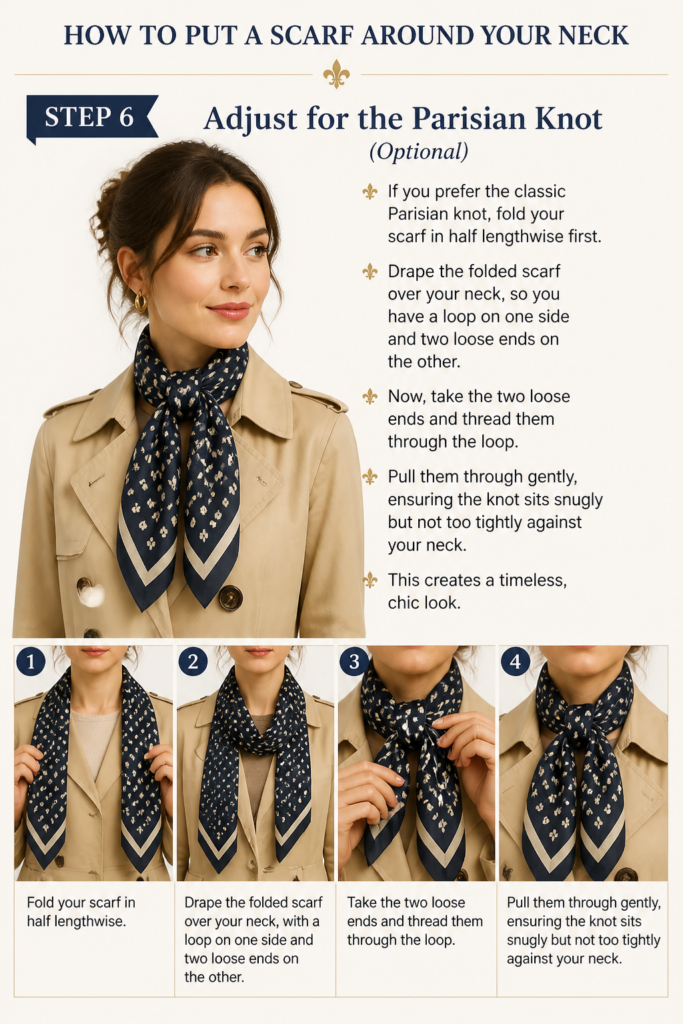
Now, take the two loose ends and thread them through the loop. Pull them through gently, ensuring the knot sits snugly but not too tightly against your neck. This creates a timeless, chic look.
Step 7: Check for Symmetry and Comfort
Once you’ve created your preferred loop or knot, take a moment to look in a mirror. Are both sides hanging evenly, or is one side noticeably longer? Adjust the ends by pulling them gently until they appear balanced.
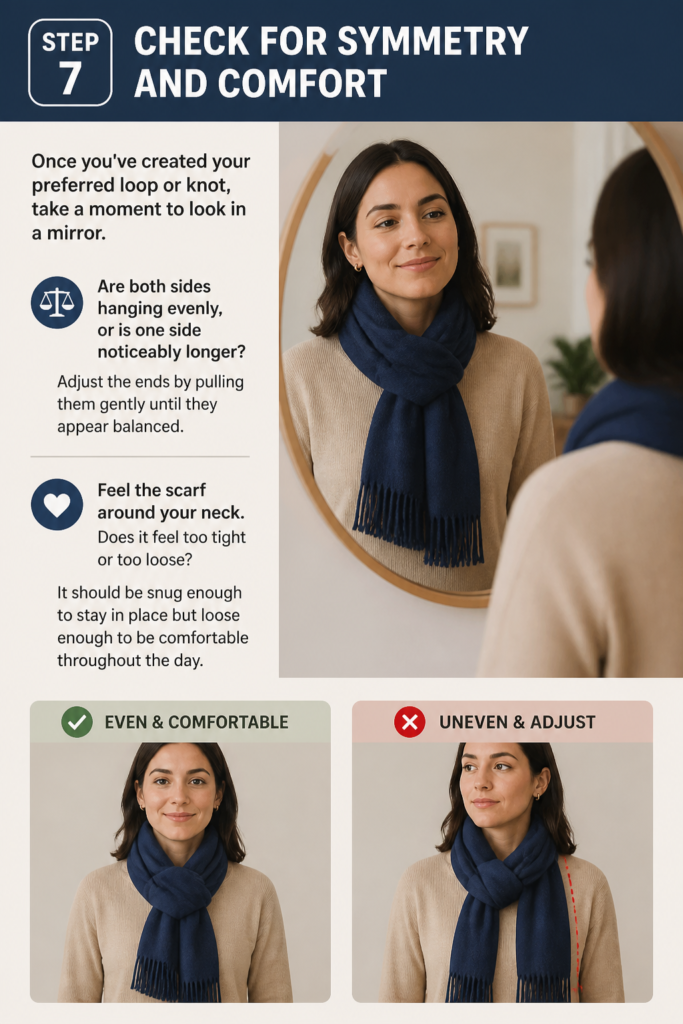
Feel the scarf around your neck. Does it feel too tight or too loose? It should be snug enough to stay in place but loose enough to be comfortable throughout the day.
Step 8: Final Styling Touches
Gently fluff out the scarf or smooth it down, depending on the look you’re going for. You can pull the knot slightly away from your neck for a more relaxed vibe or keep it tight for a polished appearance.
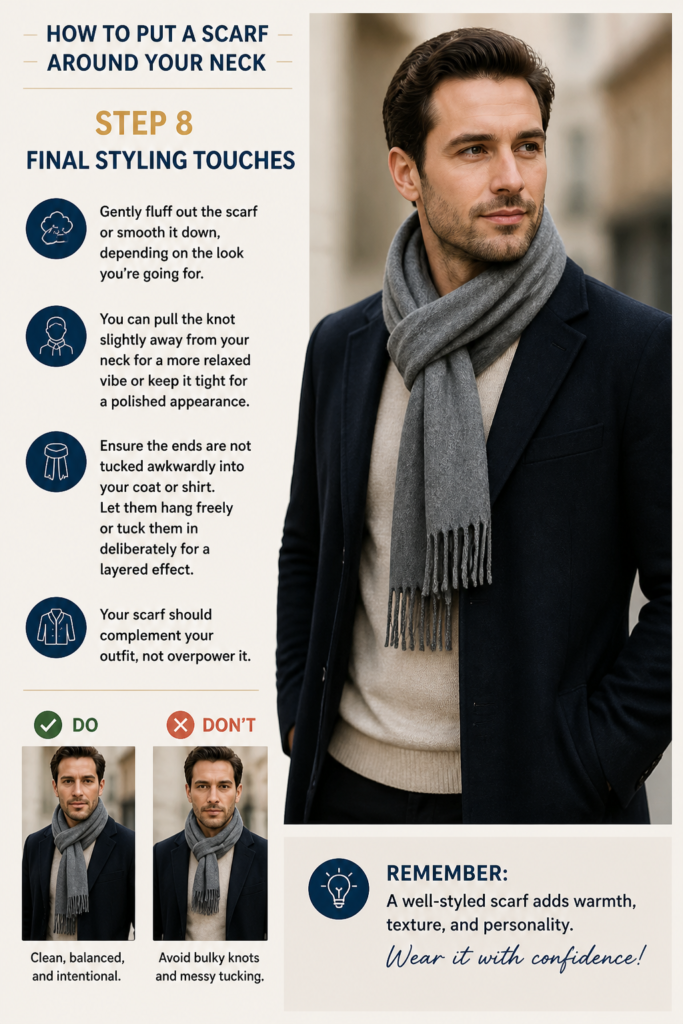
Ensure the ends are not tucked awkwardly into your coat or shirt. Let them hang freely or tuck them in deliberately for a layered effect. Your scarf should complement your outfit, not overpower it.
Common Mistakes to Avoid
Tying Too Tightly
A common error is pulling the scarf too tight around the neck. This can be uncomfortable, restrict movement, and even make you feel overheated. A scarf should always feel snug yet breathable.
Always aim for a relaxed fit. You should be able to easily slip a finger or two between your neck and the scarf. This ensures comfort and prevents a “choking” sensation.
Choosing the Wrong Scarf for the Occasion
Wearing a heavy, chunky knit scarf with a delicate silk blouse can look mismatched. Similarly, a thin, decorative scarf offers little warmth on a freezing day. Always consider both aesthetics and practicality.
Match the scarf’s weight and material to your outfit and the weather. A lightweight cotton or linen scarf is ideal for warmer weather, while wool or cashmere is best for cold.
Ignoring Scarf Proportions
Some scarves are simply too long or too short for certain styles. Trying to tie a tiny square scarf into a complex knot, or letting an extra-long scarf drag on the ground, can ruin your look.
Before you start, consider the scarf’s dimensions relative to your body and the style you want to achieve. Adjust your chosen method to suit the scarf’s length and width.
Troubleshooting
Scarf Feels Too Bulky
If your scarf feels overwhelming or creates too much volume, you likely haven’t folded it adequately. A wide or thick scarf often benefits from being narrowed before you drape it.
Try folding the scarf lengthwise multiple times until it reaches your desired width. This significantly reduces bulk, allowing for a neater, more streamlined appearance around your neck.
Scarf Keeps Slipping Off
A slippery scarf, especially one made of silk or a synthetic blend, can be frustrating. This usually happens because it’s not secured properly or is too loose.
Ensure your knot or loop is snug enough to hold the scarf in place. For very slick materials, consider a double knot or tucking the ends into a jacket to provide more friction and stability.
Ends Are Uneven After Tying
It’s common for one end to be longer than the other after creating a loop or knot. This is often due to an initial uneven drape or not enough material on one side for the chosen style.
Before you start tying, make sure one end is noticeably longer than the other (roughly 2:1 ratio). After tying, gently pull the shorter end through the knot or loop to adjust its length until it looks balanced.
Key Takeaways
- Start with a clean drape: Always ensure the scarf is smooth and untwisted before placing it around your neck.
- Master the “Once Around”: This simple loop is a versatile foundation for many scarf styles.
- Embrace the Parisian Knot: A classic, elegant way to secure your scarf that works for most rectangular scarves.
- Prioritize comfort: Your scarf should never feel too tight or restrictive; adjust for a relaxed fit.
- Consider scarf proportions: Match the scarf’s size and material to your outfit and the weather conditions.
- Practice makes perfect: Experiment with different drapes and knots to find what suits you best.
Frequently Asked Questions
What’s the easiest way to wear a scarf?
The simplest method is the “Once Around” loop. Drape the scarf over your neck with one end longer than the other. Take the longer end, wrap it once around your neck, and let it hang down in front. This provides warmth and a casual, effortless look.
How do I stop my scarf from looking too bulky?
To reduce bulk, fold wider or thicker scarves lengthwise before draping them. This creates a narrower profile around your neck. You can also opt for thinner materials like silk or fine wool if bulk is a consistent concern.
Can I wear a scarf indoors?
Absolutely! Scarves are not just for warmth; they’re also a fashion accessory. Lightweight scarves in silk, cotton, or linen can add a pop of color or texture to an indoor outfit, much like a necklace or statement piece.
What’s the best scarf length for a beginner?
For beginners, a rectangular scarf that is approximately 60-70 inches long and 10-12 inches wide is ideal. This length offers enough material for common styles like the “Once Around” or Parisian Knot without being excessively long or difficult to manage.
Our Top Recommended Finds
- Classic Cashmere Scarf: Incredibly soft and warm, perfect for luxurious comfort in colder weather.
- Versatile Cotton Blend Scarf: A great everyday option, offering breathability and easy care for year-round wear.
- Elegant Silk Square Scarf: Ideal for adding a sophisticated touch to outfits, suitable for draping or tying in smaller knots.
Elevate Your Everyday Style
Now that you have these practical steps, you’re ready to transform your wardrobe with the simple addition of a scarf. Don’t let your beautiful scarves sit unused in a drawer. They are fantastic tools for personal expression and adding a finishing touch to any look.
Start experimenting today. Grab a scarf, stand in front of a mirror, and try out these techniques. You’ll be amazed at how quickly you develop confidence and find your signature scarf style. Enjoy the process of discovering new ways to enhance your personal flair!