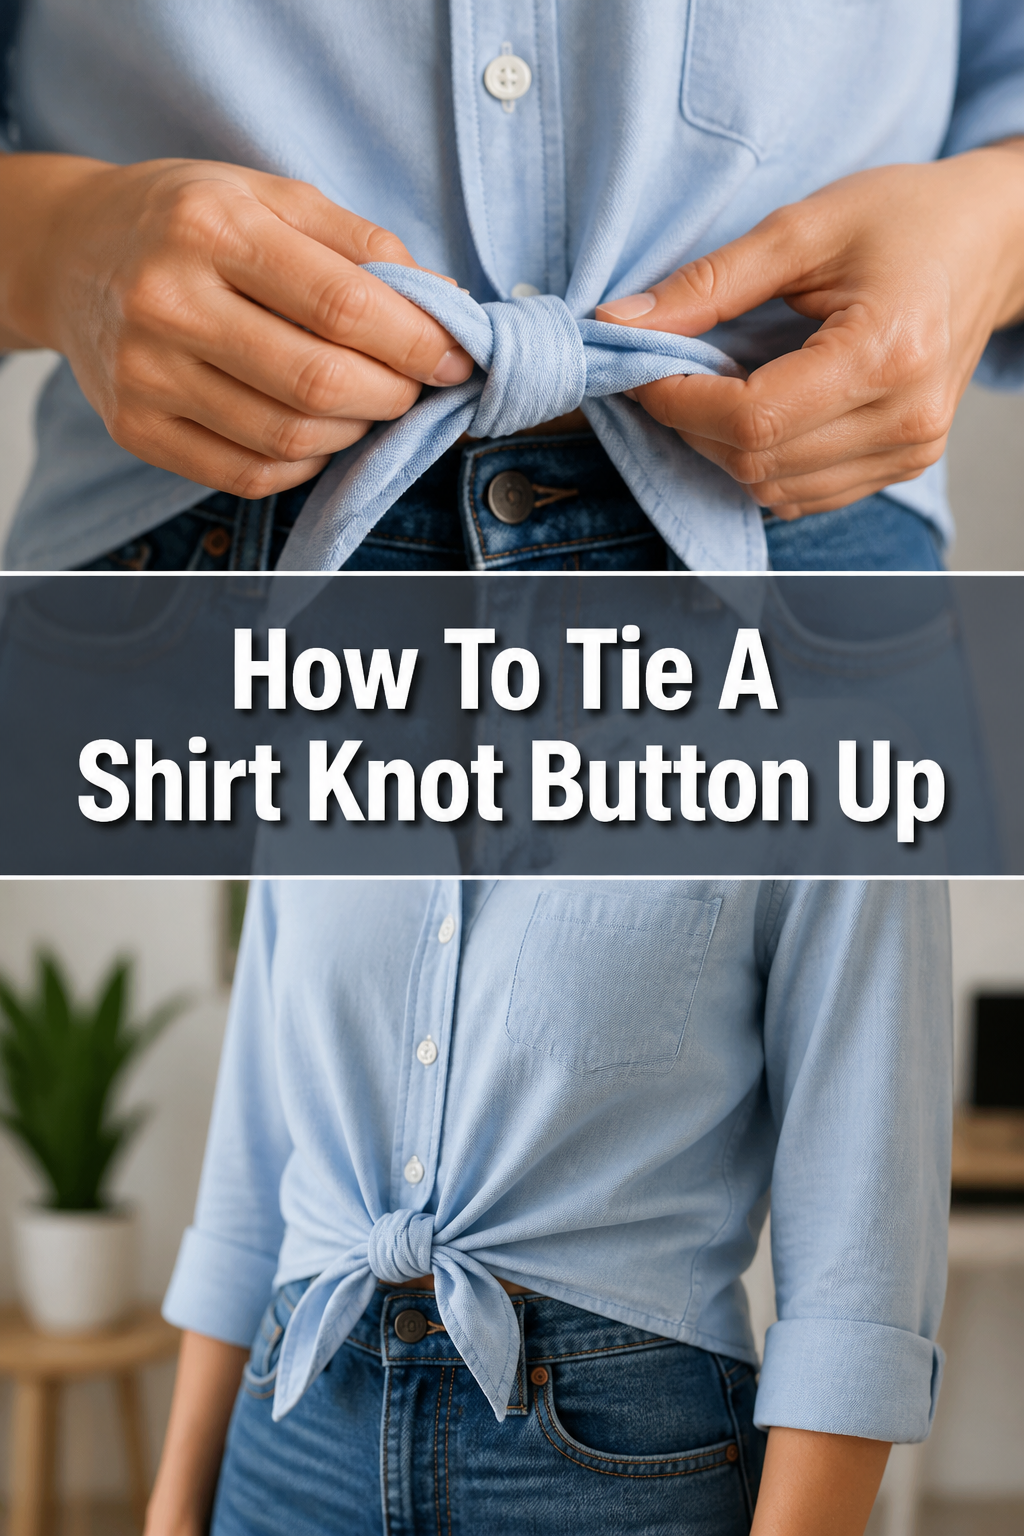
👔 How To Tie A Shirt Knot Button Up
I remember the first time I saw someone effortlessly rock a shirt knot. It looked so chic, yet I had no idea how to achieve that perfectly casual-but-put-together vibe. It took a bit of practice and some trial and error, but mastering this simple technique completely transformed my wardrobe.
This guide shares everything I learned, ensuring you can confidently tie a stylish shirt knot every single time. Get ready to elevate your everyday outfits with ease.
Quick Overview
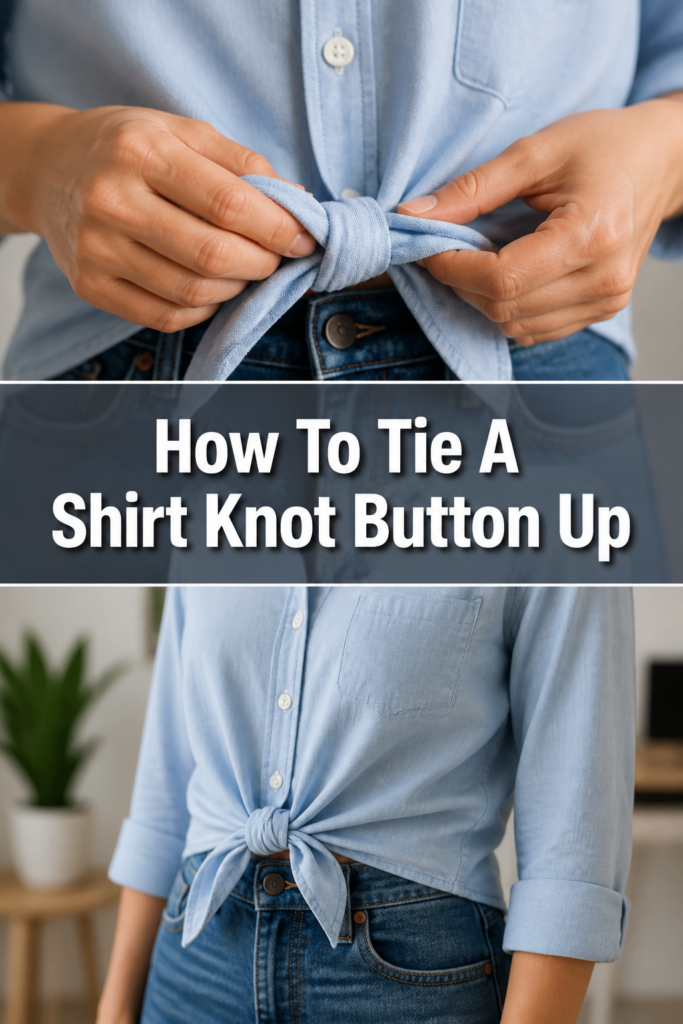
Transforming your button-up shirt into a stylish, knotted top is a fantastic way to add a personal touch to any outfit. This guide will walk you through creating a neat, secure knot that complements your style.
- Time needed: 2-5 minutes
- Difficulty: Beginner
- What you’ll need: A button-up shirt (any material works, but softer fabrics are easier)
Step-by-Step Instructions
Step 1: Choose Your Shirt and Determine Knot Placement
First, select the button-up shirt you wish to knot. Consider the fabric; lighter, softer materials like cotton, rayon, or chambray are generally easier to tie and create a more relaxed knot. Stiffer fabrics can work but might require more effort.
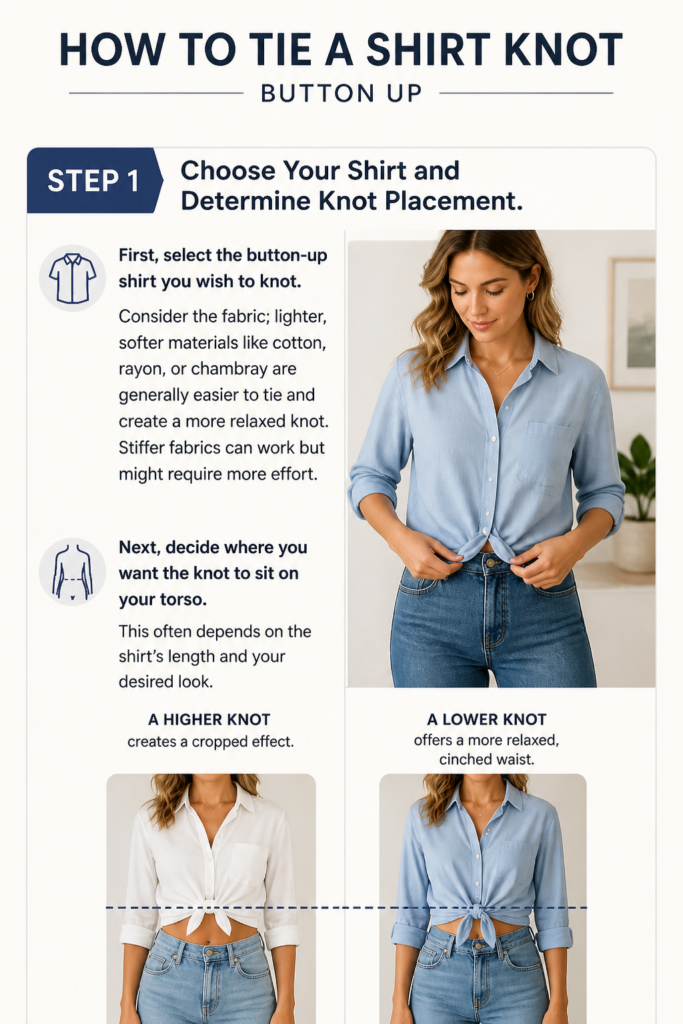
Next, decide where you want the knot to sit on your torso. This often depends on the shirt’s length and your desired look. A higher knot creates a cropped effect, while a lower one offers a more relaxed, cinched waist.
Step 2: Button Up to the Desired Point
Begin by buttoning your shirt from the bottom upwards. Stop buttoning at the exact point where you want the top of your knot to rest. This is crucial for defining the knot’s position and the amount of fabric available for tying.
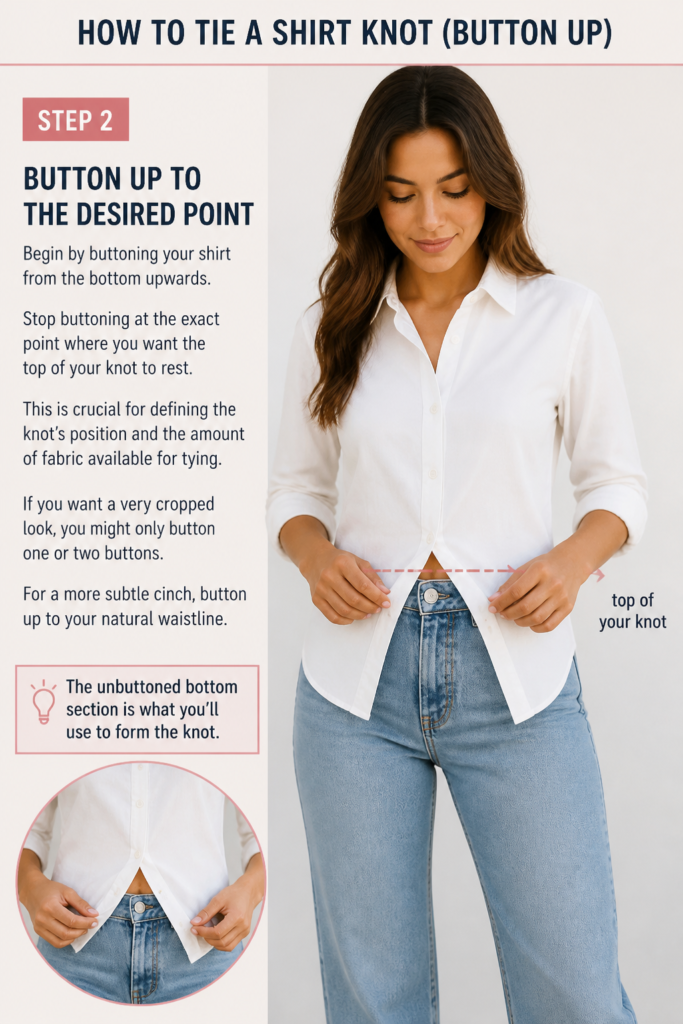
If you want a very cropped look, you might only button one or two buttons. For a more subtle cinch, button up to your natural waistline. The unbuttoned bottom section is what you’ll use to form the knot.
Step 3: Gather the Loose Fabric Evenly
With the shirt buttoned to your chosen point, take the two loose tails of the shirt at the front. Hold one tail in each hand. Ensure you are gathering an equal amount of fabric from both sides.
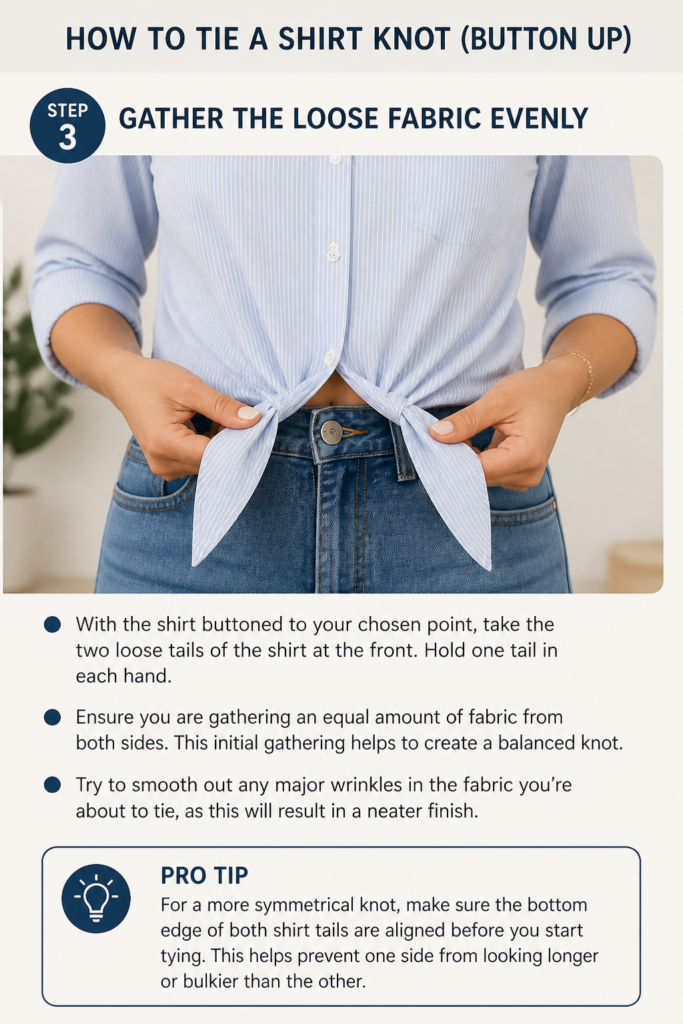
This initial gathering helps to create a balanced knot. Try to smooth out any major wrinkles in the fabric you’re about to tie, as this will result in a neater finish.
Pro Tip: For a more symmetrical knot, make sure the bottom edge of both shirt tails are aligned before you start tying. This helps prevent one side from looking longer or bulkier than the other.
Step 4: Cross One Tail Over the Other
Now, take one of the gathered tails and cross it directly over the other. It doesn’t matter which side you choose to cross over first, just be consistent. This forms the base of your knot, much like the first step in tying your shoelaces.
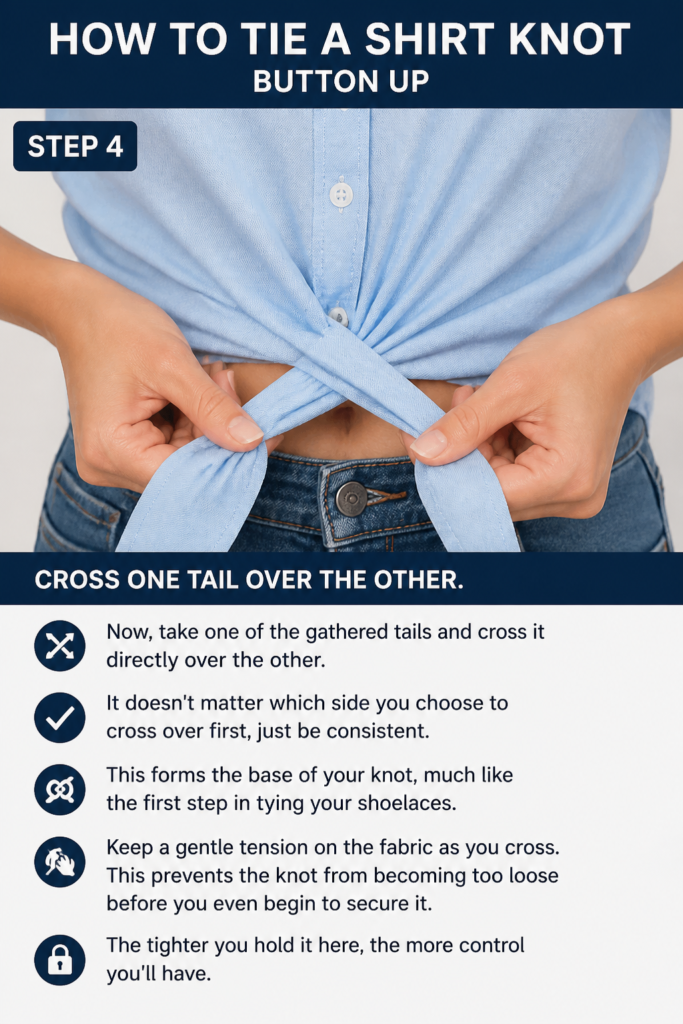
Keep a gentle tension on the fabric as you cross. This prevents the knot from becoming too loose before you even begin to secure it. The tighter you hold it here, the more control you’ll have.
Step 5: Loop the Top Tail Under and Through
Take the tail that is now on top and thread it underneath the other tail. Pull it up through the loop you’ve created. This action begins to form the first part of a basic overhand knot.
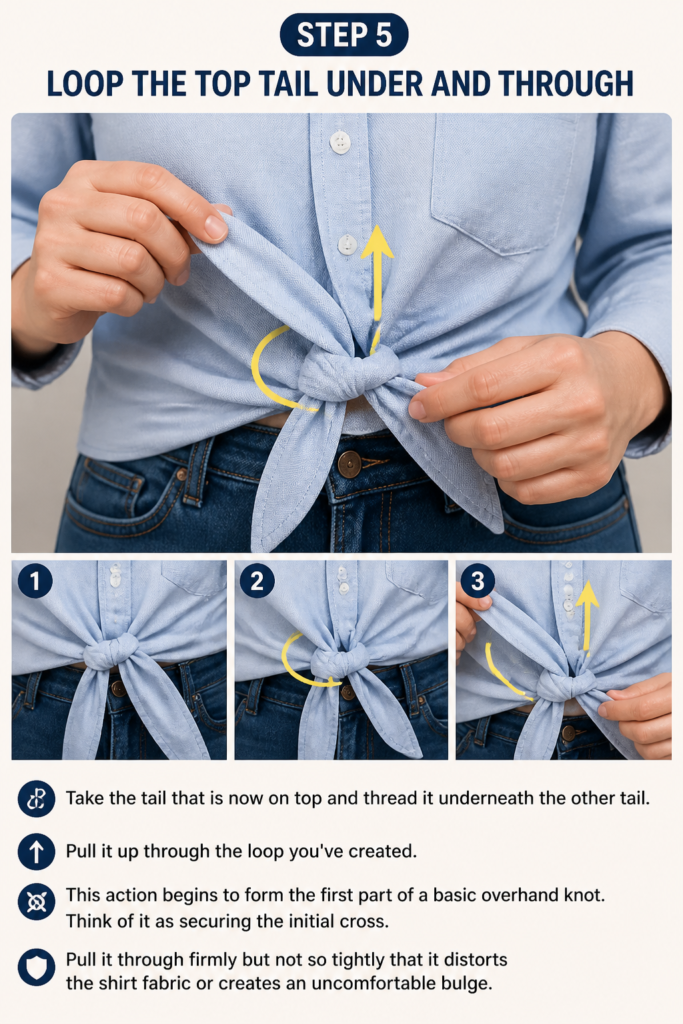
Think of it as securing the initial cross. Pull it through firmly but not so tightly that it distorts the shirt fabric or creates an uncomfortable bulge.
Step 6: Pull Both Tails to Tighten the First Knot
Once you’ve threaded the top tail through, pull both tails horizontally away from each other. This action will tighten the first half of your knot against your body. Adjust the tension until it feels secure and comfortable.
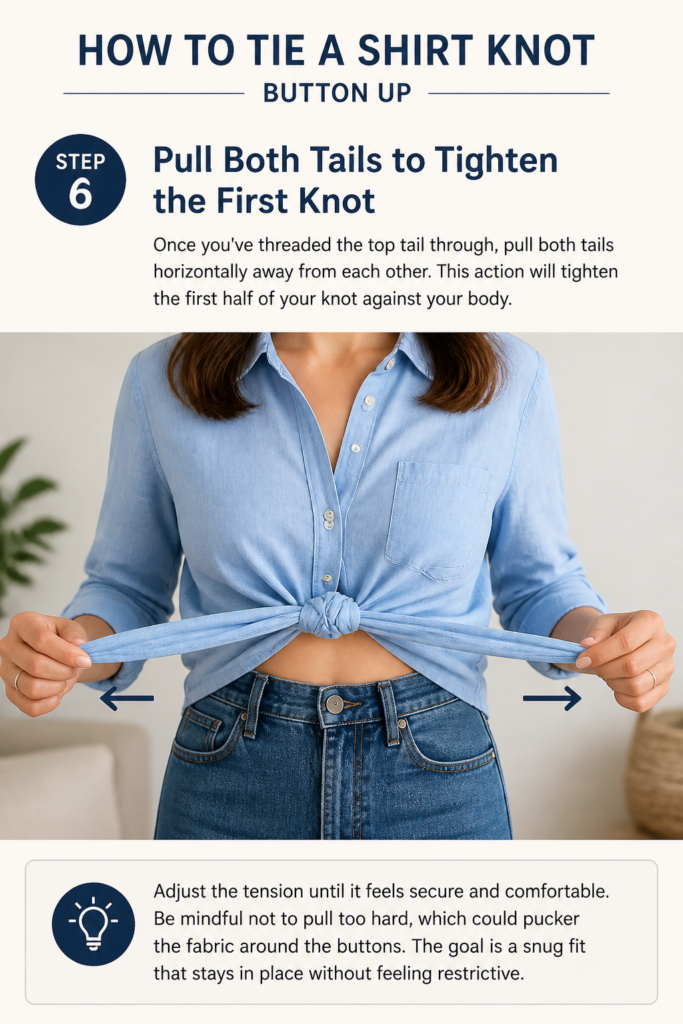
Be mindful not to pull too hard, which could pucker the fabric around the buttons. The goal is a snug fit that stays in place without feeling restrictive.
Step 7: Cross the Tails Again (Second Pass)
Now, cross the tails over each other once more. For a standard, secure knot, you generally want to cross them in the opposite direction from your first cross. If you crossed the right tail over the left initially, now cross the left tail over the right.
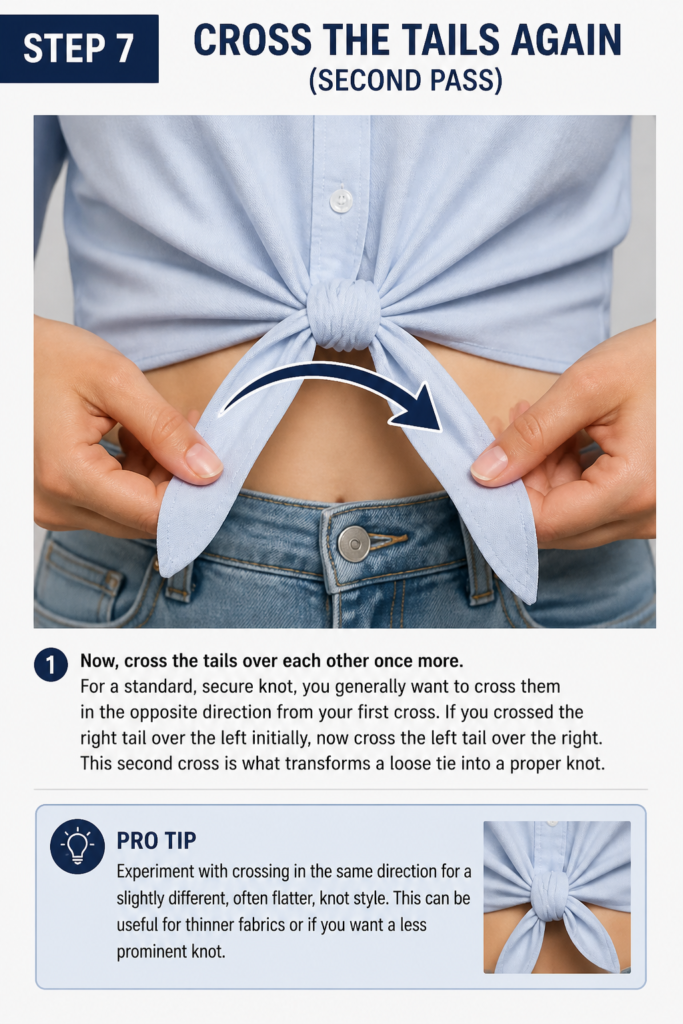
This second cross is what transforms a loose tie into a proper knot. It adds volume and ensures the knot holds its shape throughout the day.
Pro Tip: Experiment with crossing in the same direction for a slightly different, often flatter, knot style. This can be useful for thinner fabrics or if you want a less prominent knot.
Step 8: Loop the Top Tail Under and Through Again
Just like in Step 5, take the tail that is currently on top and loop it underneath the other tail, pulling it up through the new opening. This completes the second half of your knot. You are essentially creating a double overhand knot.
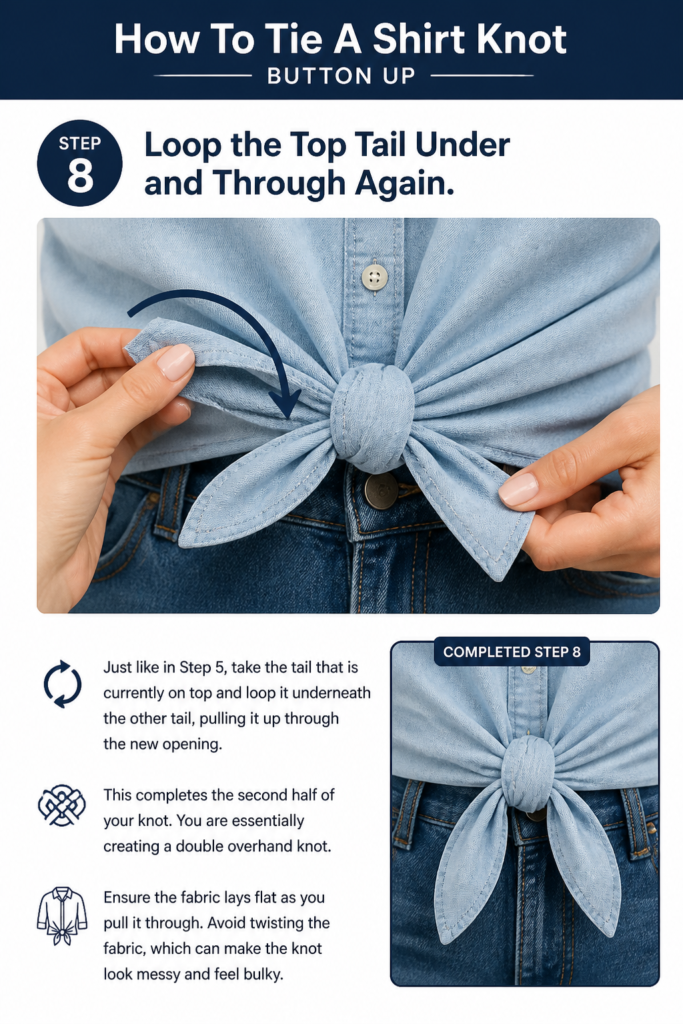
Ensure the fabric lays flat as you pull it through. Avoid twisting the fabric, which can make the knot look messy and feel bulky.
Step 9: Adjust and Refine the Knot
Gently pull both tails to tighten the knot fully. Adjust the tension until the knot feels firm and sits exactly where you want it. Take a moment to smooth out any wrinkles around the knot and the front of the shirt.
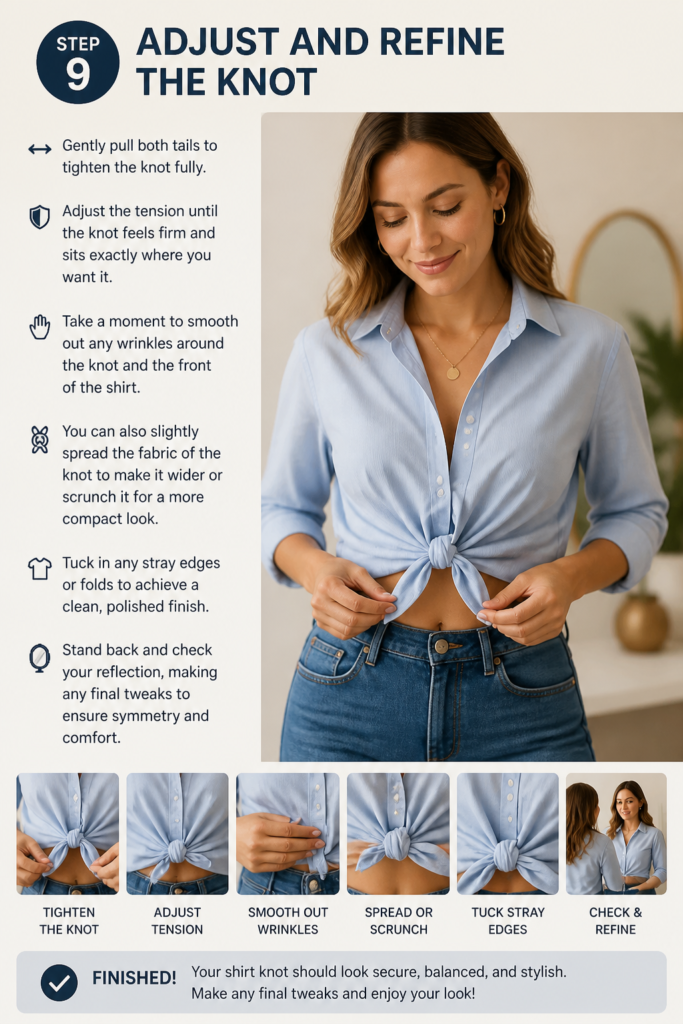
You can also slightly spread the fabric of the knot to make it wider or scrunch it for a more compact look. Tuck in any stray edges or folds to achieve a clean, polished finish. Stand back and check your reflection, making any final tweaks to ensure symmetry and comfort.
Common Mistakes to Avoid
Tying Too Loosely or Too Tightly
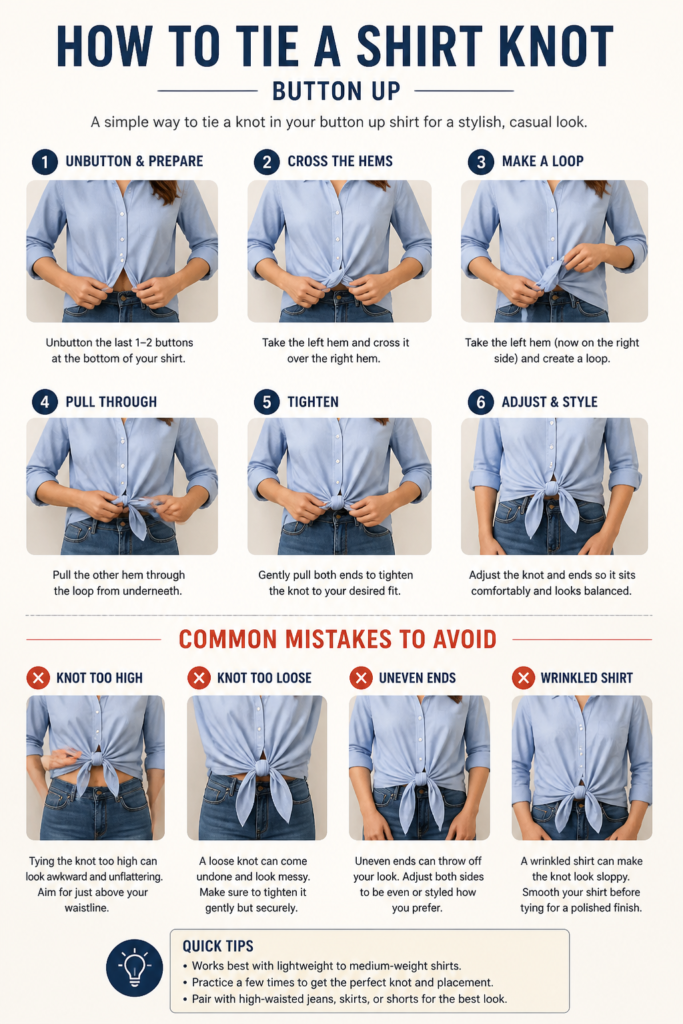
One common pitfall is tying the knot either too loosely or with excessive force. A loose knot will unravel easily throughout the day, requiring constant readjustment and looking sloppy. Conversely, an overly tight knot can pucker the fabric around the buttons, create an uncomfortable pull, and distort the shirt’s overall shape.
The key is to find a balance. Aim for a snug knot that holds its shape without straining the fabric. You should feel a gentle tension, not a restrictive squeeze. Practice will help you gauge the right amount of pressure for different shirt materials.
Uneven Fabric Distribution
Starting with an unequal amount of fabric in each tail is another frequent mistake. If one side has significantly more material than the other, your knot will appear lopsided and bulky on one side. This imbalance can throw off the entire look of your outfit.
Before you begin tying, always ensure you’ve gathered an equal amount of fabric from both the left and right sides of the shirt. Smooth out the tails so they are relatively flat and uniform in width, setting the stage for a balanced and symmetrical knot.
Twisting the Fabric Before Tying
When gathering and crossing the shirt tails, it’s easy to inadvertently twist the fabric. This twisting can lead to a lumpy, uneven knot that doesn’t lie flat against your body. Twisted fabric also makes it harder to tighten the knot smoothly and achieve a clean finish.
Always try to keep the fabric as flat as possible throughout the tying process. As you cross and loop the tails, gently smooth them out with your fingers to prevent any unnecessary twists or folds. A flat foundation ensures a sleek and polished final knot.
Ignoring Fabric Type
Not all shirt fabrics behave the same way when knotted. Trying to tie a stiff, heavy denim shirt with the same technique and expectation as a soft rayon blouse can lead to frustration. Stiffer fabrics might create a bulkier, more rigid knot, while very silky fabrics might slip and require a tighter tie.
Always consider the material of your shirt. Adjust your tension and knot style accordingly. Softer fabrics allow for more relaxed, flowing knots, while structured fabrics might benefit from a more compact, tighter knot to maintain shape.
Troubleshooting
Knot Keeps Coming Undone
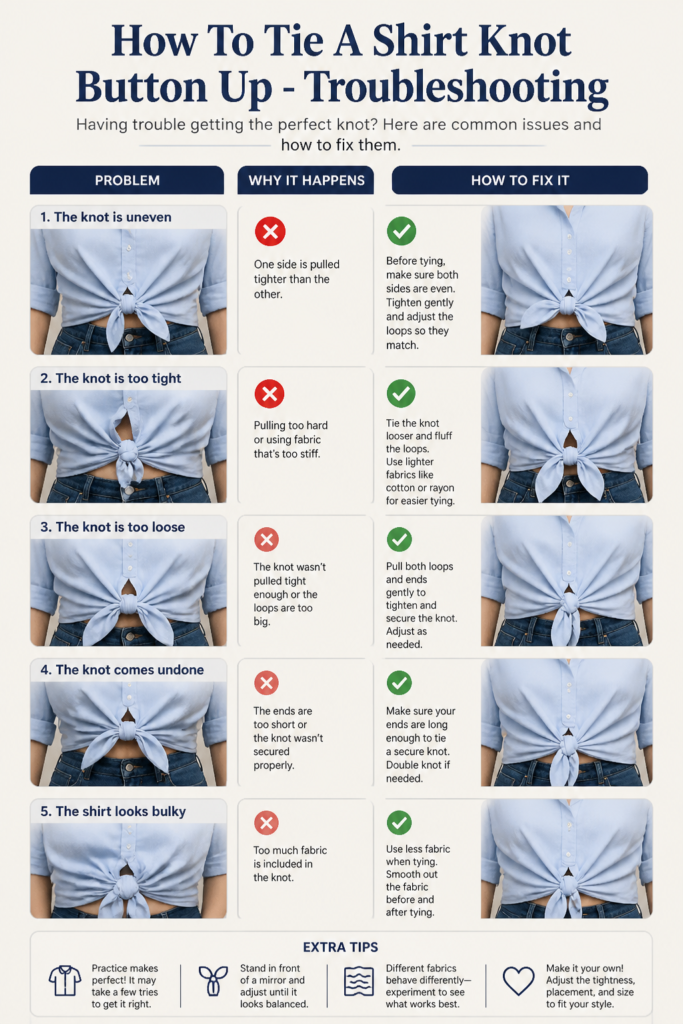
If your knot frequently loosens or completely unravels, it’s likely not secured tightly enough or the fabric is very slippery. The initial tightening of the first loop is critical. Ensure you pull both tails firmly after the first cross-over.
Also, make sure you’re completing a full double knot (crossing and looping twice). For very slick fabrics like silk or satin, you might even consider a small, discreet safety pin through the back of the knot to keep it in place, or opt for a slightly tighter initial pull.
Knot Looks Bulky or Uneven
A bulky or uneven knot usually stems from uneven fabric distribution or twisting during the tying process. Go back to the initial gathering step and ensure both shirt tails have an equal amount of fabric. Smooth out any wrinkles or folds before you start crossing.
When you loop the fabric, try to keep it as flat as possible. Avoid bunching the material. If your shirt is made of a very thick fabric, a slightly looser knot might actually look less bulky than one you try to force too tight.
Shirt Feels Too Tight or Restrictive
If your knotted shirt feels uncomfortable or restricts your movement, the knot is likely tied too high or too tightly. Re-evaluate where you stopped buttoning your shirt; moving the knot down by one button can often provide more comfort.
Loosen the knot slightly, ensuring there’s enough room for you to move without feeling constrained. Remember, the goal is a stylish cinch, not a vice grip. Adjust until you find a comfortable balance between security and freedom of movement.
Key Takeaways
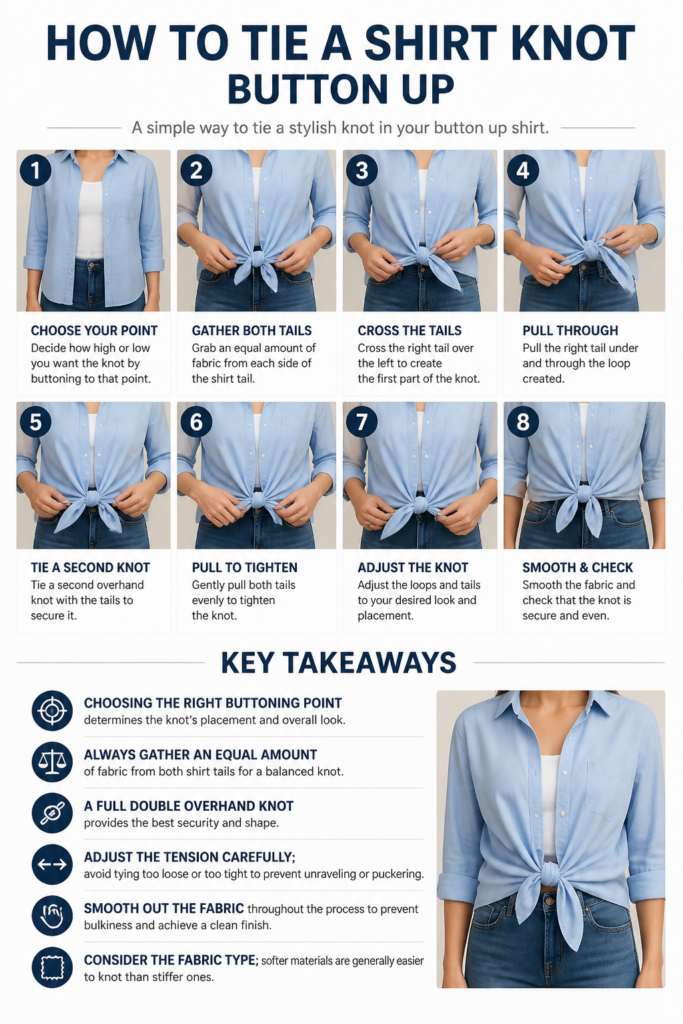
- Choosing the right buttoning point determines the knot’s placement and overall look.
- Always gather an equal amount of fabric from both shirt tails for a balanced knot.
- A full double overhand knot provides the best security and shape.
- Adjust the tension carefully; avoid tying too loose or too tight to prevent unraveling or puckering.
- Smooth out the fabric throughout the process to prevent bulkiness and achieve a clean finish.
- Consider the fabric type; softer materials are generally easier to knot than stiffer ones.
Frequently Asked Questions
Can I knot any type of button-up shirt?
While you can technically knot any button-up shirt, some fabrics work better than others. Softer, lighter materials like cotton, rayon, linen, or chambray are ideal as they drape well and are easier to manipulate. Stiffer fabrics like heavy denim or thick flannel can be knotted but might result in a bulkier, more rigid knot.
How do I make the knot stay in place all day?
To ensure your knot stays secure, make sure you complete a full double overhand knot, pulling both loops firmly but not excessively. Smooth out the fabric as you tie to prevent slippage. For very active days or slippery fabrics, a small, discreet safety pin placed through the back of the knot can provide extra security without being visible.
What’s the best way to knot a shirt if I want a cropped look?
For a cropped look, button your shirt only up to your natural waist or even higher, depending on how much midriff you want to show. The less fabric you button up, the more material will be available for a prominent knot, creating that desirable cropped effect. Ensure your pants or skirt are high-waisted to complement this style.
Can men tie shirt knots too?
Absolutely! Shirt knots are a versatile style choice for anyone. While often seen in women’s fashion, men can also use a shirt knot to add a casual, relaxed vibe to their button-ups, especially for beachwear, summer outfits, or a relaxed weekend look. The principles remain the same, focusing on comfort and desired aesthetic.
Our Top Recommended Finds
- Soft Cotton Button-Up Shirt: A classic choice, these shirts are breathable, comfortable, and knot beautifully for a relaxed yet polished look.
- Chambray Shirt: Known for its denim-like appearance but softer drape, a chambray shirt creates a stylish, casual knot perfect for everyday wear.
- Rayon or Viscose Blouse: These fabrics offer a silky smooth texture and excellent drape, making them incredibly easy to knot for an elegant, flowing finish.
Embrace Your Unique Style
Mastering the shirt knot is more than just a technique; it’s an invitation to rediscover your wardrobe with fresh eyes. This simple adjustment can transform an ordinary button-up into a statement piece, reflecting your personal flair and confidence. It’s about taking what you already own and making it work harder, smarter, and with a touch more panache.
Don’t wait for a special occasion to try this out. Grab a shirt, follow these steps, and experiment with different placements and tensions. You’ll be amazed at the versatility and style a simple knot can add. Start knotting today and let your personal style shine through!