🎀 How To Style A Bow In Your Hair
I have spent nearly a decade working as a freelance stylist, and I have seen trends come and go like the seasons.
One accessory that never truly fades is the hair bow, though it has recently enjoyed a massive resurgence in modern fashion.
In this guide, I will show you exactly how to integrate this timeless piece into your daily look without it feeling like a costume.
Quick Overview
Styling a bow is one of the fastest ways to elevate a basic hairstyle into something intentional and polished.
- Time needed: 10 to 15 minutes
- Difficulty: Beginner
- What you’ll need: Hair bow (clip or ribbon), clear elastic bands, a boar bristle brush, texturizing spray, and a handheld mirror.
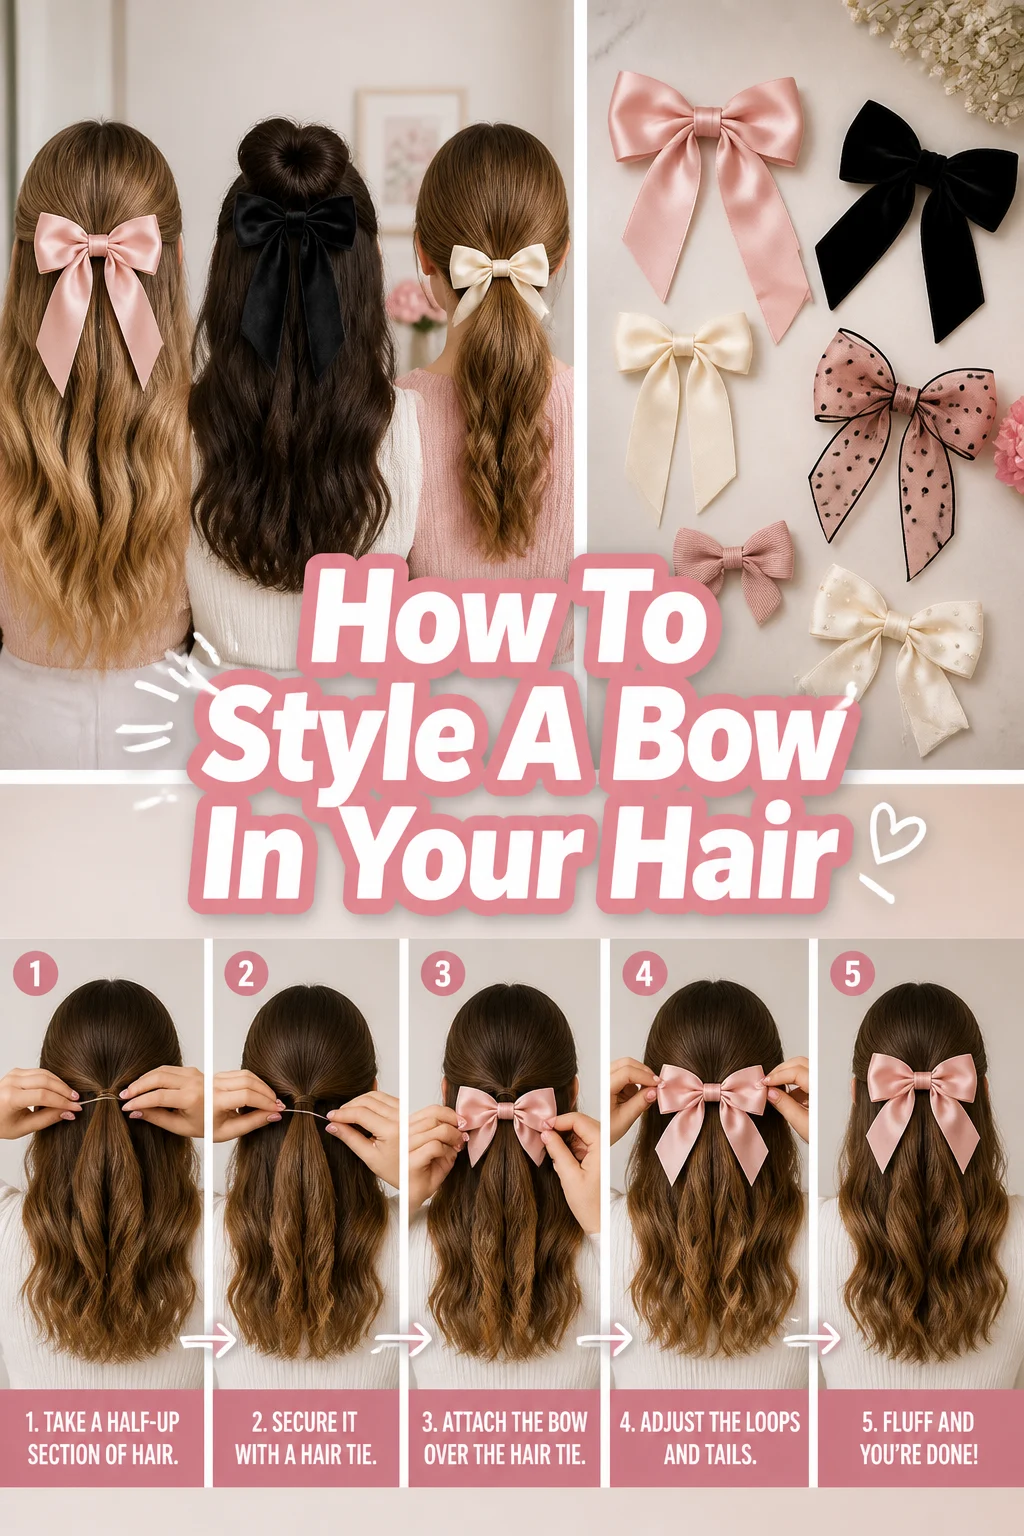
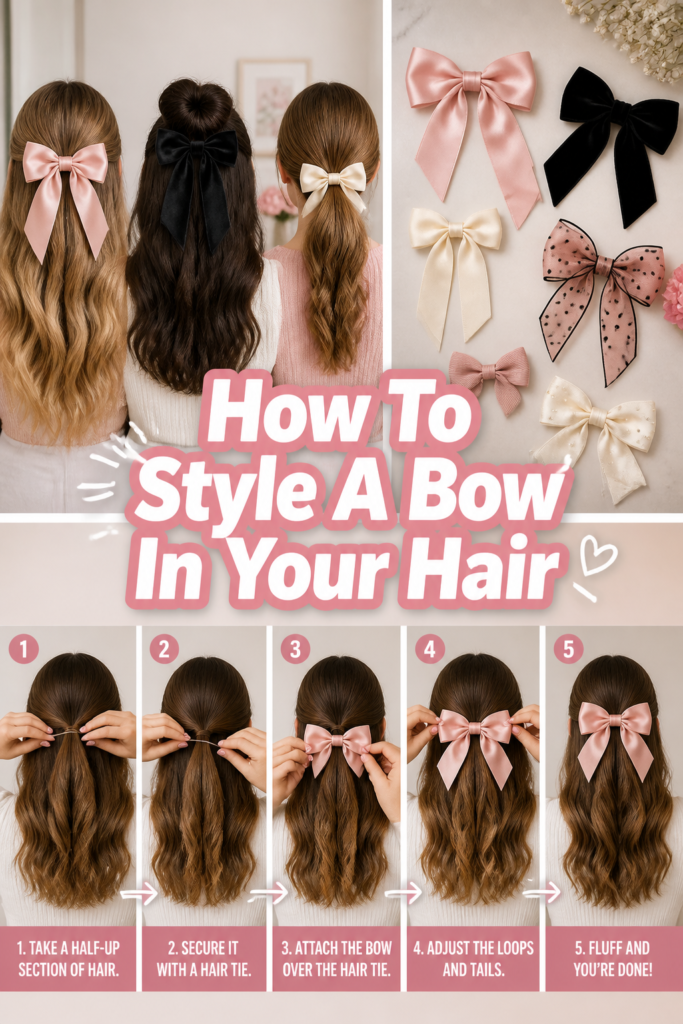
Step-by-Step Instructions
Step 1: Prepare Your Hair Texture
Brush your hair thoroughly to remove any tangles or knots before you begin styling.
Bows sit best on hair that has a bit of “grit” or hold, so avoid styling on hair that is too slippery or freshly conditioned.
Apply a light mist of texturizing spray or dry shampoo to the roots and lengths to create a foundation for the accessory.
If your hair is naturally very fine, this step is vital to prevent the bow from sliding down throughout the day.
Pro Tip: If you are using a silk or satin ribbon, spray the ribbon itself with a tiny bit of hairspray to give it more grip against your hair strands.
Step 2: Select Your Bow Type
Choose an accessory that matches both your hair volume and the occasion you are attending.
Large, oversized velvet bows are perfect for winter months and formal events, while thin silk ribbons work beautifully for a casual “coquette” aesthetic.
Determine if you prefer a French barrette, an alligator clip, or a raw ribbon that you tie yourself.
Clips are much easier for beginners to manage, while loose ribbons allow for more customization in the length of the “tails.”
Step 3: Create a Secure Foundation
Gather the section of hair where you want the bow to sit, such as a half-up style or a ponytail.
Secure this section with a small, clear elastic band before you even touch the bow.
Many people try to clip the bow directly onto loose hair, but this often leads to the accessory sagging or falling out within an hour.
The elastic acts as an anchor that supports the weight of the bow and keeps the hairstyle tight.
Step 4: Position the Accessory
Place the bow directly over the elastic band you just installed to hide it from view.
For a youthful and trendy look, position the bow high on the crown of your head so it is visible from the front.
Slide the clip or tie the ribbon at the nape of the neck if you want a more sophisticated, understated appearance.
Check your profile in a mirror to ensure the bow isn’t tilting too far to one side or sitting at an awkward angle.
Pro Tip: For a “double bow” look, place a smaller bow at the top of a braid and a matching one at the very bottom.
Step 5: Secure the Fastener
Open the clip and catch a small amount of the hair that is already gathered in the elastic.
If you are using a ribbon, loop it around the elastic twice before tying the actual bow to ensure it doesn’t loosen.
Press the clip firmly against your scalp to make sure it feels stable and doesn’t wiggle when you move your head.
If the clip feels heavy, you can criss-cross two bobby pins underneath it for extra reinforcement.
Step 6: Shape the Loops and Tails
Tug gently on the loops of the bow to fluff them up and create a three-dimensional shape.
If the tails of the ribbon are uneven, use fabric scissors to trim them at a 45-degree angle for a professional finish.
Arrange the tails so they drape naturally over your shoulders or down your back, depending on the hairstyle.
You want the bow to look intentional, so make sure the fabric isn’t twisted or folded in a way that hides the pattern.
Step 7: Blend with Your Natural Hair
Pull a few face-framing pieces of hair loose around your temples to soften the overall look.
Use a curling iron to add a soft wave to the hair hanging beneath the bow, which helps the accessory blend in seamlessly.
Smooth down any flyaways near the base of the bow using a tiny bit of hair wax or a clean toothbrush with hairspray.
This creates a clean contrast between the sleek hair and the soft texture of the ribbon.
Step 8: Set the Style for Longevity
Mist the entire style with a flexible-hold hairspray to keep everything in place.
Avoid using heavy gels, as these can make the fabric of the bow look greasy if they come into contact with it.
Give your head a gentle shake to test the security of the clip one last time.
If it feels loose, add one more bobby pin hidden behind the center knot of the bow.
Common Mistakes to Avoid
Using a Bow That Is Too Heavy
If you have very fine or thin hair, a large velvet bow with a heavy metal clip will likely slide down your head.
This happens because the weight of the accessory exceeds the tension of the hair holding it up.
Opt for lightweight chiffon or organza ribbons instead, as these provide the same visual impact without the physical weight.
Placing the Bow Too Low on a Ponytail
When a bow is placed too low on a ponytail, it tends to flip upside down or look limp against the back of the head.
This creates a “droopy” effect that can make the hairstyle look messy rather than chic.
Always aim to place the bow slightly above the elastic or right on top of it to maintain an upright, perky shape.
Ignoring the Fabric Choice
Choosing a fabric that clashes with your outfit’s texture can make the bow look like an afterthought.
For example, a shiny satin bow might look out of place with a rugged wool sweater or a heavy flannel shirt.
Try to match the “vibe” of your fabric—use linen or cotton bows for summer and velvet or heavy grosgrain for winter.
Troubleshooting
The Bow Keeps Sliding Down
This is usually caused by hair that is too clean or a clip that doesn’t have enough tension.
To fix this, create a small horizontal braid where you want the bow to sit and clip the accessory directly onto the braid.
The braid provides a thick, sturdy anchor that is much harder for a clip to slide off of compared to loose strands.
The Ribbon Tails Look Flat and Lifeless
Ribbons can often get wrinkled or flattened if they have been stored in a drawer for a long time.
Use a hair straightener on the lowest heat setting to quickly press the ribbon tails before putting them in your hair.
This instantly restores the crispness of the fabric and makes the bow look brand new again.
The Bow Is Hidden by Your Hair
If you have very thick or curly hair, a small bow can easily get swallowed up and become invisible.
In this case, you should choose a bow that is slightly wider than the section of hair you are securing.
Alternatively, use a bright, contrasting color so the accessory pops against your natural hair shade.
Key Takeaways
- Always use a clear elastic band as a base before attaching your bow to ensure it stays in place all day.
- Match the weight and fabric of your bow to your hair type and the current season for the most cohesive look.
- Prep your hair with texturizing spray to give the clip or ribbon something to grip onto.
- High placement on the crown creates a bold, modern look, while a low placement at the nape is more classic.
- Don’t be afraid to trim ribbon tails at an angle to prevent fraying and add a professional touch.
- Use a mirror to check your profile and the back of your head to ensure the bow is centered.
Frequently Asked Questions
Can I wear a bow with short hair?
Yes, bows look incredible on bob-length hair or even pixie cuts. For short hair, use a small “alligator” style clip to pin back one side of your hair near the temple. This adds a feminine touch without needing enough hair for a ponytail or a half-up style.
Should I use a ribbon or a pre-made bow clip?
If you are in a rush, a pre-made bow clip is the best option because it maintains its shape perfectly. However, if you want a more romantic and customized look, a raw ribbon allows you to control the size of the loops and the length of the tails. Ribbons are also generally cheaper and come in more color varieties at craft stores.
How do I stop the ends of my ribbon from fraying?
The best way to prevent fraying is to cut the ends at a sharp diagonal angle or in a “V” shape. If the fabric is synthetic, you can very carefully pass a lighter flame near the edge to melt the fibers slightly. For natural fabrics, a tiny dab of clear nail polish along the very edge will seal the threads perfectly.
What color bow should I choose for my hair color?
Contrast is key when choosing a bow color. Blondes look stunning in black, navy, or deep emerald, while brunettes shine in cream, pale pink, or red. If you have red hair, earthy tones like olive green or warm gold will complement your natural tones beautifully.
Our Top Recommended Finds
- Velvet French Barrette: A sturdy, wide clip that holds a significant amount of hair and provides a luxurious texture for autumn and winter.
- Silk Ribbon Spool: Buying ribbon by the yard allows you to create custom lengths and styles for a fraction of the cost of designer accessories.
- Mini Clear Elastics: These are essential for creating the “anchor” point that keeps your bow from sagging or slipping throughout the day.
Elevate Your Everyday Style
Now that you know the secrets to a perfectly placed bow, it is time to experiment with different fabrics and placements.
Try a simple half-up look for your next coffee date or a low, ribboned ponytail for a day at the office.
If you enjoyed learning about hair accessories, you might want to explore our guide on how to style silk scarves or the best ways to use claw clips for thick hair.
Grab your favorite ribbon today and see how a small detail can completely transform your confidence.