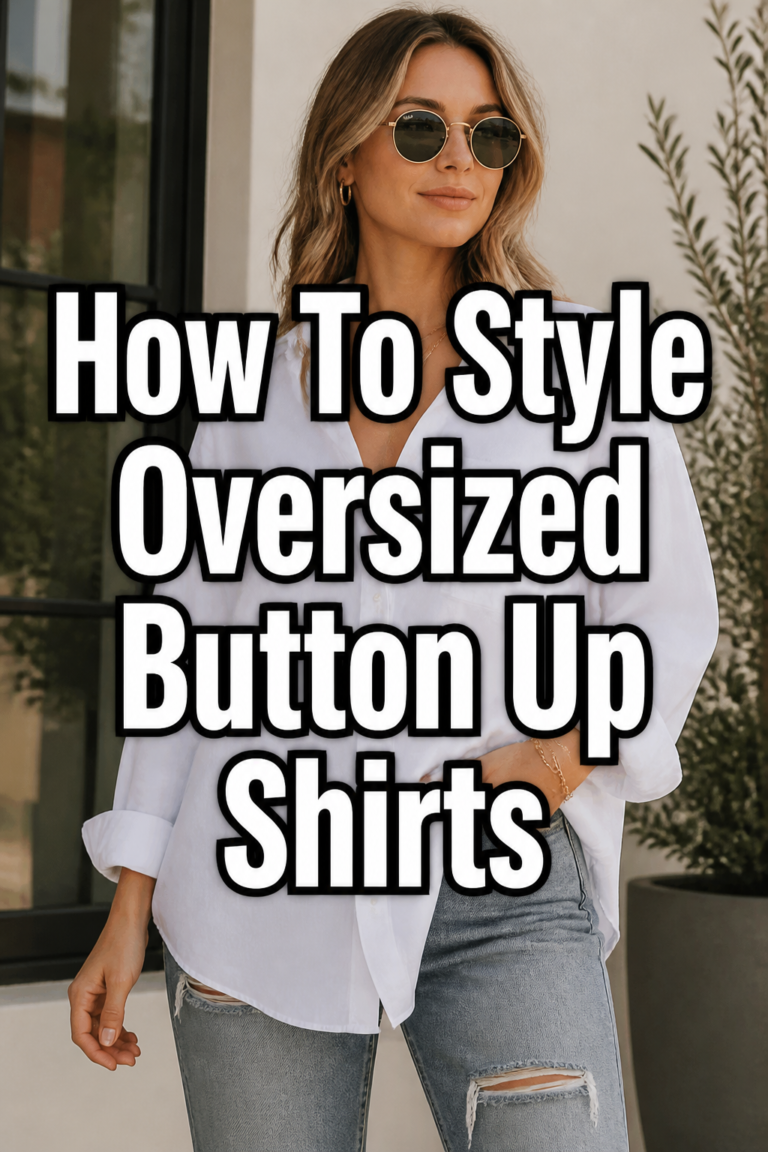
🧣 How To Make A Top From A Scarf
I remember standing in front of my closet for twenty minutes, feeling like I had absolutely nothing to wear for a last-minute summer dinner.
I pulled a vintage silk scarf from my drawer, experimented with a few knots, and walked out the door in a custom top that earned more compliments than my designer dresses.
This guide draws from years of styling experience to help you transform a simple square of fabric into a high-fashion statement piece.
Quick Overview
Creating a scarf top is the ultimate fashion hack for vacations, festivals, or hot summer days when you want something unique.
- Time needed: 5 to 15 minutes
- Difficulty: Beginner
- What you’ll need: A large square scarf (35×35 inches or larger), safety pins, and fashion tape.
Step-by-Step Instructions
Step 1: Choose the Right Fabric and Size
Select a scarf that is large enough to wrap around your torso with plenty of room left for knotting.
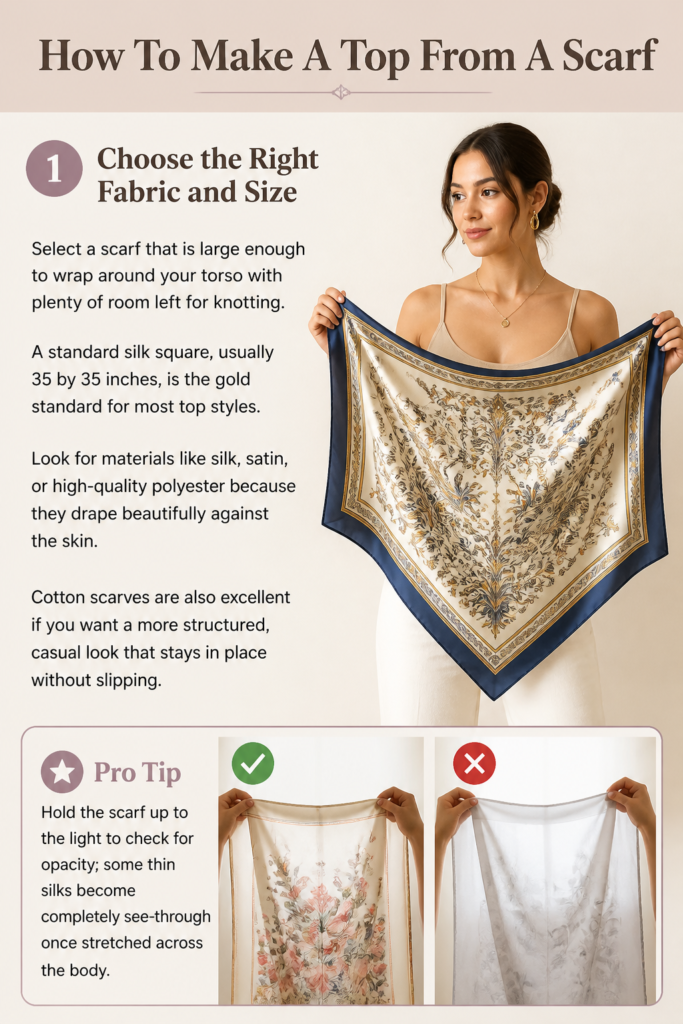
A standard “silk” square, usually 35 by 35 inches, is the gold standard for most top styles.
Look for materials like silk, satin, or high-quality polyester because they drape beautifully against the skin.
Cotton scarves are also excellent if you want a more structured, casual look that stays in place without slipping.
Pro Tip: Hold the scarf up to the light to check for opacity; some thin silks become completely see-through once stretched across the body.
Step 2: Prepare Your Fabric
Steam or iron your scarf on a low heat setting before you begin styling.
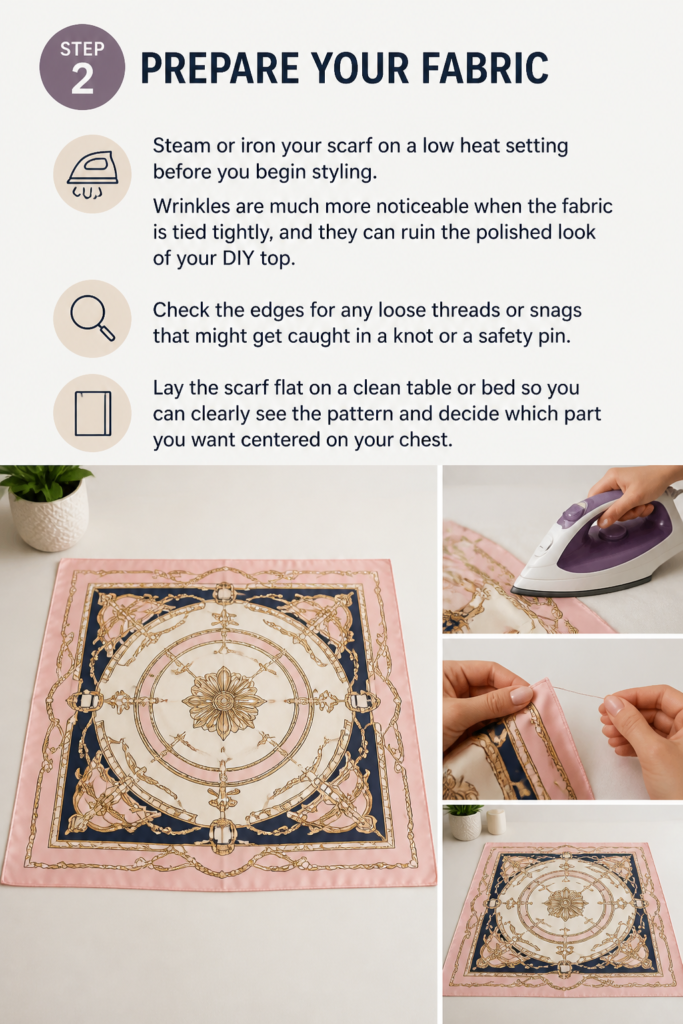
Wrinkles are much more noticeable when the fabric is tied tightly, and they can ruin the polished look of your DIY top.
Check the edges for any loose threads or snags that might get caught in a knot or a safety pin.
Lay the scarf flat on a clean table or bed so you can clearly see the pattern and decide which part you want centered on your chest.
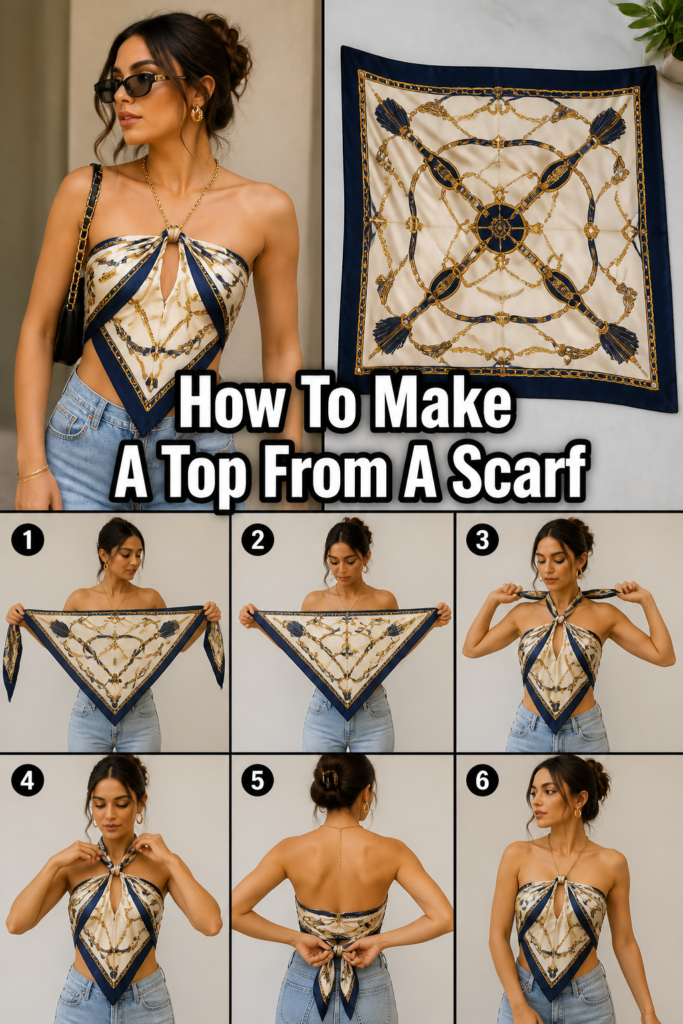
Step 3: Master the Classic Triangle Bandeau
Fold the square scarf in half diagonally to create a large triangle shape.
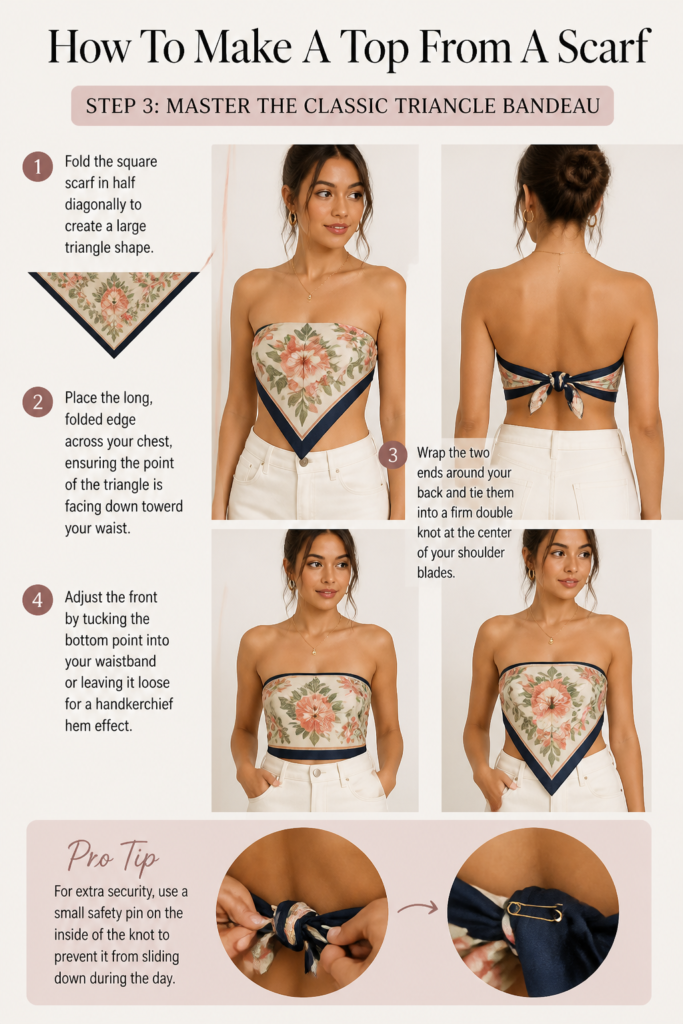
Place the long, folded edge across your chest, ensuring the point of the triangle is facing down toward your waist.
Wrap the two ends around your back and tie them into a firm double knot at the center of your shoulder blades.
Adjust the front by tucking the bottom point into your waistband or leaving it loose for a “handkerchief” hem effect.
Pro Tip: For extra security, use a small safety pin on the inside of the knot to prevent it from sliding down during the day.
Step 4: Create the Elegant Halter Neck
Start with the scarf folded into a triangle, just like the previous step.
Hold the two long ends of the triangle and tie them around your waist first, with the point of the triangle hanging down in front.
Lift the bottom point of the triangle up toward your neck, covering your torso.
Thread the point through a decorative ring or simply tie the corners behind your neck to create a sleek halter silhouette.
Smooth the fabric over your bust to ensure there are no awkward bulges or gaps at the sides.
Step 5: Try the Front-Knot Strapless Style
Fold your scarf into a long, wide rectangle by folding the top and bottom edges toward the center.
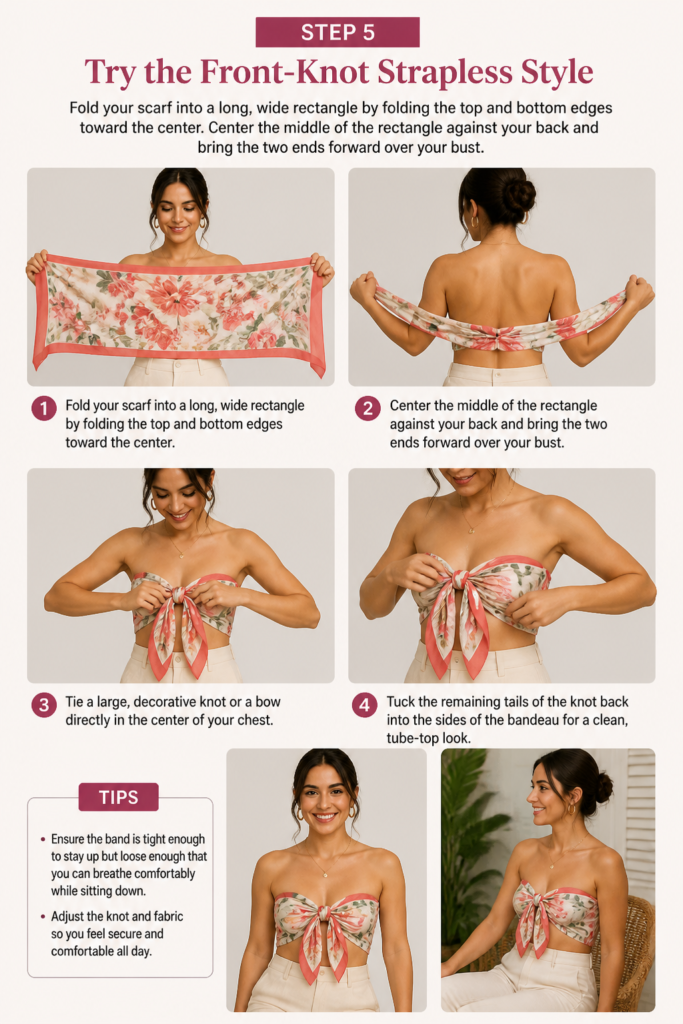
Center the middle of the rectangle against your back and bring the two ends forward over your bust.
Tie a large, decorative knot or a bow directly in the center of your chest.
Tuck the remaining “tails” of the knot back into the sides of the bandeau for a clean, tube-top look.
Ensure the band is tight enough to stay up but loose enough that you can breathe comfortably while sitting down.
Step 6: Construct the One-Shoulder Twist
Open the scarf fully and hold it behind your back, under your armpits.
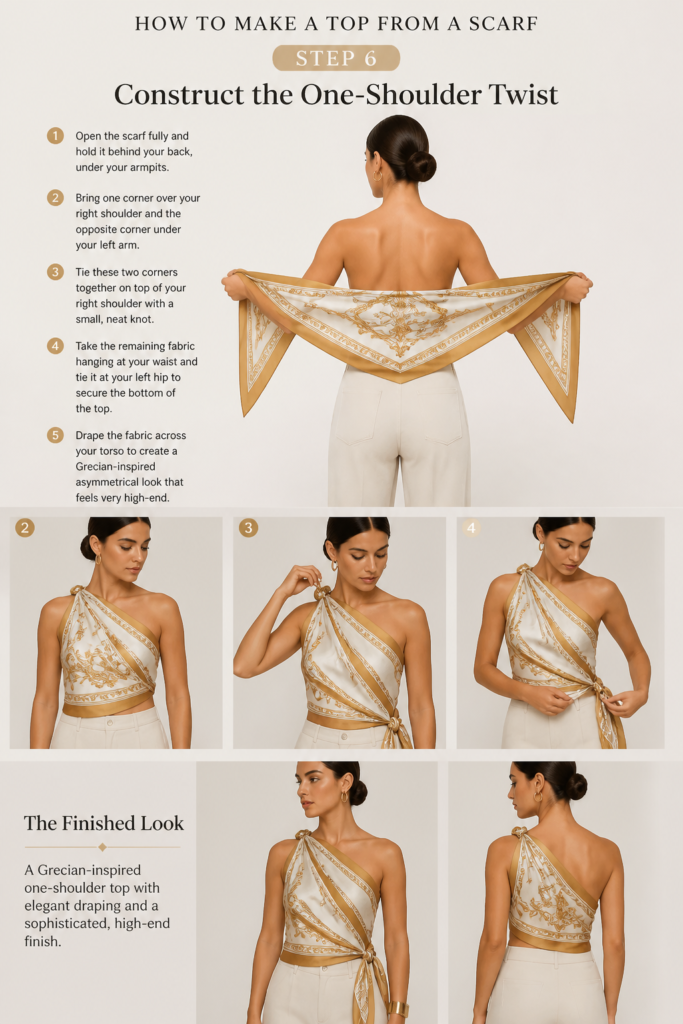
Bring one corner over your right shoulder and the opposite corner under your left arm.
Tie these two corners together on top of your right shoulder with a small, neat knot.
Take the remaining fabric hanging at your waist and tie it at your left hip to secure the bottom of the top.
Drape the fabric across your torso to create a Grecian-inspired asymmetrical look that feels very high-end.
Step 7: The Rosette Centerpiece Technique
Place the center of the scarf against your chest and wrap the ends around to your back.
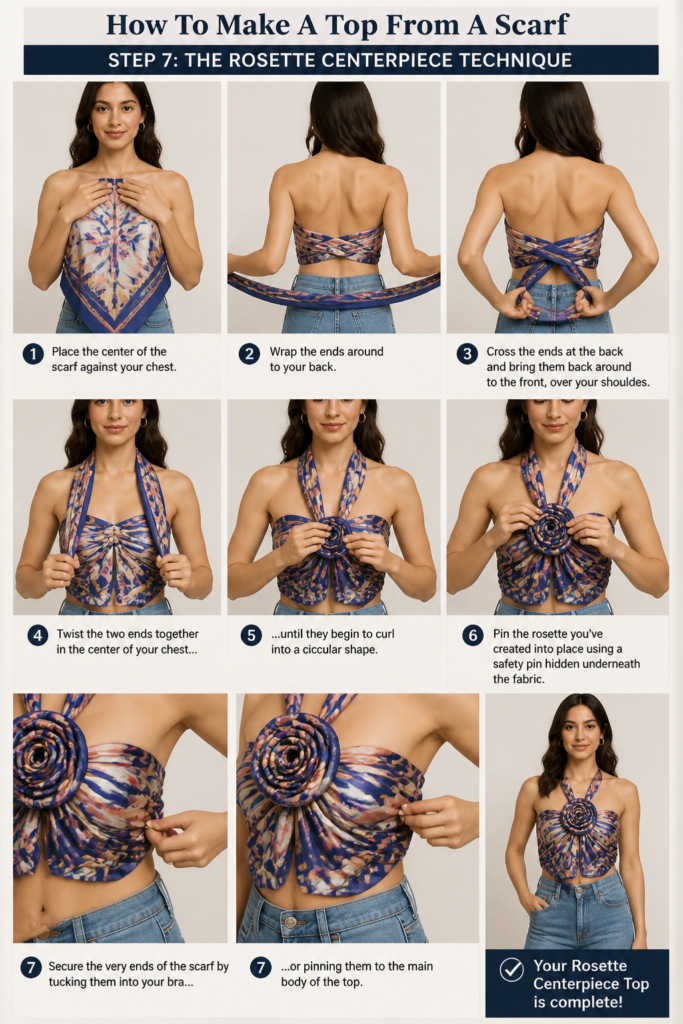
Cross the ends at the back and bring them back around to the front, over your shoulders.
Twist the two ends together in the center of your chest until they begin to curl into a circular shape.
Pin the “rosette” you’ve created into place using a safety pin hidden underneath the fabric.
Secure the very ends of the scarf by tucking them into your bra or pinning them to the main body of the top.
Step 8: Final Security and Styling
Apply double-sided fashion tape along the top edge of the scarf where it meets your skin.
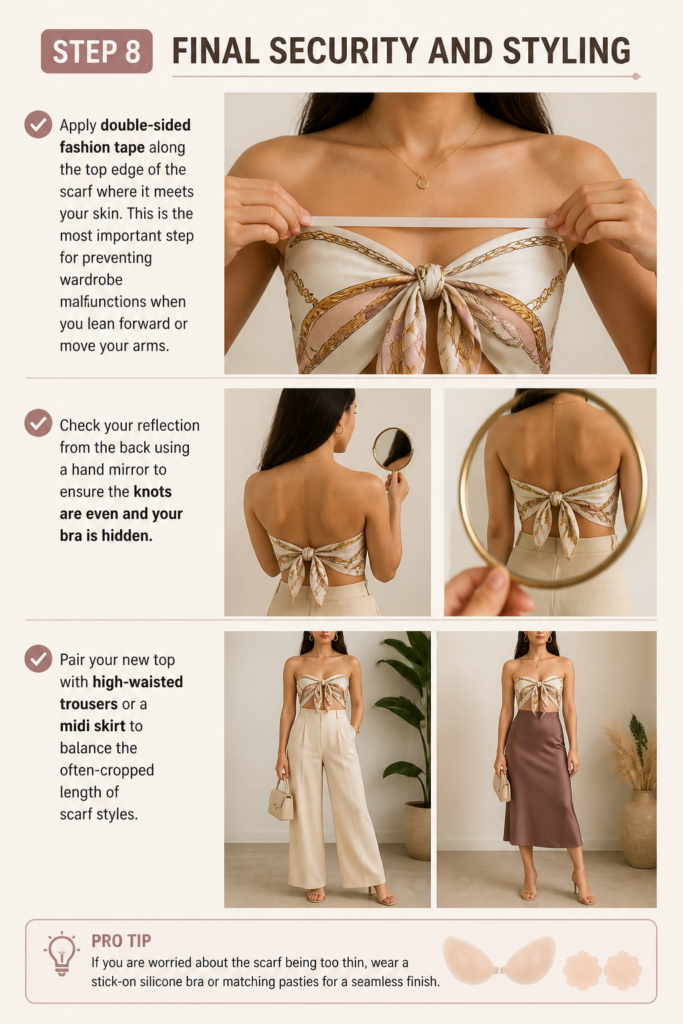
This is the most important step for preventing “wardrobe malfunctions” when you lean forward or move your arms.
Check your reflection from the back using a hand mirror to ensure the knots are even and your bra is hidden.
Pair your new top with high-waisted trousers or a midi skirt to balance the often-cropped length of scarf styles.
Pro Tip: If you are worried about the scarf being too thin, wear a stick-on silicone bra or matching pasties for a seamless finish.
Common Mistakes to Avoid
Using a Scarf That Is Too Small
Many people try to use a standard neck scarf or a “twilly” to make a top. This usually results in a top that is far too tight or fails to cover the sides of the bust properly. You need a “grand carre” size, which is typically 35 to 45 inches, to ensure you have enough fabric for both coverage and secure knotting.
Ignoring the Fabric Weight
Heavy wool or thick pashmina scarves do not work well for these styles because they create too much bulk. When you tie a thick scarf, the knots become massive and uncomfortable against your skin. Stick to lightweight materials like silk, chiffon, or thin rayon to keep the silhouette sleek and the knots manageable.
Tying Knots Too Loosely
Silk is incredibly slippery and will naturally loosen as you move throughout the day. If you only tie a single knot, the weight of the fabric will eventually cause it to slide down your waist. Always use a double knot and consider a “surgeon’s knot” for extra grip on very slick satin fabrics.
Troubleshooting
The Scarf Keeps Slipping Down
This is the most common issue with strapless scarf tops, especially on smaller frames. The solution is to use a hidden safety pin to attach the scarf directly to your strapless bra. If you aren’t wearing a bra, apply fashion tape to the top hem and press it firmly against your skin for thirty seconds to create a bond.
The Knot Is Digging Into Your Back
If the knot feels painful against your spine, you have likely tied it too tightly or used a scarf with a very thick hem. Try shifting the knot slightly to the side so it sits on the muscle rather than the bone. You can also flatten the knot by spreading the fabric tails out and pinning them flat against the back of the top.
The Fabric Is Creating a “Gap” at the Armpits
Gapping usually happens when the scarf isn’t pulled taught enough across the chest before tying. To fix this, untie the back and have a friend pull the fabric toward your shoulder blades while you hold the front in place. You can also create a small “dart” by folding a tiny bit of fabric over itself at the armpit and securing it with a safety pin on the inside.
Key Takeaways
- Size matters: Always use a square scarf that is at least 35 inches wide for adequate coverage.
- Fabric choice: Silk and satin provide the best drape, while cotton offers the most stability.
- Security is key: Use fashion tape and safety pins to prevent the fabric from shifting or falling.
- Preparation: Iron or steam the scarf beforehand to ensure the final look appears professional and intentional.
- Versatility: One scarf can be tied in at least five different ways, making it the perfect travel wardrobe staple.
- Styling: High-waisted bottoms are the best companion for scarf tops to create a balanced silhouette.
Frequently Asked Questions
Can I make a scarf top if I have a larger bust?
Yes, but you will likely need two scarves instead of one. You can tie two large squares together at the shoulders and sides to create a “poncho” style top or a more secure tank-style drape. This provides the necessary surface area to cover a larger bust while still allowing for the beautiful drape that makes scarf tops so popular.
What kind of bra should I wear with a scarf top?
A strapless bra is usually the best choice, but it can sometimes peek out from the sides or back. Many people prefer stick-on silicone bras or nipple covers to maintain a completely backless look. If the scarf is thick enough, you might find that the tension of the fabric provides enough support to go braless entirely.
Will safety pins ruin my silk scarf?
They can if you aren’t careful, especially with vintage or very fine silk. To protect your fabric, use “bulb” pins or high-quality stainless steel pins that don’t have a coiled end where threads can get caught. Always pin through a seam or a reinforced edge whenever possible to minimize the risk of creating a permanent hole in the delicate center of the scarf.
How do I stop the scarf from being too short?
If you want more length, try the “handkerchief” tie where the point of the triangle hangs down toward your belly button. This naturally creates a longer line than the bandeau style. You can also layer the scarf over a tight bodysuit or a camisole if you want the look of the scarf without exposing your midriff.
Our Top Recommended Finds
- Double-Sided Fashion Tape: This is non-negotiable for keeping silk fabric in place against your skin and preventing the top from gaping.
- Seamless Silicone Covers: These provide a smooth look under thin silk and allow you to wear backless styles without worrying about bra straps.
- Large Silk or Satin Square Scarves: Look for 35×35 inch or 43×43 inch squares in vibrant prints to get the most versatility out of your styling.
Elevate Your Summer Style Today
Transforming a scarf into a top is more than just a quick fix for a wardrobe crisis. It is a way to express your creativity and make use of the beautiful textiles you already own.
Once you master the basic triangle tie, you can start experimenting with different knots, rings, and layering techniques. This skill is particularly useful for packing light on vacation, as three scarves can become three entirely different evening outfits.
Grab your favorite scarf right now and try at least two of these styles in front of a mirror. You might find that your new favorite summer “shirt” has been sitting in your accessory drawer all along.