🎀 How To Tie A Ribbon On A Dress
A perfectly tied ribbon can transform a simple dress into a stunning outfit.
I have spent years styling bridal parties and formal events where the bow is the focal point of the entire look.
Through trial and error, I discovered that the secret lies in the tension and the direction of the loops.

Quick Overview
Before you begin, it helps to understand the basics of what makes a ribbon stay in place and look professional.
- Time needed: 5 to 10 minutes
- Difficulty: Beginner
- What you’ll need: A ribbon or sash, a mirror, fabric scissors, and a steady hand.
Step-by-Step Instructions
Step 1: Position the Ribbon Correctly
Find the center of your ribbon or sash by folding it in half.
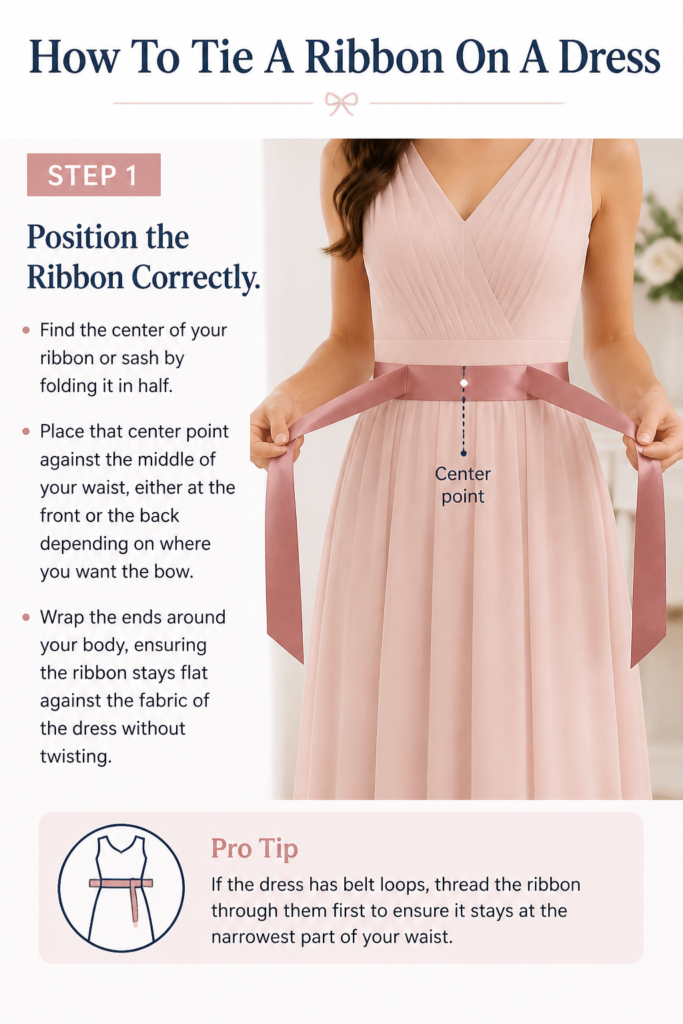
Place that center point against the middle of your waist, either at the front or the back depending on where you want the bow.
Wrap the ends around your body, ensuring the ribbon stays flat against the fabric of the dress without twisting.
Pro Tip: If the dress has belt loops, thread the ribbon through them first to ensure it stays at the narrowest part of your waist.
Step 2: Create a Solid Base Knot
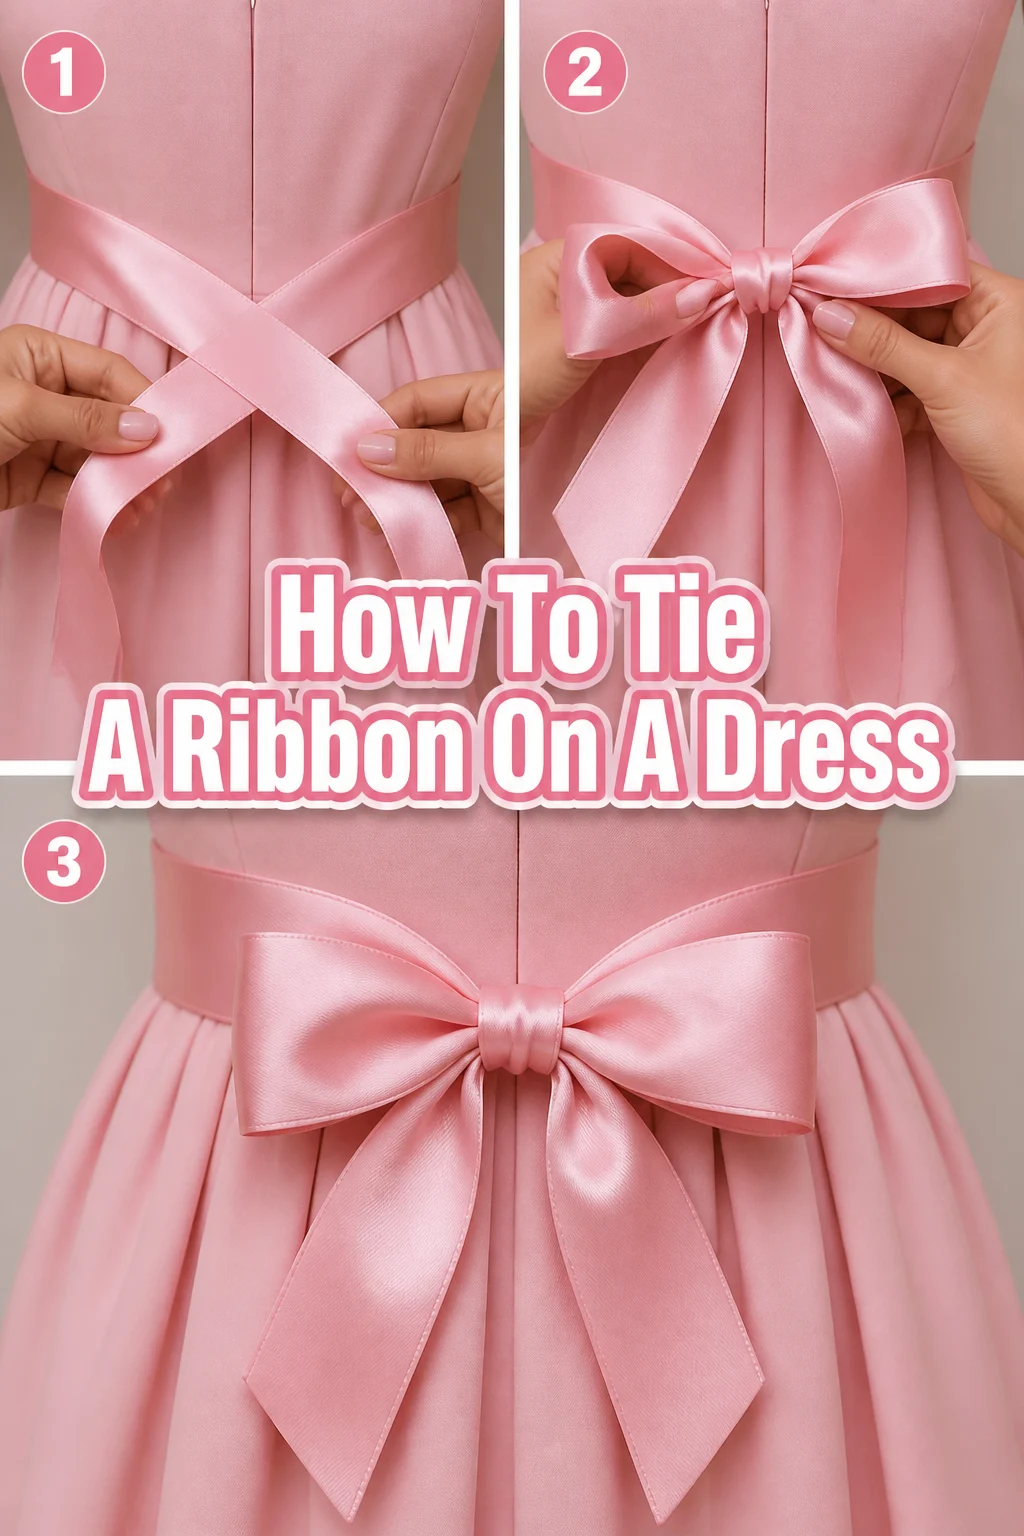
Cross the right side of the ribbon over the left side to create an “X” shape.

Tuck the top end under the bottom piece and pull it through the center hole.
Pull both ends firmly to create a snug base that won’t slip down while you are forming the loops.
Step 3: Form the First Loop
Take the bottom tail of the ribbon and fold it into a loop of your desired size.
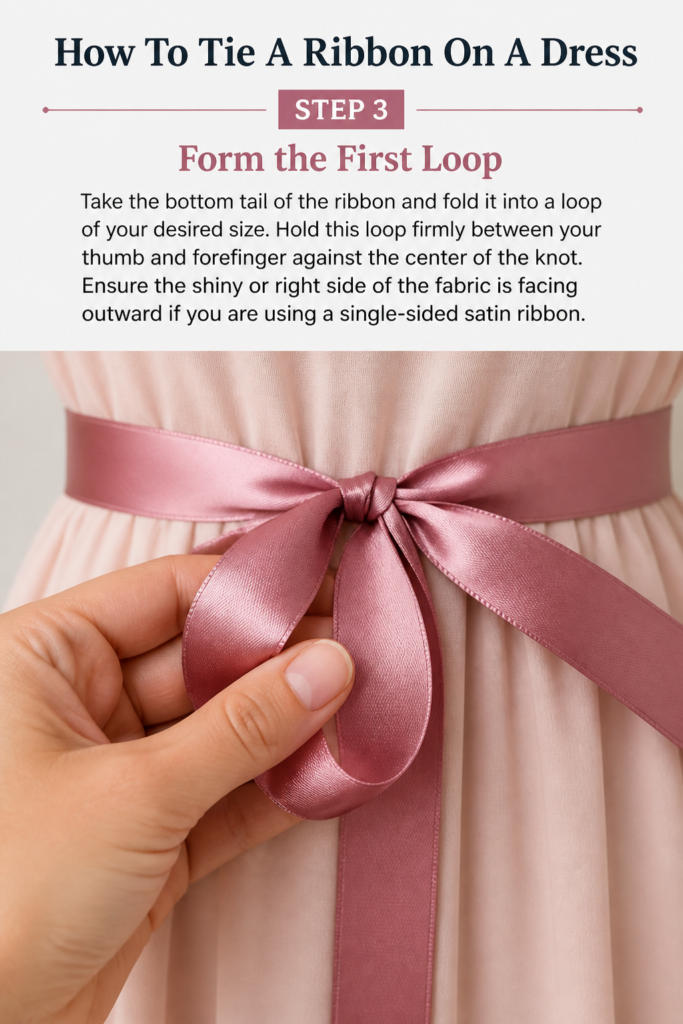
Hold this loop firmly between your thumb and forefinger against the center of the knot.
Ensure the shiny or “right” side of the fabric is facing outward if you are using a single-sided satin ribbon.
Step 4: Wrap the Second Tail
Grab the loose tail that is hanging down and bring it over the top of your first loop.
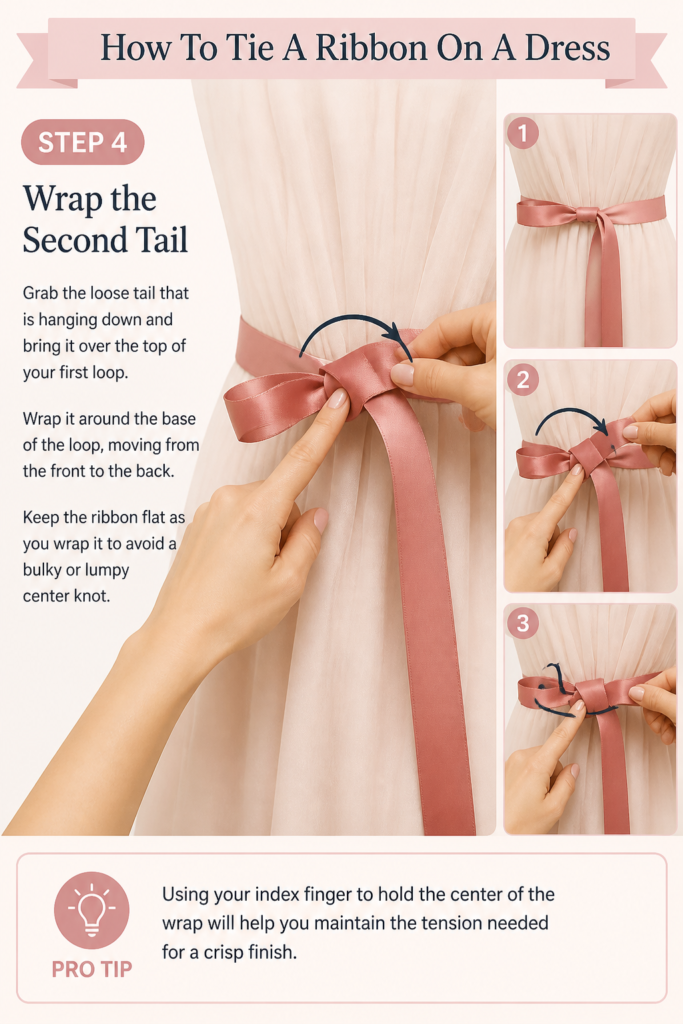
Wrap it around the base of the loop, moving from the front to the back.
Keep the ribbon flat as you wrap it to avoid a bulky or lumpy center knot.
Pro Tip: Using your index finger to hold the center of the wrap will help you maintain the tension needed for a crisp finish.
Step 5: Push Through the Second Loop
Locate the small opening you created behind the first loop while wrapping the second tail.
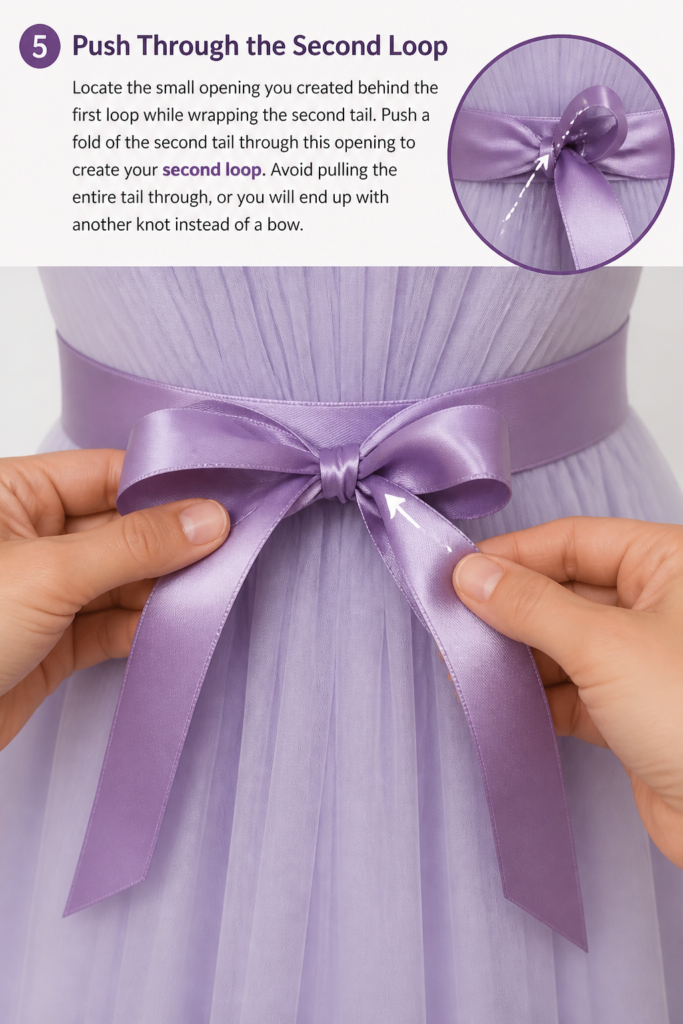
Push a fold of the second tail through this opening to create your second loop.
Avoid pulling the entire tail through, or you will end up with another knot instead of a bow.
Step 6: Adjust for Symmetry
Gently pull both loops simultaneously to tighten the center of the bow.
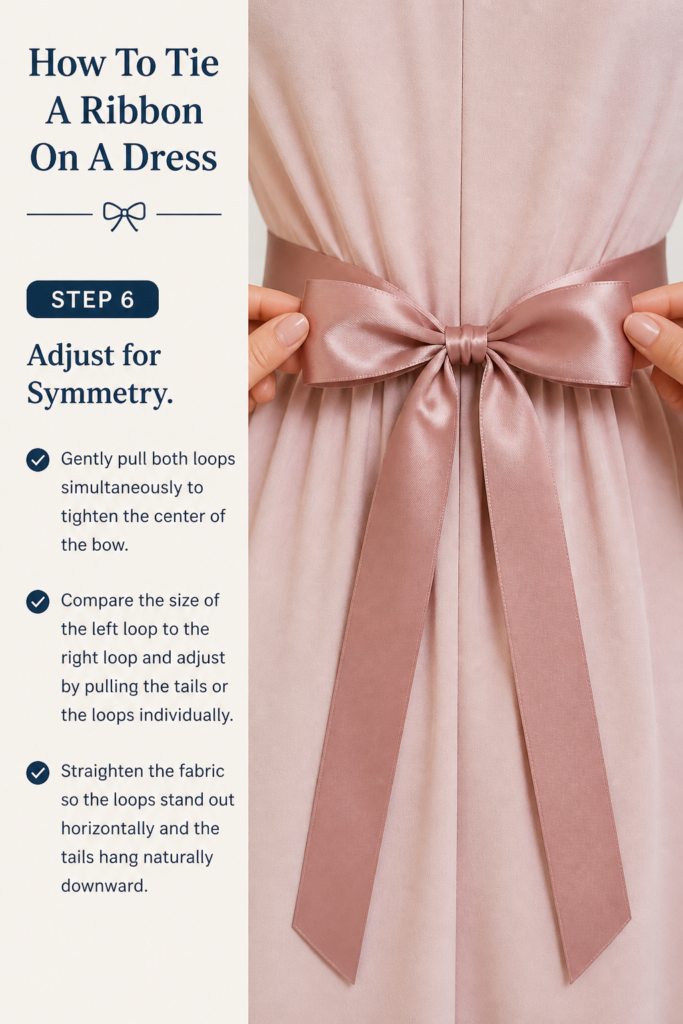
Compare the size of the left loop to the right loop and adjust by pulling the tails or the loops individually.
Straighten the fabric so the loops stand out horizontally and the tails hang naturally downward.
Step 7: Angle the Tails
Smooth the tails down with your hands to remove any static or wrinkles.
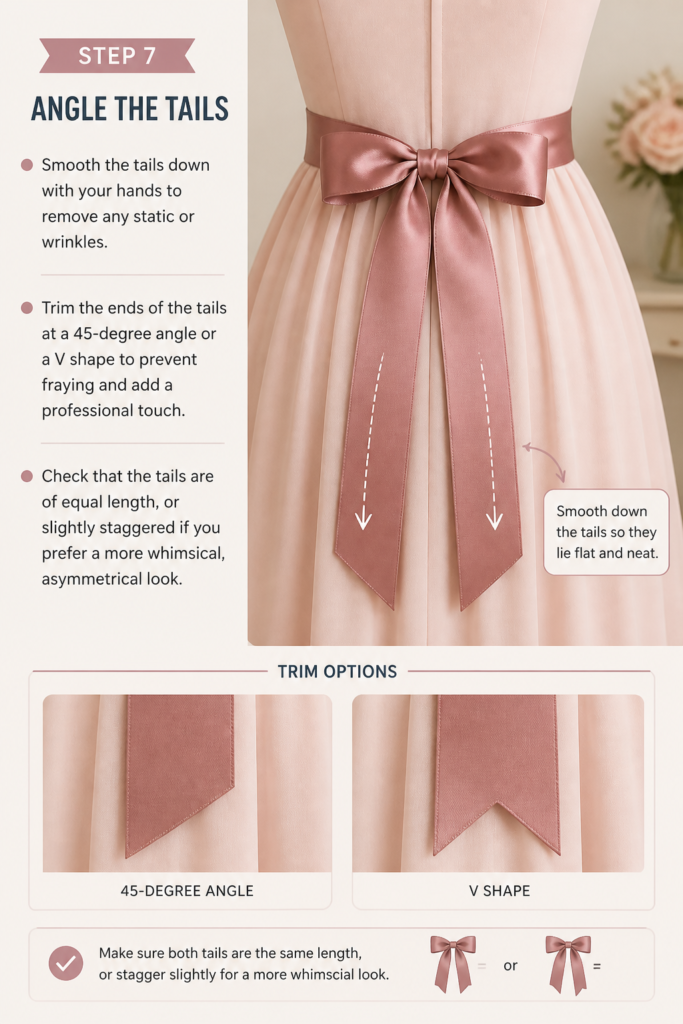
Trim the ends of the tails at a 45-degree angle or a “V” shape to prevent fraying and add a professional touch.
Check that the tails are of equal length, or slightly staggered if you prefer a more whimsical, asymmetrical look.
Common Mistakes to Avoid
The Upside Down Bow
Many people find their bow loops drooping downward instead of sitting horizontally. This usually happens when the second tail is wrapped in the wrong direction around the first loop.
To fix this, try wrapping the tail under the loop instead of over it, or vice versa, to see which direction keeps the loops upright on your specific fabric.
Over-Tightening the Knot
Pulling the initial knot too tight can cause the dress fabric to bunch and pucker uncomfortably. It can also make the center of the bow look tiny and pinched compared to the loops.
Aim for a snug fit that stays in place but allows the ribbon to sit flat against the waistline without distorting the silhouette of the dress.
Twisted Ribbon Loops
If the ribbon twists during the loop-making process, the bow will look messy and lose its luster. This is especially noticeable with satin ribbons that have a dull side and a shiny side.
Always keep the ribbon flat against your fingers as you work, and manually flip the fabric if you see the “wrong” side showing.
Troubleshooting
The Ribbon Keeps Slipping Down
Slippery fabrics like silk or high-sheen satin often slide down the waist throughout the day. This can ruin the proportions of your dress and feel frustrating.
Use a small safety pin hidden behind the knot to anchor the ribbon to the dress fabric or a seam. Alternatively, a small piece of double-sided fashion tape can keep the sash exactly where you want it.
The Loops Are Floppy
Wide ribbons or very soft materials often lack the structure to hold a crisp loop shape. They may sag under their own weight shortly after you tie them.
You can lightly spray the ribbon with hairspray or fabric stiffener before tying it. For a more permanent solution, consider inserting a thin piece of wire or stiff netting inside the loops to give them body.
Key Takeaways
- Preparation is key: Always find the center of the ribbon before you start to ensure the tails end up at equal lengths.
- Tension matters: Maintain a steady grip on the center knot to prevent the bow from falling apart while you adjust the loops.
- Check the “right” side: Keep the finished side of the ribbon facing out at every step for the most polished appearance.
- Trim for quality: Use sharp fabric scissors to cut the tails at an angle, which prevents fraying and looks more high-end.
- Anchor if necessary: Don’t be afraid to use fashion tape or pins if your ribbon is too slippery to stay in place on its own.
Frequently Asked Questions
How long should a ribbon sash be for a dress?
A standard sash is usually between 70 and 90 inches long. This length allows for enough fabric to wrap around the waist, tie a generous bow, and leave long, elegant tails.
If you prefer a smaller bow or have a very narrow waist, 60 inches may be sufficient. Always measure your waist and add at least 40 inches to account for the knot and loops.
What is the best type of ribbon for a dress bow?
Grosgrain ribbon is excellent for beginners because its ribbed texture provides grip, making it less likely to slip. It holds its shape very well and creates a sturdy, matte bow.
Satin ribbon is the most popular choice for formal wear due to its beautiful sheen. However, it is much more slippery and may require more practice or the use of fashion tape to stay secure.
Should I tie the bow in the front or the back?
Tying the bow in the back is the classic choice for bridal and formal gowns, as it creates a beautiful focal point as you walk away. It also keeps the front of the dress clean and streamlined.
A side-tied bow offers a more modern and playful look, often used for cocktail dresses or casual sun dresses. Front-tied bows are less common but can work well if the bow is small and the dress is very simple.
How do I stop the ribbon ends from fraying?
The most effective way to stop fraying is to cut the ends with very sharp scissors at a sharp angle. This reduces the stress on the fabric threads.
For synthetic ribbons like polyester satin, you can very carefully pass the cut edge near a flame to melt and seal the fibers. Be extremely cautious not to burn the fabric or your fingers.
Our Top Recommended Finds
- Double-Faced Satin Ribbon: This type of ribbon has a shiny finish on both sides. It makes tying much easier because you never have to worry about a “dull” side showing in your loops.
- Fabric Scissors: A dedicated pair of sharp sewing shears will give you a clean, crisp cut on your ribbon tails. Dull kitchen scissors will likely chew the fabric and cause immediate fraying.
- Double-Sided Fashion Tape: This is a lifesaver for slippery sashes. A small strip placed under the ribbon will keep your bow perfectly centered all night long.
Perfecting Your Signature Style
Tying the perfect bow is a skill that improves every time you practice it. Once you master the basic technique, you can experiment with different widths and textures to change the vibe of your favorite dresses.
Try using a velvet ribbon for a winter event to add a touch of luxury and warmth to your look. Alternatively, a sheer organza ribbon can add a light, airy feel to a summer wedding outfit.
Take a few minutes today to grab a spare piece of ribbon and practice these steps in front of a mirror. You will be surprised at how much confidence a perfectly placed bow can give you at your next big event.