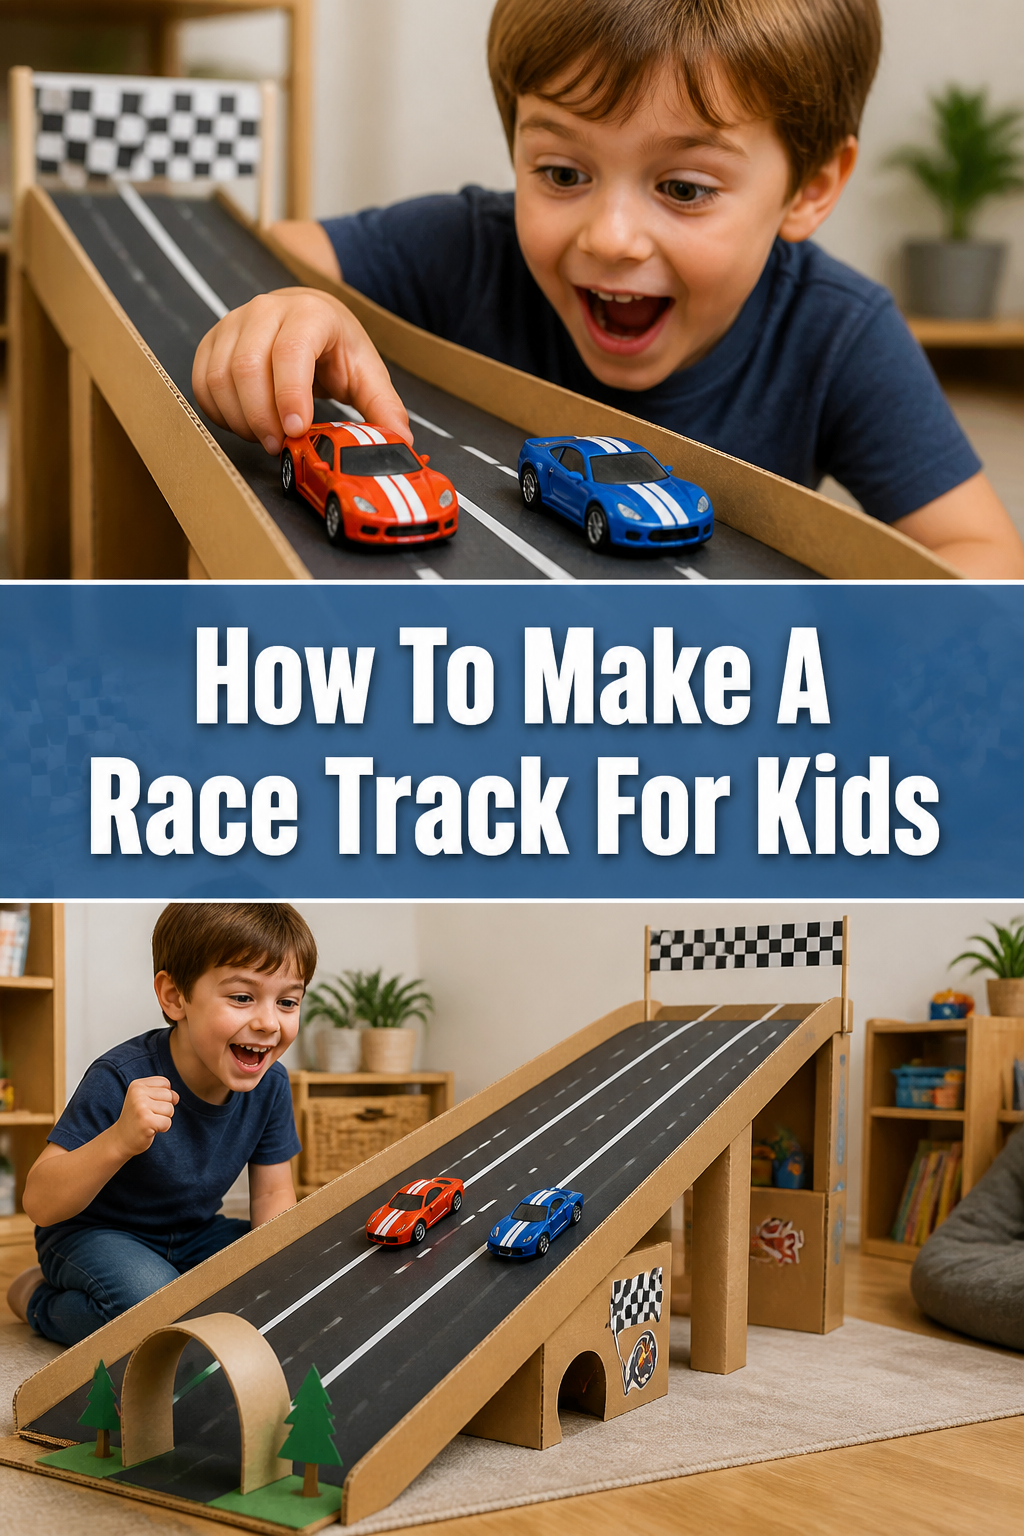
🏎️ How To Make A Race Track For Kids
Creating a race track for kids is a fantastic way to spark imagination and encourage active play. I remember countless hours spent with my own children, transforming simple household items into thrilling circuits for their toy cars. It’s an activity that brings so much joy and fosters creativity.
This guide will walk you through the process, ensuring you have all the practical steps to build an amazing track your kids will adore. You’ll be surprised at how easy it is to bring their racing dreams to life with just a few basic materials and a bit of enthusiasm.
Quick Overview
Get ready to construct an exciting race track that will provide hours of entertainment for your little racers. This project is all about creativity and making the most of everyday items.
- Time needed: 1-3 hours (depending on complexity)
- Difficulty: Beginner
- What you’ll need: Cardboard, tape, scissors, toy cars
Step-by-Step Instructions
Step 1: Gather Your Materials
The foundation of any great race track starts with the right supplies. Look around your home; you likely have most of what you need already. This step is about collecting everything before you begin building.
You will need a good amount of cardboard. Think large appliance boxes, moving boxes, or even sturdy shipping boxes. Flat sheets of cardboard are also excellent for track sections.
Strong adhesive tape is essential for connecting track pieces. Duct tape, masking tape, or painter’s tape all work well, with painter’s tape being gentler on surfaces if you plan to attach parts to walls or floors temporarily. Scissors or a utility knife (for adult use only) will be needed for cutting the cardboard.
Don’t forget markers, crayons, or paint for decorating your track later. Finally, gather a collection of toy cars to test your creation. Hot Wheels, Matchbox cars, or similar small vehicles are perfect.
Pro Tip: Collect various sizes and thicknesses of cardboard. Thinner pieces are great for curves, while thicker ones offer more stability for ramps and elevated sections.
Step 2: Choose Your Location and Layout
Deciding where your race track will live is crucial for its design and stability. Consider the available space and how it might influence the track’s shape. An open floor space, a long hallway, or even a sturdy table can serve as your base.
Think about the track’s overall footprint. Do you want a sprawling track that fills a room, or a compact design that fits neatly into a corner? Involve your kids in this decision; their ideas often lead to the most imaginative layouts.
Sketching a simple layout on paper can help visualize your ideas. Consider different elements like straightaways, sharp turns, ramps, and tunnels. This preliminary sketch doesn’t have to be perfect, just a guide.
Step 3: Design the Track Sections
Now for the fun part: shaping your track. Most race tracks are made up of straight sections, curves, and potentially some special features. Start by thinking about how many of each you’ll need.
For straight sections, simply cut long, rectangular strips of cardboard. The width of these strips should be wide enough for your toy cars to comfortably race side-by-side, plus a little extra room for barriers. Aim for a width of at least 4-6 inches for standard toy cars.
To create curves, you can gently bend longer, thinner pieces of cardboard into an arc. Alternatively, cut out curved shapes from larger cardboard sheets. Ensure the curve is smooth enough for cars to navigate without getting stuck.
Pro Tip: Use a dinner plate or a large bowl as a template to trace perfect curves onto your cardboard. This makes cutting much easier and more precise.
Step 4: Cut and Shape the Track Pieces
With your designs in mind, it’s time to bring them to life with cutting. Always use a cutting mat or a protected surface if using a utility knife. Adult supervision is essential for this step, especially with younger children.
Carefully cut out all your straight sections and curved pieces. Try to make the edges as clean as possible, as this will help with smooth connections later. If you’re making multiple copies of a particular curve, stack the cardboard and cut them simultaneously for consistency.
Consider adding small tabs or flaps to the ends of some pieces. These can be folded down and taped to the next section, providing a more secure connection. This technique is particularly useful for tracks that will be moved frequently.
Step 5: Assemble the Track Segments
This is where your race track starts to take shape. Begin by laying out your cut pieces according to your chosen design. Don’t tape anything permanently until you’re happy with the overall flow.
Once the layout looks good, start connecting the pieces with your tape. Apply tape generously to the underside of the track where two segments meet. This creates a strong, less visible bond.
For added stability, especially on the top side, you can run a strip of tape along the seam where two pieces connect. Make sure the tape is flat and smooth so it doesn’t impede the cars’ movement. Test each connection as you go to ensure it holds firm.
Step 6: Add Barriers and Ramps
No race track is complete without exciting features. Barriers are essential to keep cars from flying off the track during high-speed races. Cut strips of cardboard about 2-3 inches tall and tape them along the outer edges of your track sections.
Ramps add an exhilarating element to the track. To make a ramp, simply bend a piece of cardboard into an incline. Support the ramp with folded cardboard boxes or crumpled paper underneath to maintain its elevation. Ensure the incline isn’t too steep, or cars might struggle to get up or crash too hard on the way down.
You can also create tunnels by cutting an archway into a box and placing it over a track section. Bridges can be made by elevating a track section on supports, allowing another track or even a play area to pass underneath.
Pro Tip: For sturdy ramps, create a box-like structure underneath the incline. This provides solid support and prevents the ramp from collapsing during play.
Step 7: Decorate and Detail Your Track
Now it’s time to personalize your race track and make it truly unique. This is where kids can really let their creativity shine. Provide markers, crayons, paint, or even stickers.
Encourage them to draw racing stripes, checkered flags, sponsor logos, or even imaginary landscapes around the track. They can add pit stops, grandstands, or even a winner’s podium. This step transforms simple cardboard into a vibrant play world.
Consider adding small details like traffic cones (made from rolled paper), trees (cut from green paper), or even spectators (drawn on cardboard cutouts). These small touches enhance the immersive experience.
Step 8: Test and Refine
The final step before the grand opening is to test your track with the toy cars. Place a car at the starting line and give it a gentle push. Watch how it navigates the straightaways, curves, and special features.
Pay attention to any areas where cars might get stuck, fall off, or lose momentum. You might find that a curve is too sharp, a ramp is too steep, or a barrier isn’t tall enough. Make adjustments as needed. This could involve reinforcing connections, widening sections, or adjusting ramp angles.
Don’t be afraid to iterate. The best race tracks are often the result of a little trial and error. Once the track performs smoothly, it’s ready for hours of racing fun!
Common Mistakes to Avoid
Ignoring Track Stability
One frequent pitfall is not making the track stable enough. Flimsy connections or unsupported sections will lead to frustration as cars constantly derail or the track collapses. Always use plenty of tape on all seams, both top and bottom, and ensure elevated sections have solid supports underneath. Reinforce any wobbly areas immediately.
Overcomplicating the Design
It’s tempting to try and build the most elaborate track possible right away, but this can quickly become overwhelming. Starting with a simpler design and gradually adding features is a better approach. A basic loop with a ramp can be incredibly fun and much easier to manage than a multi-level, multi-lane behemoth for your first attempt.
Forgetting Safety First
While cardboard tracks are generally safe, sharp edges from cutting can pose a minor risk, especially for younger children. Always ensure all cut edges are smoothed down or covered with tape. If using a utility knife, it must be handled exclusively by an adult. Keep an eye on small pieces that could become choking hazards for very young children.
Troubleshooting
Cars Keep Falling Off
If your cars are constantly veering off the track, the barriers might be too low or the track might be too narrow. Increase the height of your cardboard barriers to at least 2-3 inches. You might also need to widen the track sections, particularly on curves, to give cars more room to maneuver without hitting the sides.
Track Sections Don’t Connect Smoothly
Rough or uneven connections between track segments can cause cars to stutter or stop. Ensure that the ends of your cardboard pieces are cut as straight as possible. When taping, try to align the edges perfectly and press the tape down firmly to create a seamless transition. Adding an extra strip of tape over the top seam can help smooth out any small bumps.
Track Lacks Excitement
If the track feels a bit bland, it’s time to add some dynamic elements. Introduce a new ramp, a tunnel, or even a small jump. You can also incorporate obstacles like a “puddle” (blue paper) or a “rocky patch” (crumpled brown paper) that cars have to navigate around. Decoration also plays a huge role in making the track visually engaging and exciting.
Key Takeaways
- Start by gathering all your materials, focusing on cardboard and strong tape.
- Plan your track layout in advance, considering the available space and desired complexity.
- Cut and shape track pieces carefully, ensuring consistent widths and smooth curves.
- Assemble the track securely with ample tape, reinforcing all connections.
- Incorporate exciting features like barriers, ramps, and tunnels to enhance play.
- Personalize the track with decorations to make it visually engaging and unique.
- Test the track thoroughly with toy cars and make any necessary adjustments for smooth racing.
- Prioritize stability and safety throughout the entire building process.
Frequently Asked Questions
What’s the best material for a race track?
Cardboard is hands-down the best material for a DIY kids’ race track due to its versatility, availability, and ease of cutting and shaping. It’s also inexpensive and can be recycled, making it an eco-friendly choice. For added durability, thick appliance boxes work wonderfully.
How can I make it reusable?
To make your track reusable, design it in modular sections that can be easily connected and disconnected. Use painter’s tape for connections, as it’s less aggressive than duct tape and allows for easier disassembly without damaging the cardboard. Store the sections flat or neatly stacked to prevent bending and damage.
What age group is this best for?
This project is suitable for a wide range of ages. Younger children (preschoolers) will enjoy the decorating and playing aspects, with adults handling the cutting and assembly. Older children (elementary school age) can actively participate in designing, cutting (with supervision), and building, making it a collaborative and educational activity.
Our Top Recommended Finds
- Large Cardboard Sheets: Perfect for a blank canvas, allowing you to cut custom pieces without being limited by pre-folded boxes.
- Painter’s Tape (Blue or Green): Offers strong adhesion for assembly but is gentler on surfaces and easier to remove if you want to reuse track sections.
- Assorted Toy Car Set: A fresh set of diverse cars ensures plenty of racing action and can inspire new track designs for different vehicle types.
Build Their Dreams: The Race Is On!
You now have all the knowledge and practical steps to create an incredible race track for the kids in your life. This isn’t just about building a toy; it’s about building memories, fostering creativity, and encouraging imaginative play. The satisfaction of seeing their faces light up as their cars zoom around a track they helped create is truly priceless.
Don’t wait! Gather your materials, invite the kids to the design table, and start building today. Whether it’s a simple loop or an elaborate multi-level course, the adventure of making and playing will be a rewarding experience for everyone involved. Get ready to hear the cheers of triumph and the excited sounds of miniature engines roaring to life!