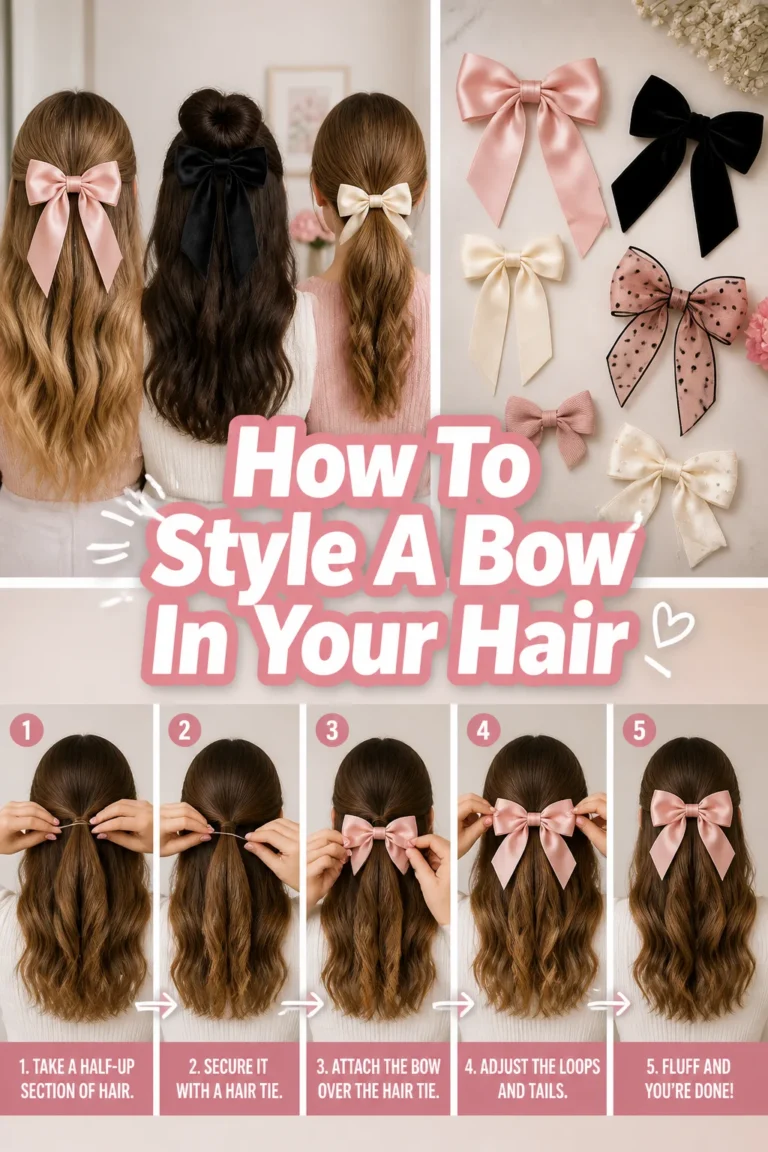
🌸 How To Tie A Head Scarf With Braids
Transforming your look with a simple accessory is pure magic. I’ve spent years experimenting with hair and scarves, discovering how braids add an extra layer of charm. This guide shares my best tricks for a stunning, secure style that feels uniquely you.

Quick Overview
This guide will walk you through creating a beautiful and stable head scarf style that perfectly complements your braids. You’ll learn how to prepare your hair, choose the right scarf, and tie it securely for a chic finish.
- Time needed: 15-25 minutes (depending on braid complexity and scarf style)
- Difficulty: Intermediate
- What you’ll need: A head scarf, hair ties, bobby pins, hairspray (optional)
Step-by-Step Instructions
Step 1: Prepare Your Braids and Hairline
Start with clean, dry braids. Ensure your braids are neatly done and securely tied at the ends. This foundation is crucial for a smooth scarf application.
You might want to apply a light edge control or gel to your hairline. This helps to smooth down any flyaways and creates a polished base for your scarf. Neatly styled edges frame your face beautifully.
• Refresh your braids if they are a few days old.
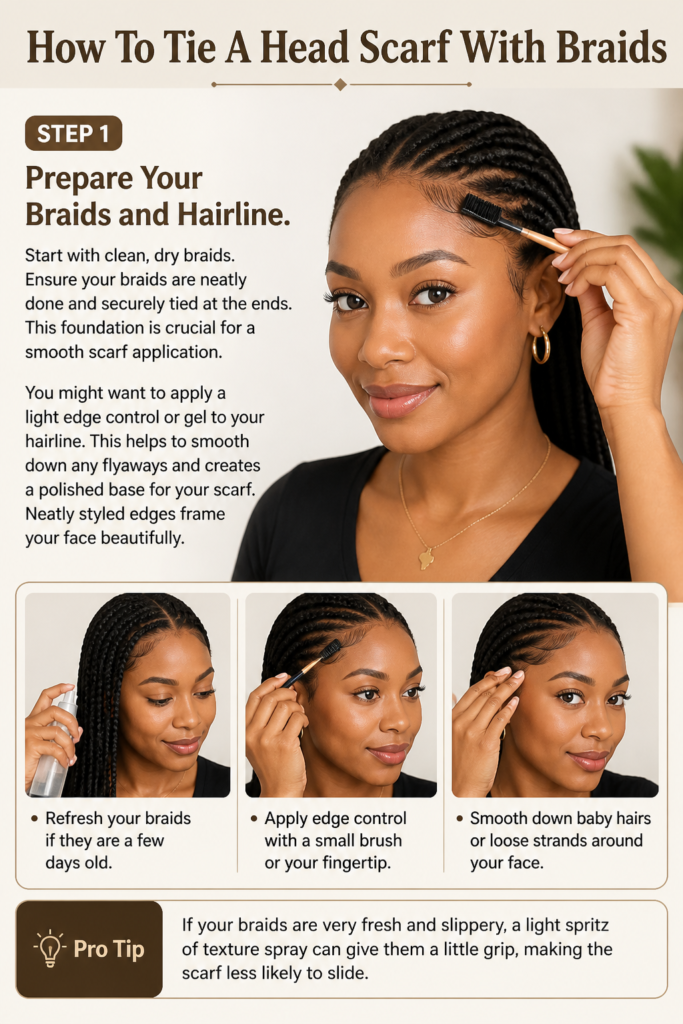
• Apply edge control with a small brush or your fingertip.
• Smooth down baby hairs or loose strands around your face.
Pro Tip: If your braids are very fresh and slippery, a light spritz of texture spray can give them a little grip, making the scarf less likely to slide.
Step 2: Choose Your Scarf Wisely
The right scarf makes all the difference in comfort and style. Consider the fabric, size, and shape of your scarf before you begin. Different materials offer varying levels of hold and drape.
A square scarf offers versatility for various folds, while a rectangular one is great for wider coverage. Silk or satin scarves are gentle on hair, but cotton or rayon can provide more grip.
• Select a scarf made from cotton, rayon, or a blend for better grip.

• Opt for silk or satin if you prioritize hair protection and a sleek look.
• Consider the size: a larger scarf (e.g., 36×36 inches or larger) offers more styling options.
Pro Tip: For beginners, a medium-weight cotton or linen blend scarf is often easiest to work with as it’s less prone to slipping than pure silk.
Step 3: Fold Your Scarf for the Desired Style
How you fold your scarf determines its shape and how it will sit on your head. There are several common folding techniques, each leading to a different final look. Experiment to find what works best for your chosen style.
A triangular fold creates a point, often used for classic head wraps. A rectangular fold results in a band, perfect for a turban or headband style.
• For a triangular fold: Lay the scarf flat, then fold one corner to meet the opposite corner, forming a triangle.
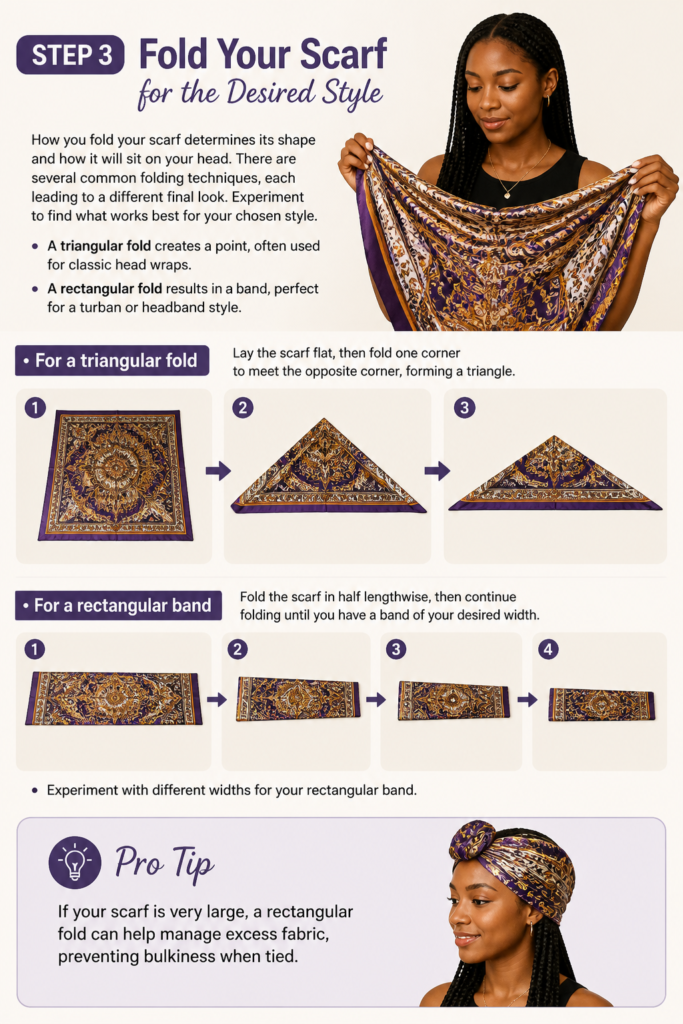
• For a rectangular band: Fold the scarf in half lengthwise, then continue folding until you have a band of your desired width.
• Experiment with different widths for your rectangular band.
Pro Tip: If your scarf is very large, a rectangular fold can help manage excess fabric, preventing bulkiness when tied.
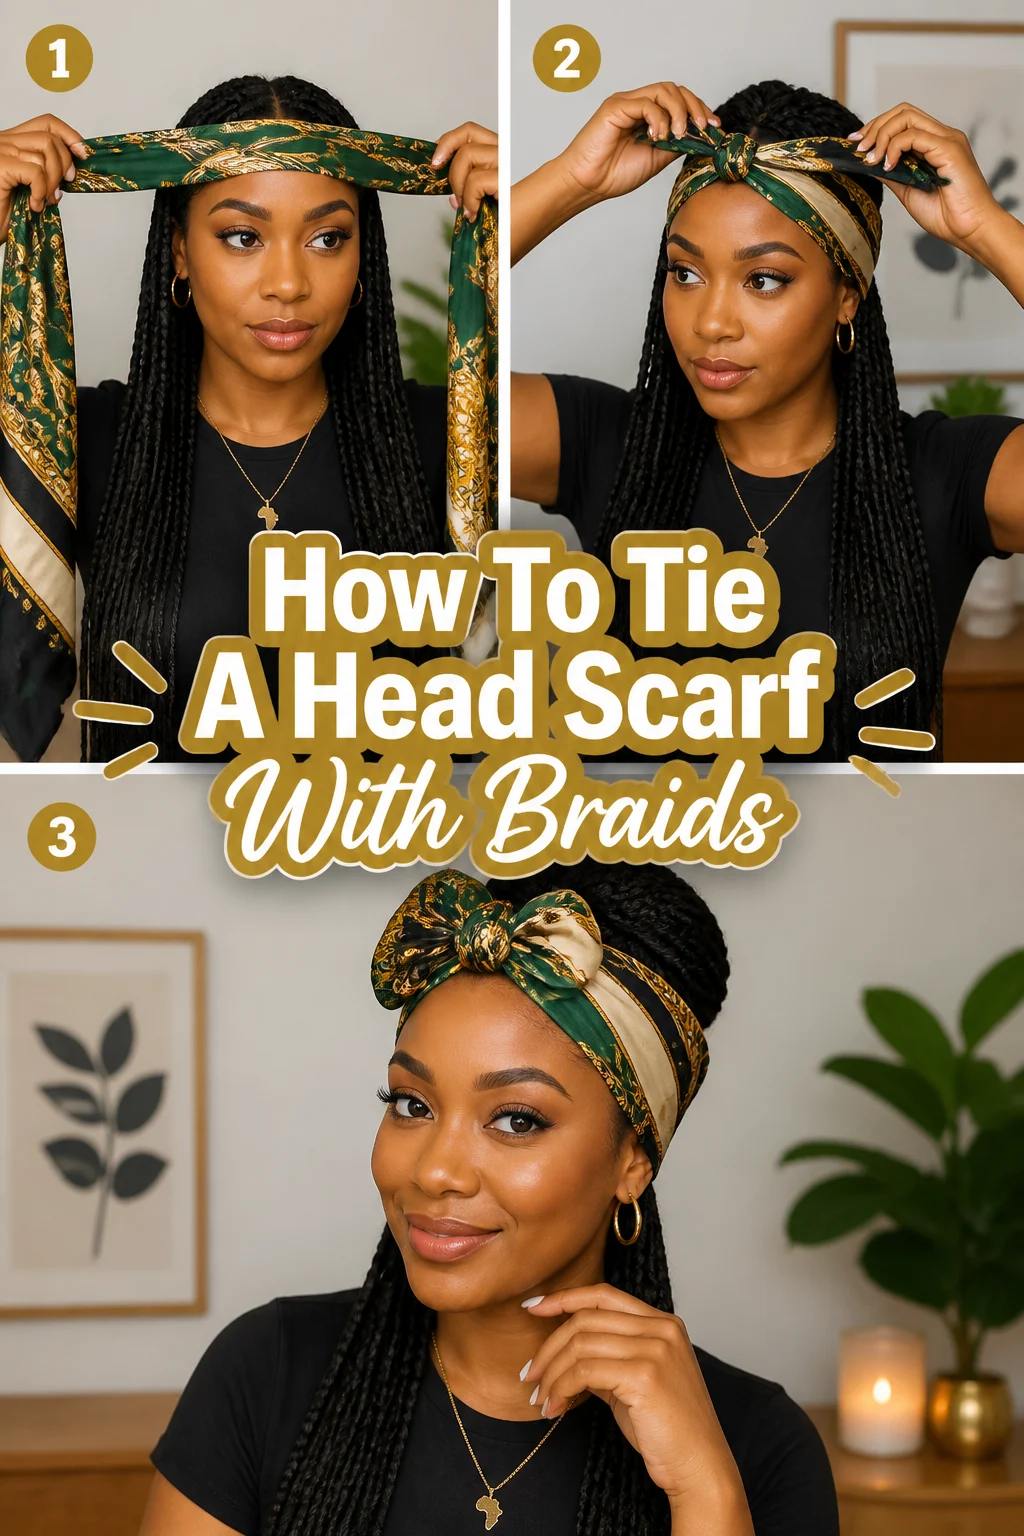
Step 4: Position the Scarf on Your Head
The starting position of your scarf dictates the overall look and how secure it will feel. You can place it at your nape, across your forehead, or just behind your hairline. Each position creates a distinct aesthetic.
Ensure the scarf is centered and evenly distributed across your head. This prevents an off-kilter appearance and helps maintain balance.
• For a classic turban: Place the folded scarf at the nape of your neck, bringing the ends forward.
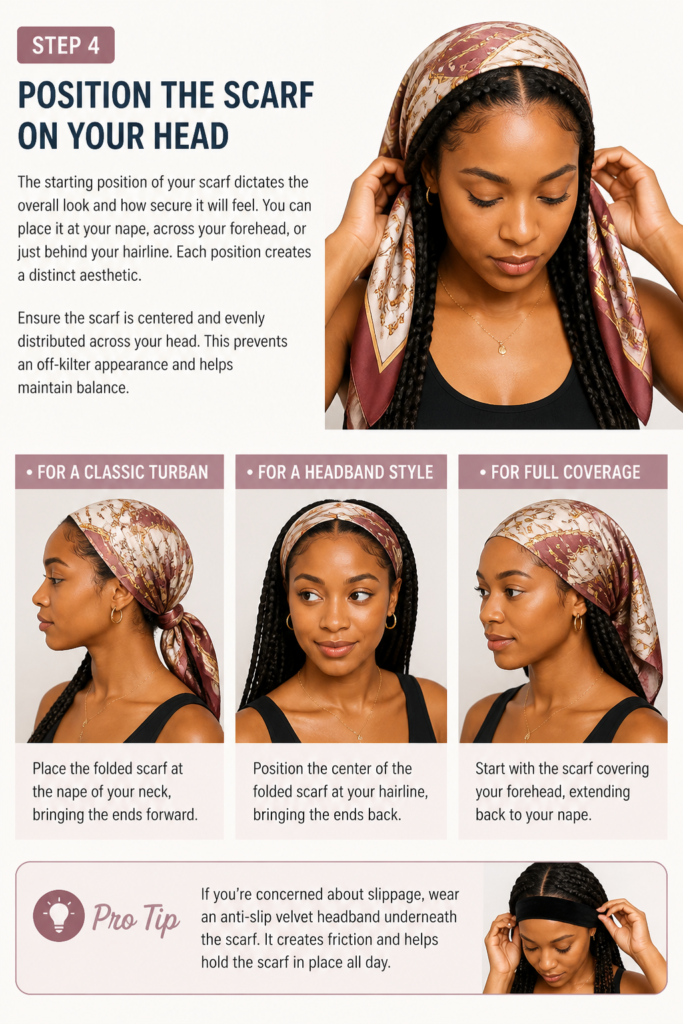
• For a headband style: Position the center of the folded scarf at your hairline, bringing the ends back.
• For full coverage: Start with the scarf covering your forehead, extending back to your nape.
Pro Tip: If you’re concerned about slippage, wear an anti-slip velvet headband underneath the scarf. It creates friction and helps hold the scarf in place.
Step 5: Begin Tying the Scarf
This is where the magic happens as you start to shape your style. The initial tie should be firm but not uncomfortably tight. You want it secure enough to hold, but loose enough to adjust.
Cross the ends of the scarf over each other. The direction you cross them and where you make the first knot will define the next steps.
• Bring the two ends of the scarf forward (if starting from the nape) or backward (if starting from the hairline).
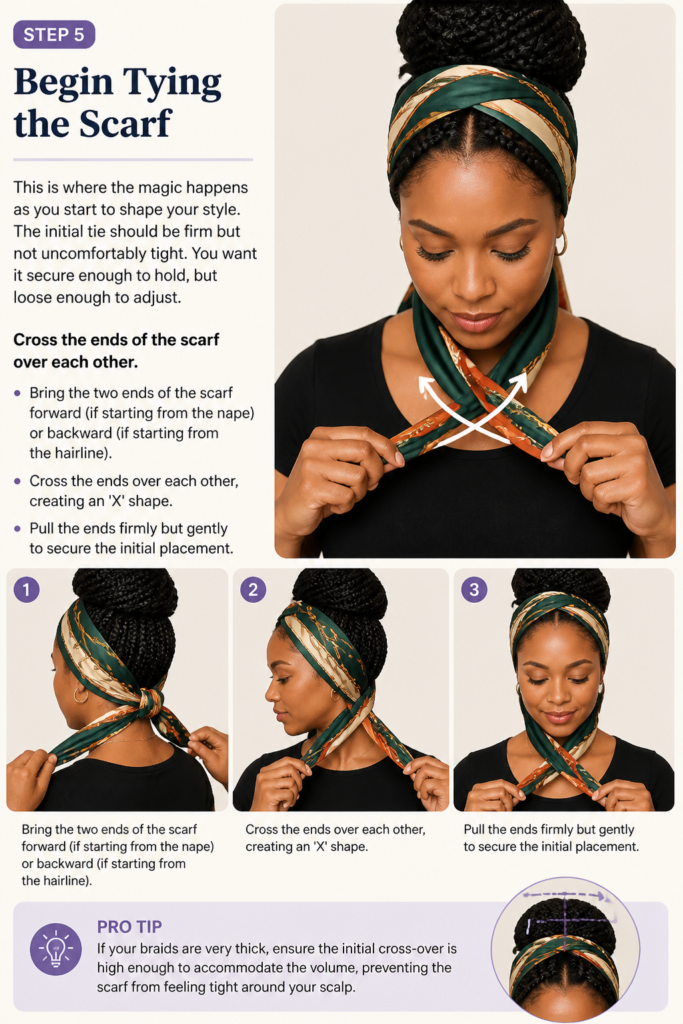
• Cross the ends over each other, creating an ‘X’ shape.
• Pull the ends firmly but gently to secure the initial placement.
Pro Tip: If your braids are very thick, ensure the initial cross-over is high enough to accommodate the volume, preventing the scarf from feeling tight around your scalp.
Step 6: Create Your Knot or Wrap Style
Now, choose your desired knot or wrap. This could be a simple knot, an elegant bow, or a full turban wrap. Each option adds its unique flair to your braided look.
Twist, knot, or loop the scarf ends according to your chosen style. Take your time to ensure the folds are neat and even.
• For a simple knot: Tie the ends into a double knot at the front, side, or back of your head.
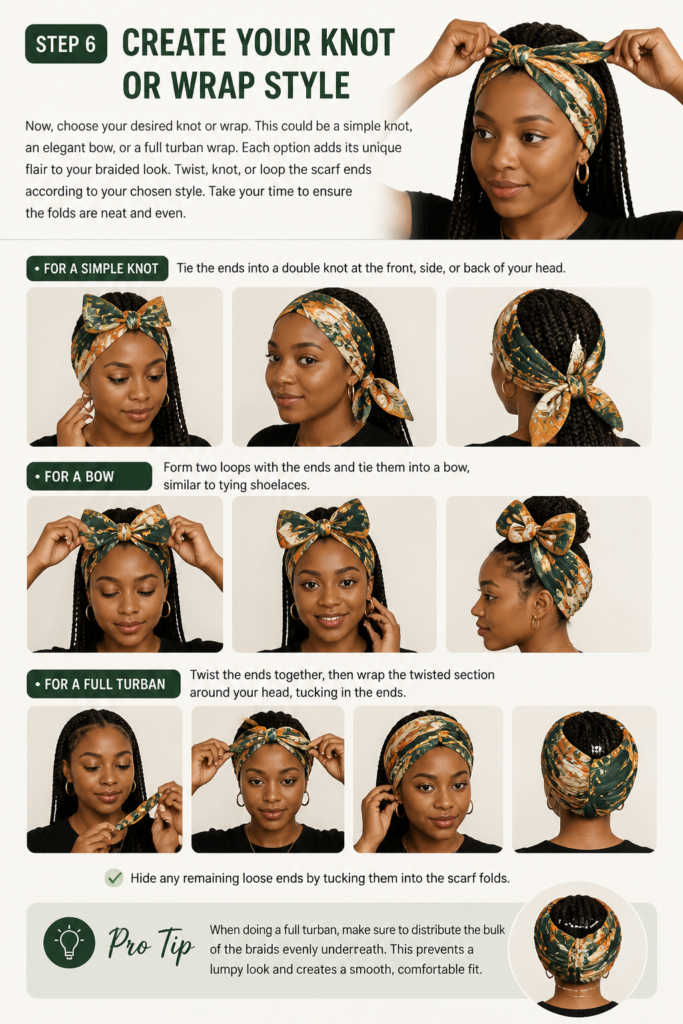
• For a bow: Form two loops with the ends and tie them into a bow, similar to tying shoelaces.
• For a full turban: Twist the ends together, then wrap the twisted section around your head, tucking in the ends.
• Hide any remaining loose ends by tucking them into the scarf folds.
Pro Tip: When doing a full turban, make sure to distribute the bulk of the braids evenly underneath. This prevents a lopsided or uncomfortable fit.
Step 7: Secure and Adjust for Comfort and Style
The final touches ensure your scarf is comfortable, secure, and looks impeccable. Use bobby pins to anchor any loose edges or folds. A few strategically placed pins can make a huge difference.
Gently tug and adjust the scarf to ensure it covers what you want it to cover. Check for any uncomfortable pressure points.
• Use bobby pins to secure the scarf to your braids or the underlying hair.
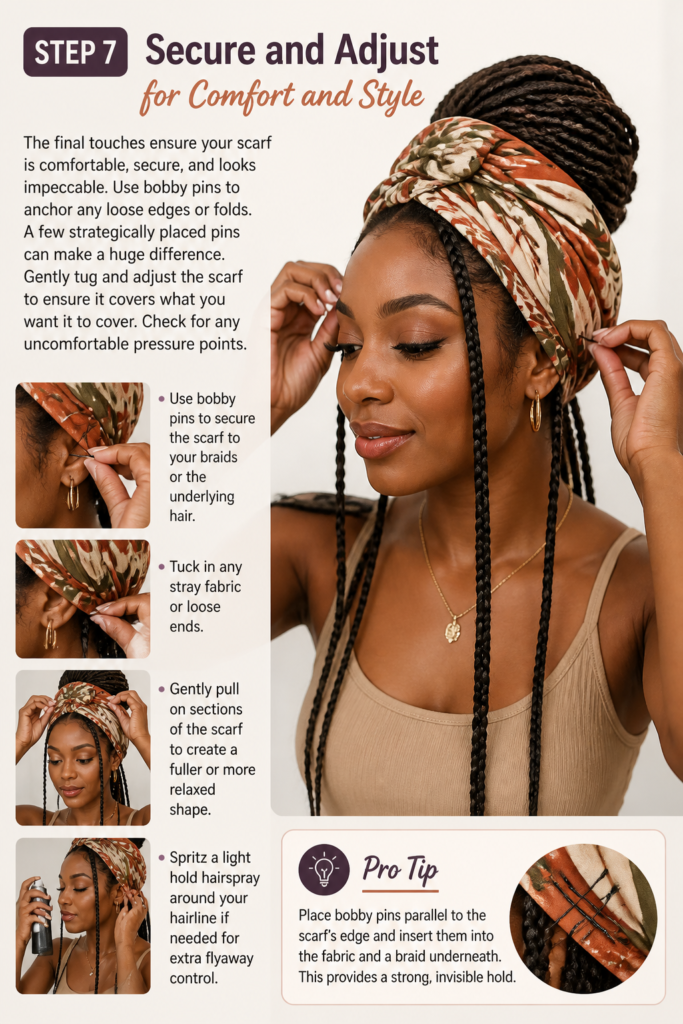
• Tuck in any stray fabric or loose ends.
• Gently pull on sections of the scarf to create a fuller or more relaxed shape.
• Spritz a light hold hairspray around your hairline if needed for extra flyaway control.
Pro Tip: Place bobby pins parallel to the scarf’s edge and insert them into the fabric and a braid underneath. This provides a strong, invisible hold.
Step 8: Showcase Your Braided Scarf Style
With your scarf securely tied and adjusted, you’re ready to show off your beautiful look. Take a moment to admire your work. This style combines the elegance of a scarf with the texture of your braids.
Walk with confidence, knowing your style is both fashionable and practical. Your braids are protected, and you’ve added a chic accessory to your outfit.
• Do a quick head shake test to ensure everything feels secure.
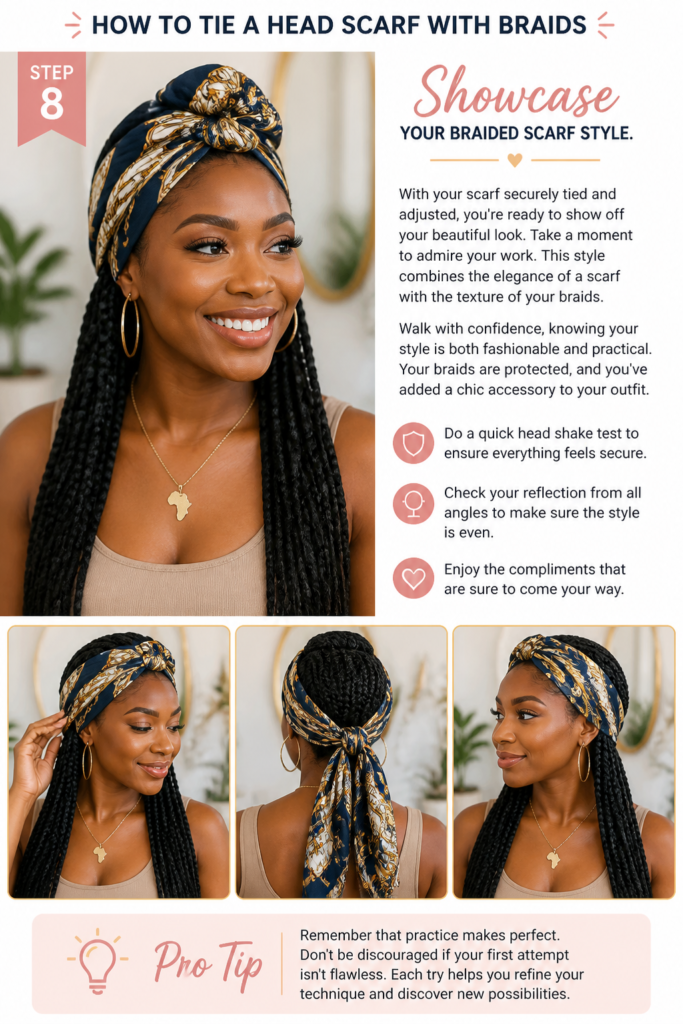
• Check your reflection from all angles to make sure the style is even.
• Enjoy the compliments that are sure to come your way.
Pro Tip: Remember that practice makes perfect. Don’t be discouraged if your first attempt isn’t flawless. Each try helps you refine your technique and discover new possibilities.
Common Mistakes to Avoid
Choosing the Wrong Scarf Fabric
Using a scarf made from a very slippery material like pure silk can be frustrating. While luxurious, silk often struggles to stay in place, especially over smooth braids. This leads to constant readjusting and a less secure style.
Instead, opt for fabrics with a bit more texture, such as cotton, rayon, or a blend. These materials provide better grip against your hair and braids, ensuring your scarf stays put throughout the day. If you love silk, consider layering it over a cotton anti-slip band.
Braids Too Loose or Too Tight
The tension of your braids plays a significant role in comfort and how well the scarf sits. Braids that are too loose might allow the scarf to slip or create an uneven surface. Braids that are too tight can cause discomfort under the scarf, leading to headaches.
Ensure your braids are firm but not pulling at your scalp. They should feel secure and neat. This provides an optimal base for the scarf, allowing it to sit comfortably and stably.
Improper Scarf Placement
Starting the scarf in the wrong position on your head can lead to an awkward look or constant slippage. Placing it too far back might expose your hairline too much, while too far forward can cover your face. An uneven start also makes the final style look lopsided.
Always center the scarf and ensure it’s positioned where you intend. Take a moment to check its alignment before tying the first knot. Correct placement from the beginning saves you effort later on.
Forgetting to Secure with Pins
Many people skip the crucial step of using bobby pins, only to find their scarf unraveling or shifting. Relying solely on knots, especially with active movement, is often not enough to maintain a secure style, particularly with braids adding volume.
Always incorporate a few bobby pins into your routine. They act as anchors, securing the scarf to your braids or the hair underneath. Place them discreetly within the folds for an invisible yet powerful hold.
Troubleshooting
Scarf Keeps Slipping
If your scarf consistently slides off, the issue might be a combination of fabric choice and lack of grip. Smooth braids and silky scarves don’t offer much friction, making it hard for the scarf to stay put. This can be incredibly annoying throughout the day.
Try wearing a velvet anti-slip headband underneath your scarf. This creates the necessary friction. You can also spritz your braids with a texturizing spray before tying the scarf, or choose a scarf made from a grippier material like cotton.
Style Feels Uncomfortable or Too Tight
A scarf style that pulls or feels too constricting can quickly ruin your day. This discomfort often stems from tying the scarf too tightly or from braids that are already too taut. You shouldn’t feel pain or excessive pressure on your scalp.
Loosen the initial tie and re-adjust the scarf. Ensure your braids are not excessively tight to begin with. If the issue is bulk from your braids, try a different scarf fold or a larger scarf to distribute the volume more evenly.
Braids Look Messy Under Scarf
Sometimes, despite your best efforts, your braids might appear lumpy or uneven under the scarf. This can detract from the polished look you’re aiming for. It usually happens if braids are not neatly laid or if the scarf is tied too loosely in certain areas.
Ensure your braids are neatly arranged and lying flat against your head before applying the scarf. Use bobby pins to flatten any particularly bulky sections of braids. When tying, make sure the scarf’s tension is even across your head to smooth out any bumps.
Key Takeaways
- Preparation is paramount: Always start with neatly styled and refreshed braids for the best foundation.
- Scarf choice matters: Select fabrics and sizes that offer both style and necessary grip.
- Folding dictates style: Your initial scarf fold largely determines the final look and manages bulk.
- Secure with pins: Don’t skip bobby pins; they are essential for a long-lasting and stable style.
- Comfort is key: Ensure the scarf is tied firmly but never uncomfortably tight.
- Experiment and personalize: Practice different folds and knots to find what suits your braids and face shape best.
Frequently Asked Questions
Can I do this with short braids?
Absolutely! This technique works wonderfully with shorter braids like box braids, cornrows, or even braided bobs. The key is ensuring your braids are securely tied at the ends and neatly laid against your scalp. You might find a smaller scarf or a rectangular fold more manageable with shorter lengths.
What’s the best scarf size for a turban style?
For a full, voluminous turban style that completely covers your head and braids, a large square scarf is ideal. Look for sizes 36×36 inches (90×90 cm) or larger. This provides ample fabric for wrapping and creating beautiful folds without feeling too bulky or short.
How do I protect my braids under a scarf?
To protect your braids, especially from friction and frizz, choose a scarf with a satin or silk lining, or wear a separate satin bonnet or cap underneath. These materials reduce snagging and help retain moisture, keeping your braids fresh and neat for longer.
Can I sleep with a head scarf on?
Yes, you can definitely sleep with a head scarf on! Many people do this to protect their braids, maintain their style, and reduce frizz. Opt for a comfortable, breathable scarf, ideally made of silk or satin, to minimize friction and prevent your braids from getting matted overnight.
Our Top Recommended Finds
- Satin-Lined Head Scarf: These scarves provide the beauty of an outer fabric with the hair-protecting benefits of satin on the inside, reducing friction and preserving your braids.
- Velvet Anti-Slip Scarf Grip Band: Worn underneath your scarf, this soft band creates friction against your hair and the scarf fabric, preventing slippage throughout the day.
- Fine-Toothed Rat Tail Comb: Perfect for creating precise parts for your braids and smoothing down edges before applying your scarf, ensuring a neat and polished look.
Your Braided Scarf Journey Begins Now
Styling a head scarf with braids is more than just covering your hair; it’s an expression of creativity and personal flair. You now have the practical steps to master this elegant look. From choosing the perfect scarf to securing every fold, you’re equipped to create a style that truly shines.
Don’t hesitate to experiment with different colors, patterns, and tying techniques. Each attempt builds your confidence and helps you discover new favorites. Embrace the journey of transforming your braids with this versatile accessory. Start practicing today and unlock a world of stylish possibilities.