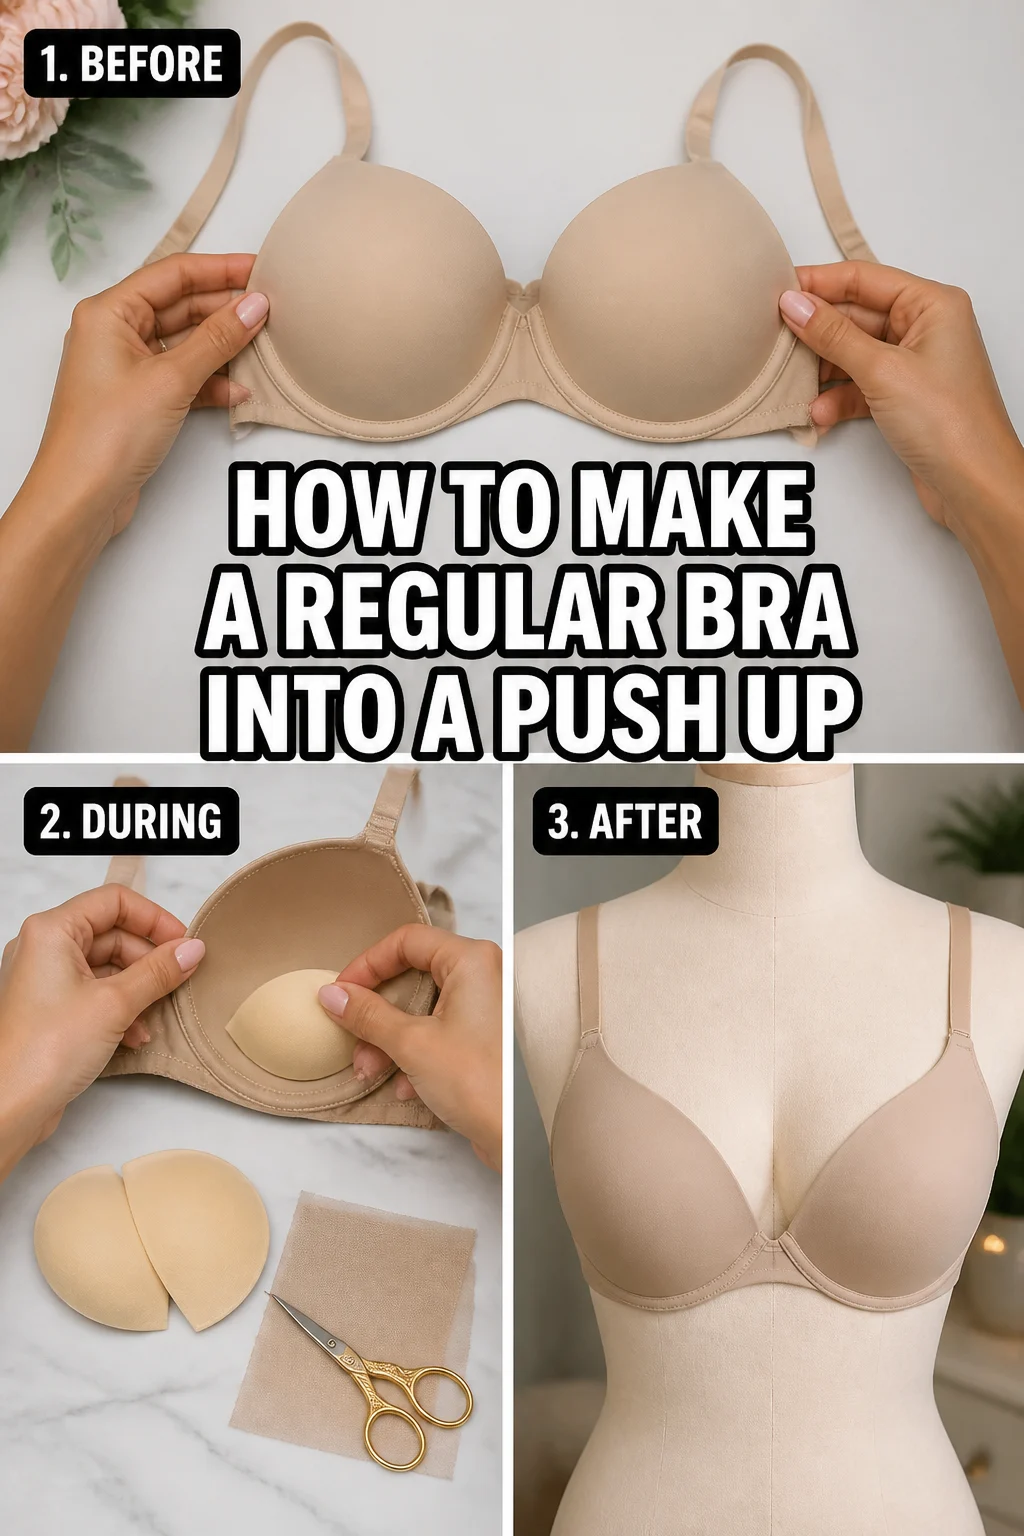
⬆️ How To Make A Regular Bra Into A Push Up
Feeling a little flat in your favorite outfit can be frustrating. Sometimes, a regular bra just doesn’t give you the lift and shape you want. I’ve been there, staring at my wardrobe and wishing for a little extra oomph.
This guide comes from countless personal experiments and a desire to make my existing bras work harder for me. You don’t always need a brand-new bra to achieve a flattering push-up effect.
With a few simple tricks and readily available items, you can transform your everyday support into something truly special.
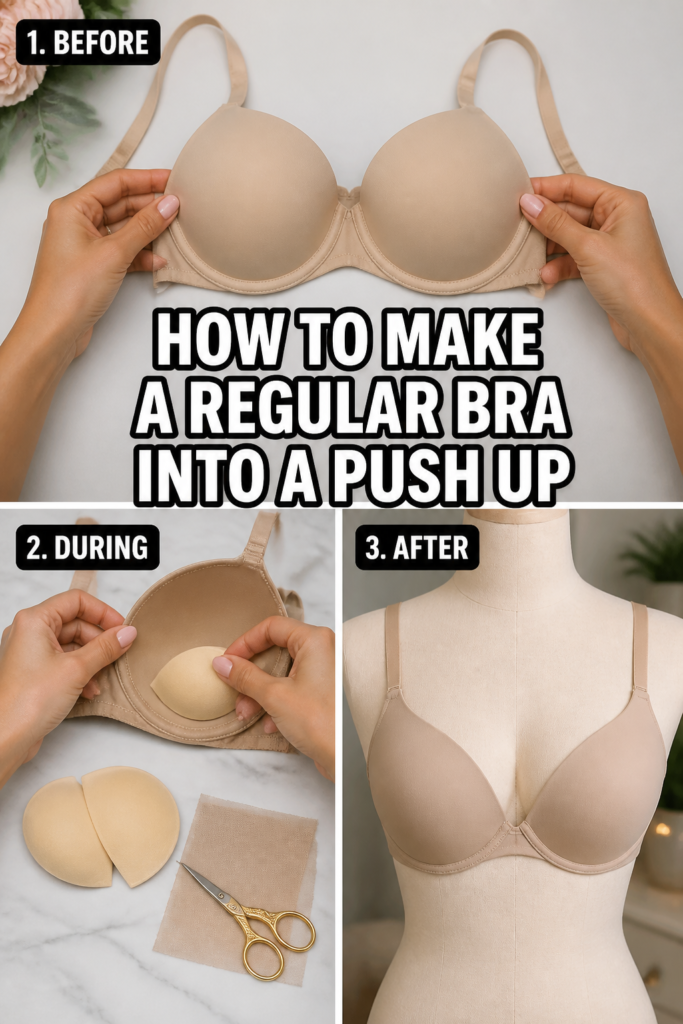
Quick Overview
This guide will walk you through the practical steps to enhance your bra’s lift and create a push-up effect. You’ll learn various techniques, from temporary fixes to more integrated solutions. The goal is to achieve a comfortable, natural-looking boost without buying a new bra.
- Time needed: 10-30 minutes (depending on method)
- Difficulty: Beginner
- What you’ll need: Your regular bra, various padding options (silicone inserts, fabric pads, even household items), scissors, fashion tape, needle and thread (optional).
Step-by-Step Instructions
Step 1: Understand Your Bra’s Potential
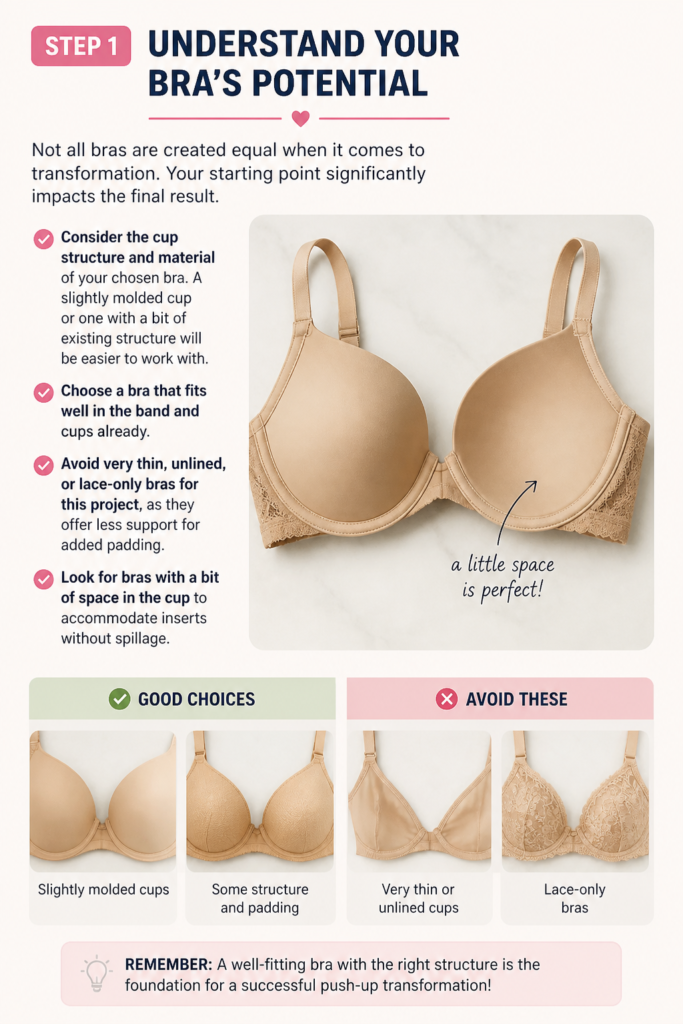
Not all bras are created equal when it to transformation. Your starting point significantly impacts the final result.
Consider the cup structure and material of your chosen bra. A slightly molded cup or one with a bit of existing structure will be easier to work with.
Choose a bra that fits well in the band and cups already.
Avoid very thin, unlined, or lace-only bras for this project, as they offer less support for added padding.
Look for bras with a bit of space in the cup to accommodate inserts without spillage.
Step 2: Gather Your Padding Options
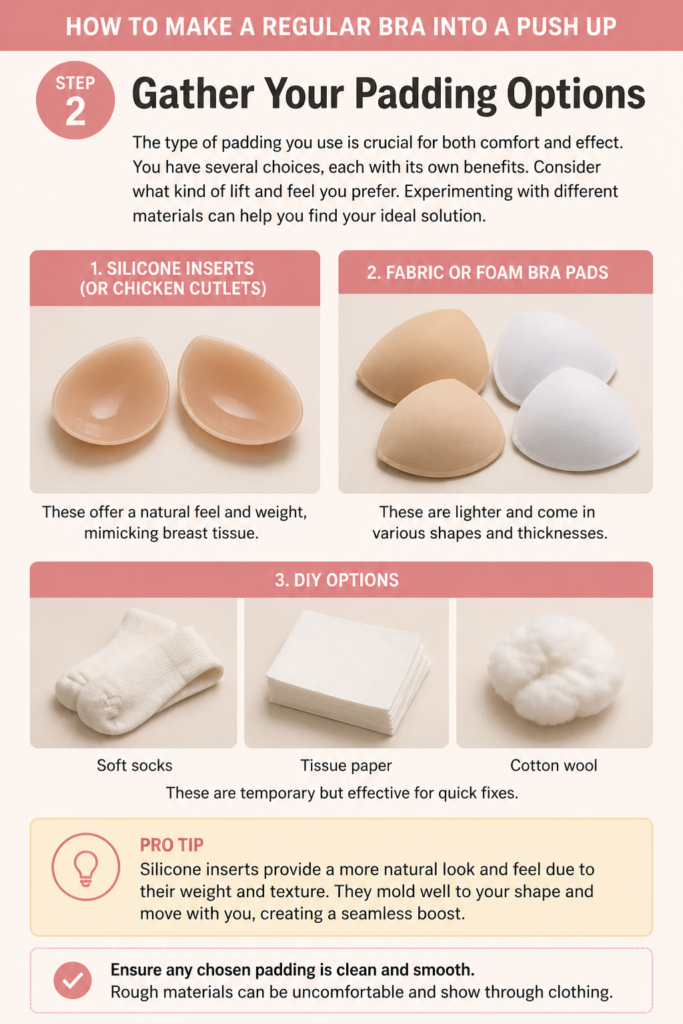
The type of padding you use is crucial for both comfort and effect. You have several choices, each with its own benefits.
Consider what kind of lift and feel you prefer. Experimenting with different materials can help you find your ideal solution.
Acquire silicone bra inserts or “chicken cutlets.” These offer a natural feel and weight, mimicking breast tissue.
Find fabric or foam bra pads. These are lighter and come in various shapes and thicknesses.
Consider DIY options like soft socks, tissue paper, or even cotton wool. These are temporary but effective for quick fixes.
Ensure any chosen padding is clean and smooth. Rough materials can be uncomfortable and show through clothing.
Pro Tip: Silicone inserts provide a more natural look and feel due to their weight and texture. They mold well to your body.
Step 3: Position the Padding for Lift
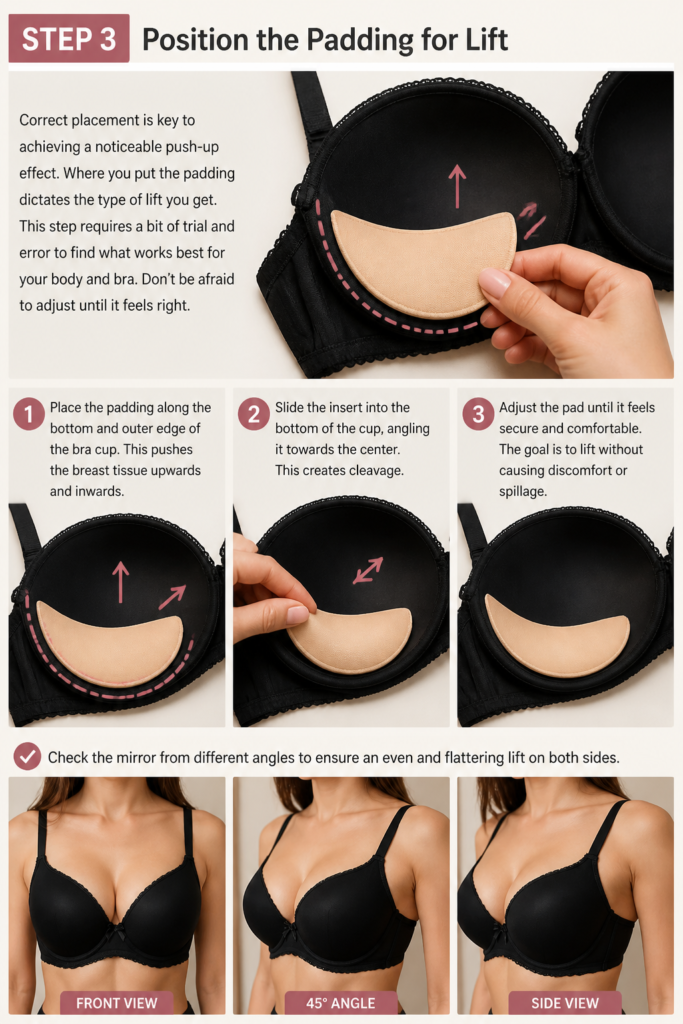
Correct placement is key to achieving a noticeable push-up effect. Where you put the padding dictates the type of lift you get.
This step requires a bit of trial and error to find what works best for your body and bra. Don’t be afraid to adjust until it feels right.
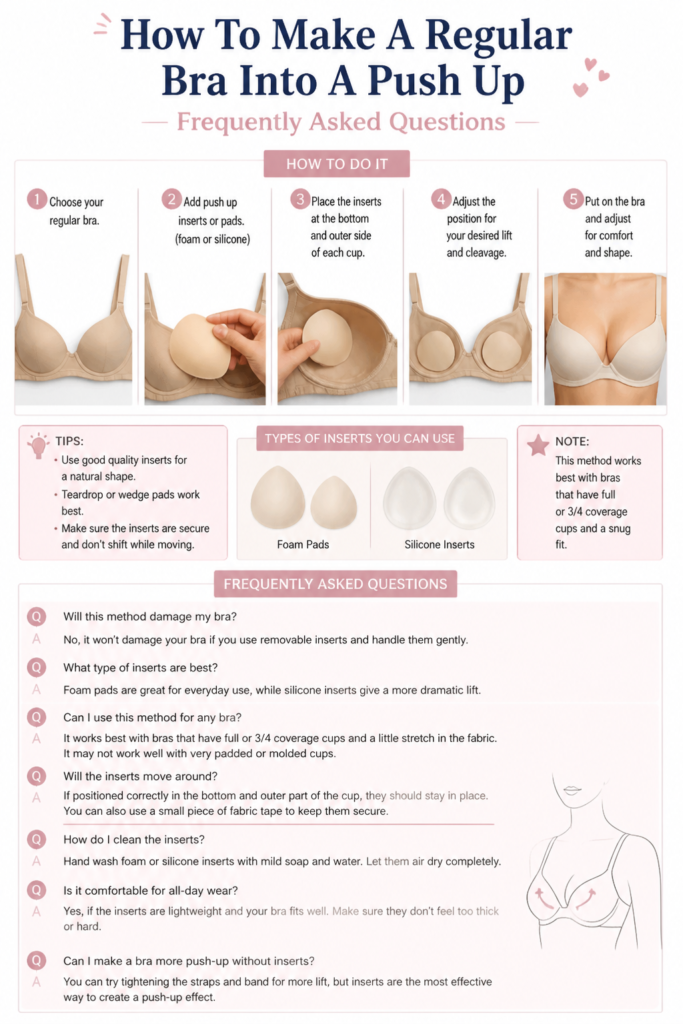
Place the padding along the bottom and outer edge of the bra cup. This pushes the breast tissue upwards and inwards.
Slide the insert into the bottom of the cup, angling it towards the center. This creates cleavage.
Adjust the pad until it feels secure and comfortable. The goal is to lift without causing discomfort or spillage.
Check the mirror from different angles to ensure an even and flattering lift on both sides.
Step 4: Secure Temporary Padding
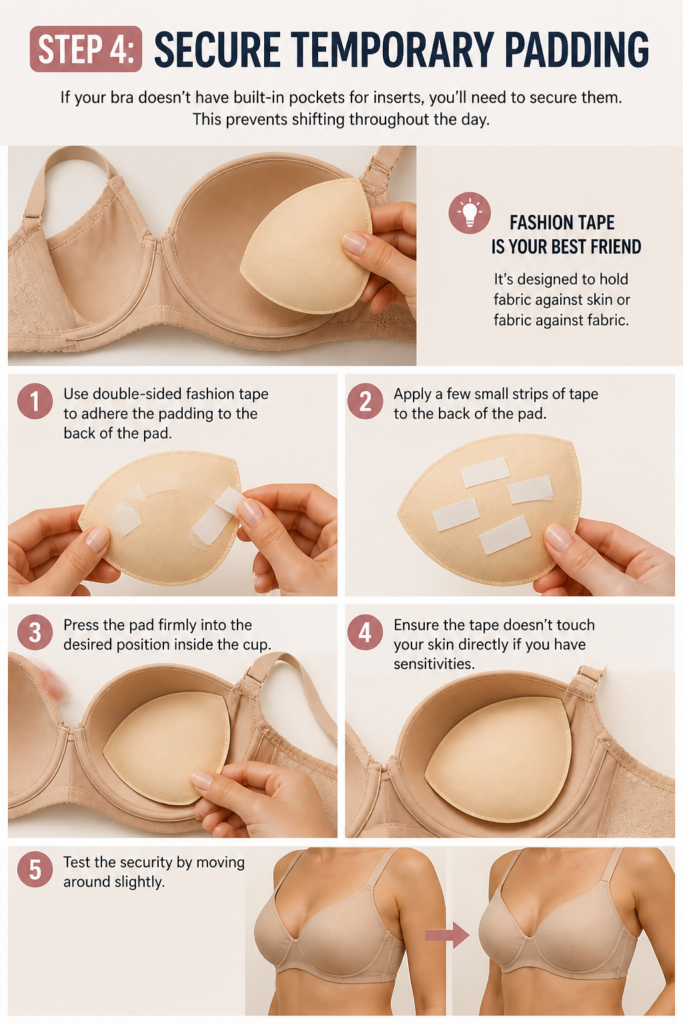
If your bra doesn’t have built-in pockets for inserts, you’ll need to secure them. This prevents shifting throughout the day.
Fashion tape is your best friend for temporary solutions. It’s designed to hold fabric against skin or fabric against fabric.
Use double-sided fashion tape to adhere the padding to the inside of the bra cup.
Apply a few small strips of tape to the back of the pad.
Press the pad firmly into the desired position inside the cup.
Ensure the tape doesn’t touch your skin directly if you have sensitivities.
Test the security by moving around slightly.
Step 5: Achieve a More Permanent Solution (Optional)
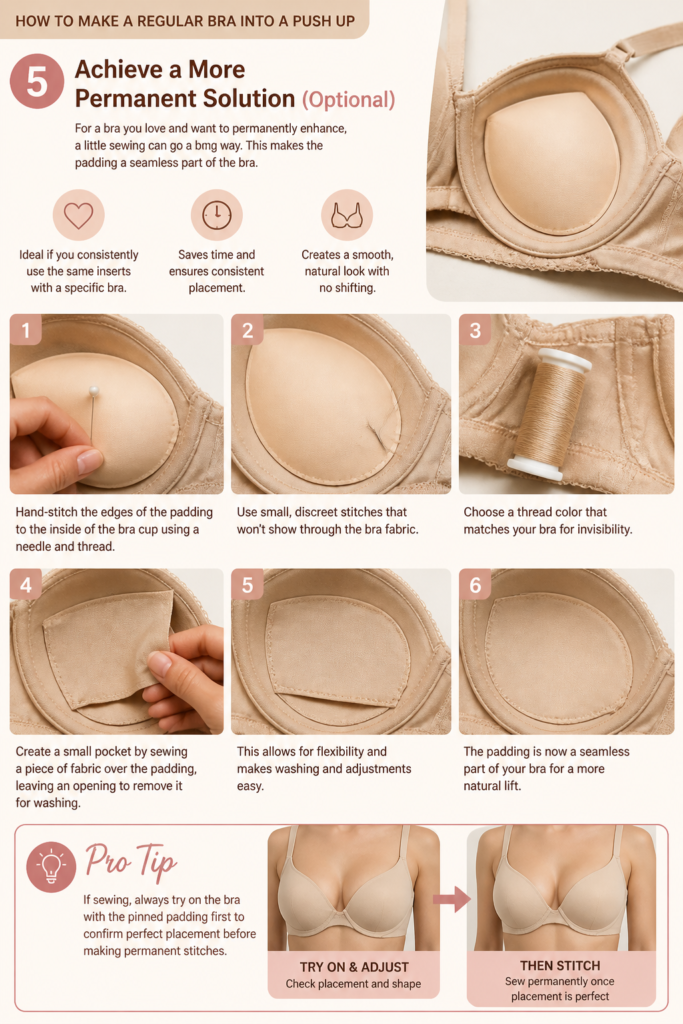
For a bra you love and want to permanently enhance, a little sewing can go a long way. This makes the padding a seamless part of the bra.
This method is ideal if you consistently use the same inserts with a specific bra. It saves time and ensures consistent placement.
Hand-stitch the edges of the padding to the inside of the bra cup using a needle and thread.
Use small, discreet stitches that won’t show through the bra fabric.
Choose a thread color that matches your bra for invisibility.
Create a small pocket by sewing a piece of fabric over the padding, leaving an opening to remove it for washing. This allows for flexibility.
Pro Tip: If sewing, always try on the bra with the pinned padding first to confirm perfect placement before making permanent stitches.
Step 6: Adjust and Refine for Comfort and Look
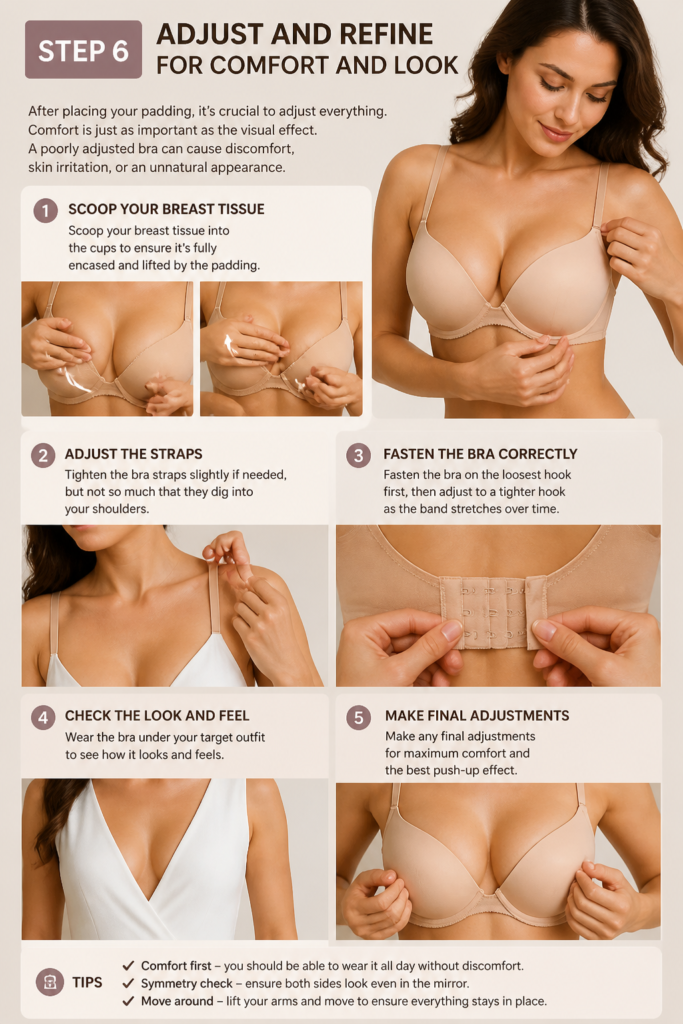
After placing your padding, it’s crucial to adjust everything. Comfort is just as important as the visual effect.
A poorly adjusted bra can cause discomfort, skin irritation, or an unnatural appearance. Take your time with this step.
Scoop your breast tissue into the cups to ensure it’s fully encased and lifted by the padding.
Tighten the bra straps slightly if needed, but not so much that they dig into your shoulders.
Fasten the bra on the loosest hook first, then adjust to a tighter hook as the band stretches over time.
Wear the bra under your target outfit to see how it looks and feels. Make any final adjustments.
Step 7: Consider the Overall Silhouette
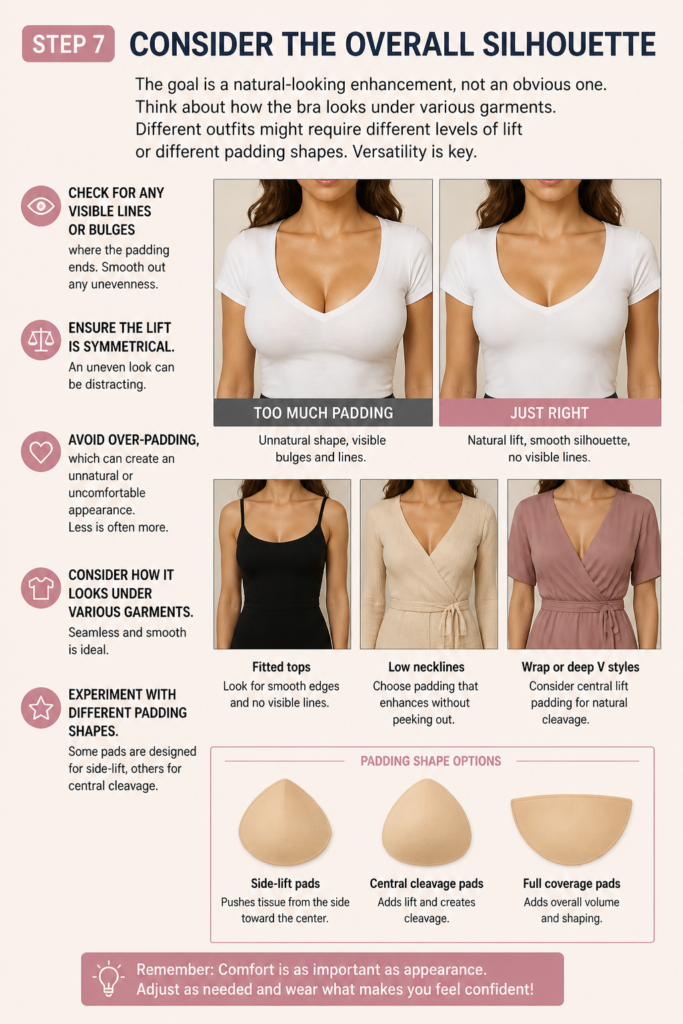
The goal is a natural-looking enhancement, not an obvious one. Think about how the bra looks under various garments.
Different outfits might require different levels of lift or different padding shapes. Versatility is key.
Check for any visible lines or bulges where the padding ends. Smooth out any unevenness.
Ensure the lift is symmetrical. An uneven look can be distracting.
Avoid over-padding, which can create an unnatural or uncomfortable appearance. Less is often more.
Experiment with different padding shapes. Some pads are designed for side-lift, others for central cleavage.
Step 8: Care for Your Modified Bra
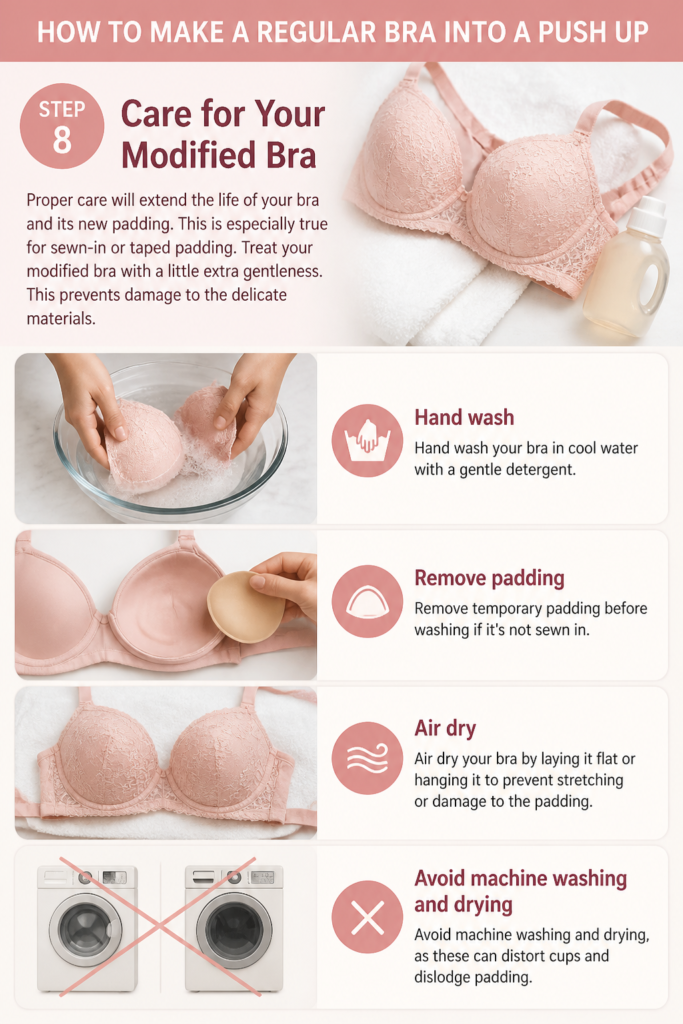
Proper care will extend the life of your bra and its new padding. This is especially true for sewn-in or taped padding.
Treat your modified bra with a little extra gentleness. This prevents damage to the delicate materials.
Hand wash your bra in cool water with a gentle detergent.
Remove temporary padding before washing if it’s not sewn in.
Air dry your bra by laying it flat or hanging it to prevent stretching or damage to the padding.
Avoid machine washing and drying, as these can distort cups and dislodge padding.
Common Mistakes to Avoid
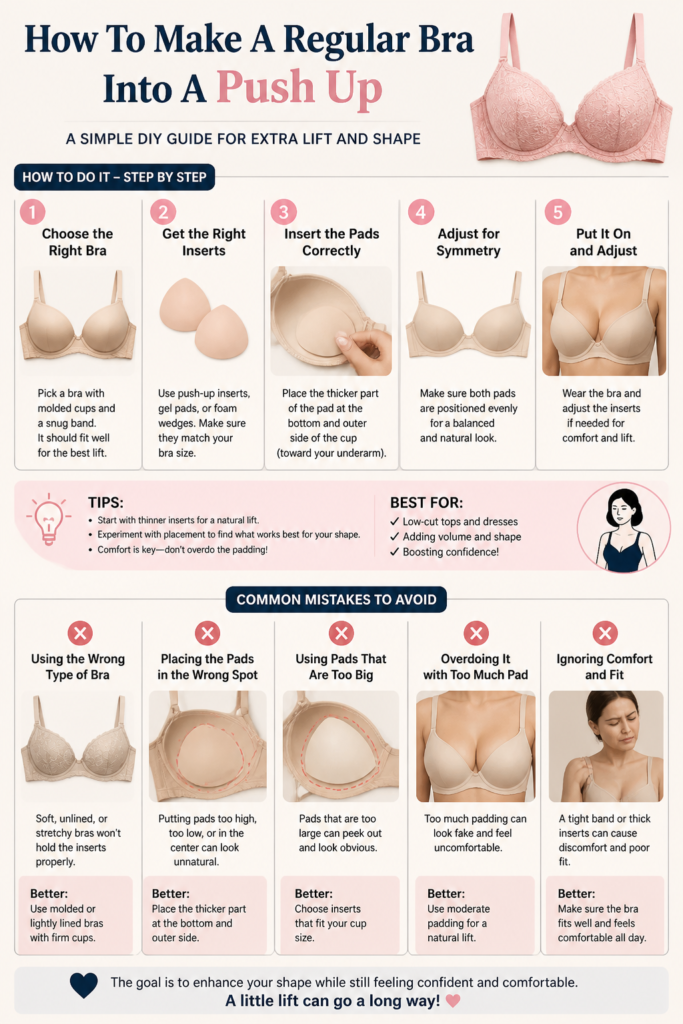
Using Too Much Padding
A common pitfall is adding excessive padding in an attempt to achieve maximum lift. This often results in an unnatural, bulky appearance. It can also cause discomfort by pushing breast tissue out of the cup, leading to spillage and an unflattering silhouette. Focus on strategic placement with a moderate amount of padding for the best results.
Incorrect Pad Placement
Simply stuffing pads into the bottom of the cup isn’t always effective. Placing padding too high or too far to the side can create an odd shape or make your breasts appear misshapen. The goal is to lift and center the breast tissue, so always position pads along the bottom and outer edges of the cup, angling them inwards for cleavage.
Ignoring Comfort
While achieving a push-up look is the goal, sacrificing comfort is a mistake. Padding that digs into your skin, causes excessive pressure, or makes the bra feel tight will be unbearable to wear for long periods. Always prioritize how the bra feels; if it’s uncomfortable, adjust the padding or try a different type.
Choosing the Wrong Bra Type
Attempting to add push-up padding to a flimsy, unlined, or purely decorative bra can lead to disappointing results. These bras lack the structure needed to support added weight and shape. Always start with a bra that already offers some structure and a good fit, as it will provide a much better foundation for enhancement.
Troubleshooting
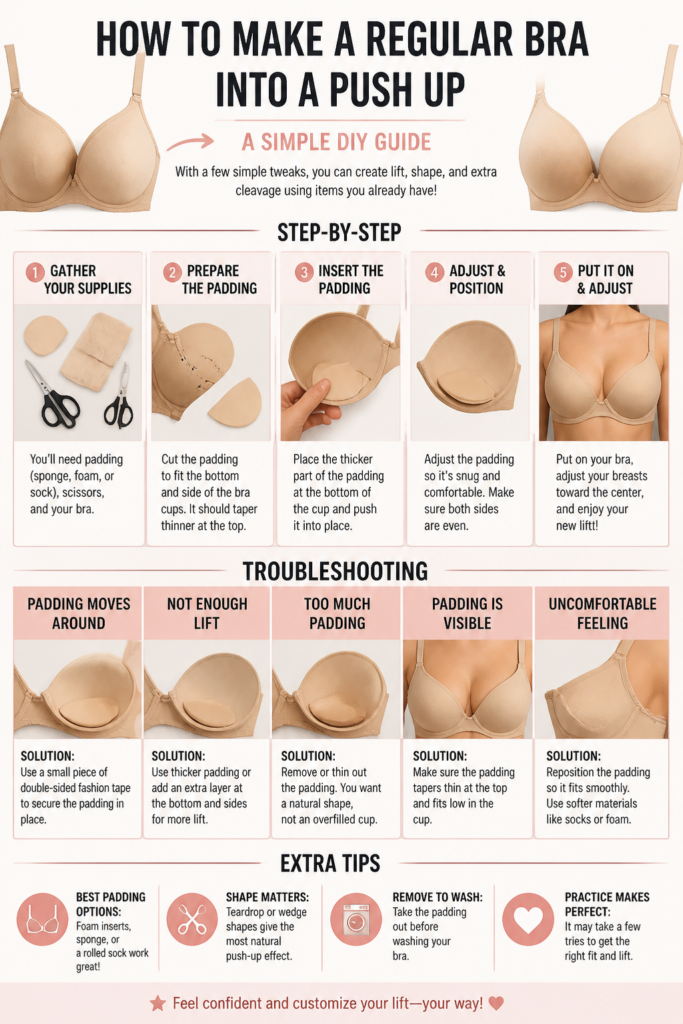
Uneven Lift or Appearance
If one side of your bra looks higher or fuller than the other, your padding might be misplaced. Gently adjust the position of the pad in the less lifted cup, ensuring it sits symmetrically to the other side. Also, make sure your breast tissue is fully “scooped” into both cups.
Pads Shifting or Moving
If your inserts are constantly slipping out of place, they aren’t adequately secured. For temporary solutions, use more double-sided fashion tape, applying it to both the pad and the inside of the bra cup. For a more permanent fix, consider tacking the pads in place with a few small stitches.
Discomfort or Digging
Discomfort often arises from ill-fitting padding or over-stuffing. Try using a thinner pad or repositioning the current one so it doesn’t press against sensitive areas. Ensure the padding isn’t too large for the cup, causing it to buckle or push into your skin. Sometimes, a slightly larger bra cup size might be needed to accommodate the extra volume comfortably.
Key Takeaways
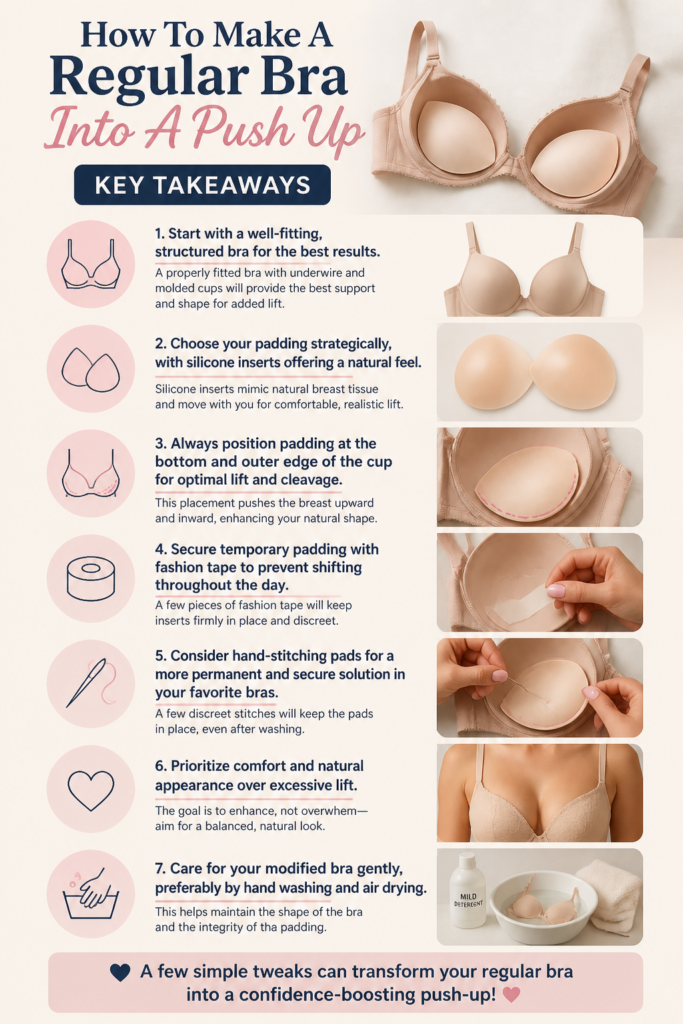
- Start with a well-fitting, structured bra for the best results.
- Choose your padding strategically, with silicone inserts offering a natural feel.
- Always position padding at the bottom and outer edge of the cup for optimal lift and cleavage.
- Secure temporary padding with fashion tape to prevent shifting throughout the day.
- Consider hand-stitching pads for a more permanent and secure solution in your favorite bras.
- Prioritize comfort and natural appearance over excessive lift.
- Care for your modified bra gently, preferably by hand washing and air drying.
Frequently Asked Questions
Can I use anything for padding if I don’t have special inserts?
Yes, you absolutely can! For a quick and temporary fix, clean, soft items like rolled-up socks, balled-up tissue paper, or even cotton wool can work. Just be mindful of how they feel and look under your clothing, as they might not offer the same smooth silhouette as dedicated inserts.
Will this modification damage my bra?
If done carefully, especially with temporary methods like fashion tape, the modification should not damage your bra. For sewing, use fine needles and thread, and make small, discreet stitches to avoid tearing the fabric. Always test any adhesive on an inconspicuous area first.
How much lift can I realistically expect?
The amount of lift depends on your natural breast size, the bra’s original structure, and the padding’s thickness. You can typically expect a noticeable increase in volume and a more rounded, lifted appearance, often equivalent to one cup size or more. Aim for a natural enhancement rather than an extreme transformation.
Is it possible to make this a permanent change?
Yes, you can make it permanent by hand-stitching the padding directly into the bra cups. This is a great option for bras you wear frequently with specific inserts. Alternatively, you can create a small fabric pocket inside the cup to hold the insert, allowing for easy removal when washing.
Our Top Recommended Finds
- Silicone Bra Inserts: These offer a natural weight and feel, molding perfectly to create a seamless lift. They are reusable and easy to clean.
- Fabric/Foam Bra Pads: Lightweight and versatile, these come in various shapes (triangle, crescent) and thicknesses, perfect for different lift needs.
- Double-Sided Fashion Tape: An essential for securing temporary padding, preventing wardrobe malfunctions, and ensuring everything stays in place.
Embrace Your Enhanced Confidence
Transforming a regular bra into a push-up is a surprisingly simple skill that opens up new wardrobe possibilities. You now have the knowledge to create the lift and shape you desire, tailored precisely to your needs. This isn’t just about changing your bra; it’s about boosting your confidence and feeling great in every outfit.
Why wait to feel amazing? Gather your materials and give these techniques a try today. You might be surprised at how easy it is to achieve a fresh, lifted look. Experiment, have fun, and enjoy the renewed confidence that comes with mastering your lingerie.