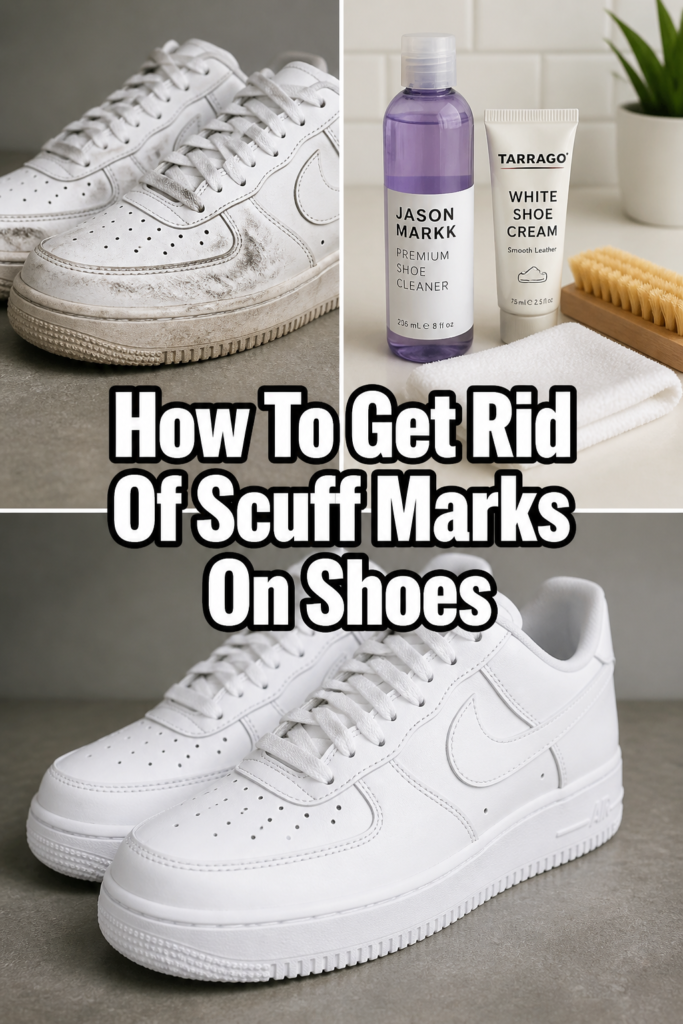
👟 How To Get Rid Of Scuff Marks On Shoes
We’ve all been there, admiring our favorite pair of shoes, only to spot that dreaded scuff mark. It’s frustrating, isn’t it? These unwelcome blemishes can make even new footwear look worn and tired.
I’ve spent years figuring out the best ways to restore my shoes, from everyday sneakers to dressier leather pairs. This guide brings you practical, tested methods to banish those scuffs for good, helping you reclaim your shoes’ pristine look.
Quick Overview
This guide will equip you with the knowledge and techniques to tackle scuff marks on various shoe materials. You’ll learn how to identify the scuff, choose the right method, and restore your shoes without causing damage.
Time needed: 15-45 minutes (depending on scuff severity and material)
Difficulty: Beginner
What you’ll need: Soft cloths, gentle cleaners, common household items, and potentially specialized shoe care products.
Step-by-Step Instructions
Step 1: Gather Your Cleaning Arsenal
Before you begin, collect all the necessary tools and cleaning agents. Having everything at hand prevents interruptions and ensures a smooth process. This preparation is crucial for an effective cleaning session.
You’ll need several soft, clean cloths, preferably microfiber. A soft-bristled brush, like an old toothbrush, can also be very useful for textured areas. Ensure you have a small bowl for mixing solutions.
Step 2: Identify the Shoe Material and Scuff Type
Determine what your shoes are made of—leather, synthetic, canvas, suede, patent leather, or rubber. Each material reacts differently to cleaners. Also, observe the scuff: is it a surface mark, a transfer of color, or a deeper abrasion?
A light scuff might just be dirt or a foreign substance on the surface. Deeper scuffs might have actually removed a tiny layer of the shoe’s finish. Understanding this helps you choose the gentlest yet most effective approach.
Pro Tip: Always test any cleaning solution on an inconspicuous area of your shoe first. This prevents potential damage or discoloration on a visible part.
Step 3: Perform a Basic Surface Clean
Wipe down the entire shoe with a dry, soft cloth to remove loose dirt and dust. This initial cleaning prevents you from grinding abrasive particles into the shoe surface during the scuff removal process.
For more stubborn surface grime, lightly dampen a cloth with plain water and gently wipe the shoe. Allow the shoe to air dry completely before proceeding to the next step. This prepares the surface for targeted scuff treatment.
Step 4: Tackle Light Scuffs with a Rubber Eraser
For many surface scuffs on leather, synthetic, or even rubber soles, a simple white rubber eraser can work wonders. Gently rub the eraser over the scuff mark in short, light strokes. The friction helps lift the mark without harsh chemicals.
Brush away any eraser shavings with a clean cloth. If the scuff persists, apply a little more pressure, but avoid aggressive scrubbing. This method is often surprisingly effective for minor blemishes.
Step 5: Utilize Toothpaste or Baking Soda Paste
For slightly more stubborn scuffs on non-delicate materials like sneakers or synthetic leather, a mild abrasive can be effective. Mix a small amount of non-gel toothpaste (white, not colored) or baking soda with a few drops of water to form a paste.
Apply the paste to the scuff mark using a soft cloth or an old toothbrush. Gently rub in circular motions. The fine abrasive particles help buff away the scuff.
Wipe away the paste with a clean, damp cloth. Make sure all residue is removed. This method is particularly effective on rubber soles and white sneakers.
Step 6: Employ Petroleum Jelly or Olive Oil for Leather
For patent leather or finished leather shoes, petroleum jelly or olive oil can be excellent for removing scuffs and restoring shine. Dab a small amount onto a clean, soft cloth.
Gently rub the petroleum jelly or olive oil over the scuff mark. The oil helps to break down the scuff and condition the leather. Buff the area with a fresh, clean cloth until the scuff is gone and the shine is restored.
This method also helps to moisturize the leather, preventing future cracking. It’s a dual-action solution for specific leather types.
Step 7: Consider Rubbing Alcohol for Ink or Dye Transfers
If the scuff is actually an ink mark or a dye transfer from another surface, rubbing alcohol can be a lifesaver. Moisten a cotton swab or the corner of a clean cloth with a small amount of rubbing alcohol.
Lightly dab or gently wipe the scuff mark. Be very careful not to rub too hard or spread the alcohol too widely, especially on colored shoes, as it can strip color. This is for targeted application only.
Follow immediately by wiping the area with a damp cloth to remove any alcohol residue. Then, allow the area to air dry completely. This method is best for quick, precise stain removal.
Step 8: Apply Specialized Shoe Cleaners or Polishes
For very tough scuffs, especially on leather, a dedicated shoe cleaner or polish might be necessary. Follow the product instructions carefully. Leather cleaners are formulated to safely lift dirt and scuffs.
If using shoe polish, choose a color that matches your shoe exactly. Apply a thin layer over the scuff, then buff with a clean cloth. This can fill in minor abrasions and restore color.
Always ensure the shoe is clean and dry before applying any specialized products. These products are designed for specific materials and can offer the best results for stubborn marks.
Step 9: Condition and Protect Your Shoes
Once the scuff is gone and your shoes are clean, it’s time for the final touches. Apply a leather conditioner to leather shoes to restore moisture and flexibility. This is crucial after cleaning.
For all shoe types, consider a protective spray designed for footwear. Spray a thin, even layer to create a barrier against water, stains, and future scuffs. This proactive step significantly extends the life and appearance of your shoes.
Allow the conditioner or protector to dry completely before wearing your shoes. This ensures maximum absorption and effectiveness.
Common Mistakes to Avoid
Using Harsh Abrasives
Using steel wool, rough sponges, or overly abrasive cleaners can permanently damage your shoe material. These tools can scratch the surface, remove finishes, or even create deeper scuffs than the ones you’re trying to remove. Always start with the gentlest method and gradually increase intensity only if needed.
Scrubbing Too Hard
Aggressive scrubbing, even with a soft cloth, can spread the scuff, push dirt deeper into the material, or cause friction damage. Gentle, consistent pressure in short strokes is far more effective. Patience is key when dealing with scuffs.
Not Testing in an Inconspicuous Area
Skipping the patch test is a common and risky mistake. Different shoe materials react uniquely to various cleaners. Applying a new product directly to a visible scuff without testing can lead to discoloration, fading, or material degradation that is impossible to fix. Always test first.
Ignoring Shoe Protection
Once you’ve removed a scuff, neglecting to condition and protect your shoes leaves them vulnerable to future marks. Skipping this crucial step means you’ll be dealing with new scuffs sooner rather than later. Regular protection is your best defense.
Troubleshooting
Scuff Mark Won’t Come Off
If a scuff mark persists after trying several methods, it might be deeper than a surface blemish. It could be an actual abrasion where the material itself has been damaged, not just a mark on top. In such cases, a professional shoe repair specialist might be able to help.
Sometimes, multiple gentle applications of the same method, with drying time in between, can be more effective than one aggressive attempt. For leather, a colored shoe polish can help conceal deep scuffs by filling in the damaged area.
Shoe Material Looks Dulle or Discolored
Dulling or discoloration often occurs from using an unsuitable cleaner or rubbing too vigorously. For leather, apply a good quality leather conditioner and then a matching shoe polish to restore its luster and color. For other materials, a specialized shoe restoration product might be needed.
Always remember to condition leather after cleaning to prevent it from drying out. If discoloration is severe, especially on delicate fabrics, consult a professional. Prevention through patch testing is always the best approach.
Key Takeaways
Always identify your shoe material before selecting a cleaning method.
Begin with the gentlest cleaning approach and gradually increase intensity.
Test any cleaning product or method on an inconspicuous area first to prevent damage.
A rubber eraser is a surprisingly effective tool for many light surface scuffs.
Petroleum jelly or olive oil can work wonders on patent and finished leather scuffs.
Finish your cleaning routine by conditioning and protecting your shoes to prevent future marks.
Frequently Asked Questions
Can scuffs be removed from all shoe materials?
Most surface scuffs can be removed from common materials like leather, synthetic leather, canvas, and rubber. Suede and nubuck are more delicate and require specialized brushes and cleaners, as liquid solutions can stain them. Deep abrasions that have removed material are much harder to “remove” and often require professional repair or concealment.
Is shoe polish good for scuffs?
Shoe polish, especially cream or wax polish, is excellent for concealing scuffs on leather shoes. It can fill in minor abrasions and restore the color and shine to the damaged area. However, it doesn’t “remove” the scuff but rather covers it up, making it invisible. Always choose a polish that perfectly matches your shoe color.
How can I prevent scuffs on my shoes?
Prevention is key! Regularly clean and condition your shoes, especially leather ones. Apply a protective spray suitable for your shoe material to create a barrier against marks and moisture. Be mindful of where you walk and store your shoes carefully to avoid rubbing against other items.
When should I give up and see a professional?
If you’ve tried several appropriate methods and the scuff remains, or if you notice any signs of damage like color stripping or material tearing, it’s best to consult a professional shoe repair specialist. They have specialized tools and expertise to handle stubborn or complex issues without causing further harm.
Our Top Recommended Finds
Premium Microfiber Cloths: Essential for gentle cleaning and buffing without scratching.
All-Purpose Shoe Cleaner Kit: A versatile kit with brushes and solutions for various shoe materials.
Leather Conditioner & Protector: Crucial for maintaining leather integrity and preventing future damage after cleaning.
Step Out Confidently: Your Scuff-Free Future Awaits
Getting rid of scuff marks doesn’t have to be a daunting task. With the right tools and a little patience, you can restore your favorite footwear to its former glory. Remember, a gentle approach and understanding your shoe’s material are your best allies in this endeavor.
Don’t let those minor blemishes keep you from wearing your best. Take action today, follow these steps, and enjoy the satisfaction of perfectly maintained shoes. Consider exploring guides on long-term shoe storage or advanced leather care to keep your entire collection pristine.