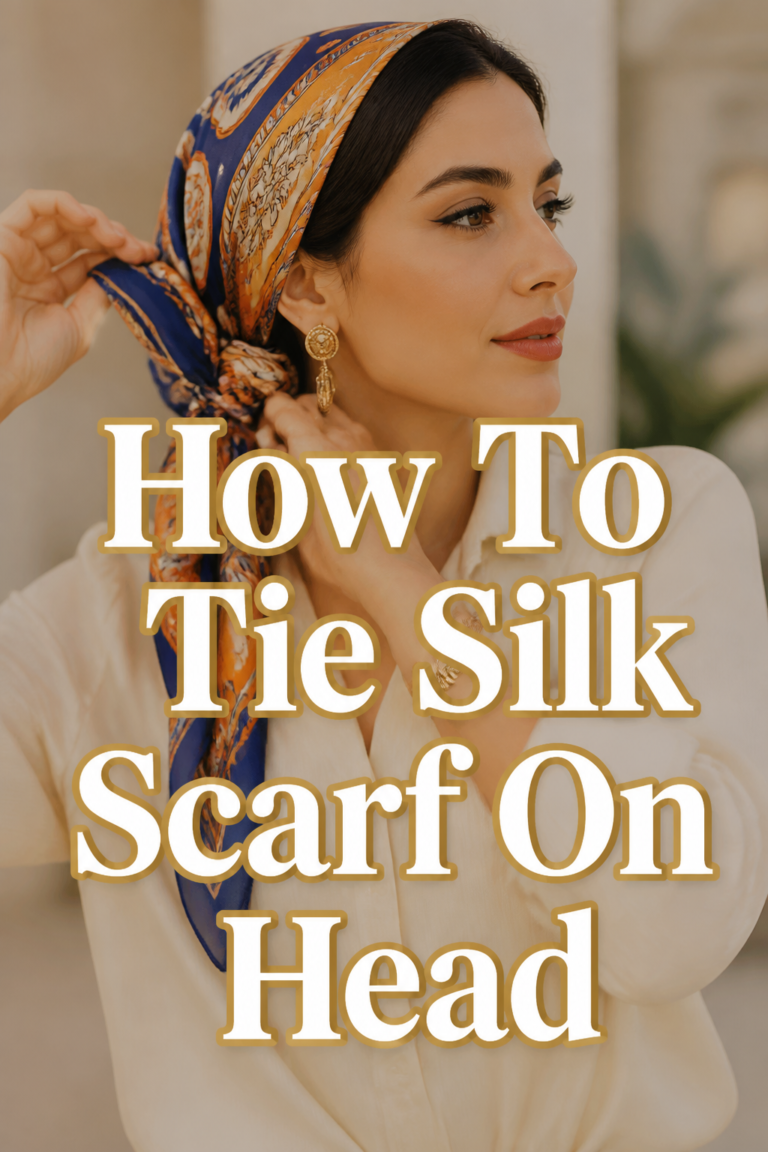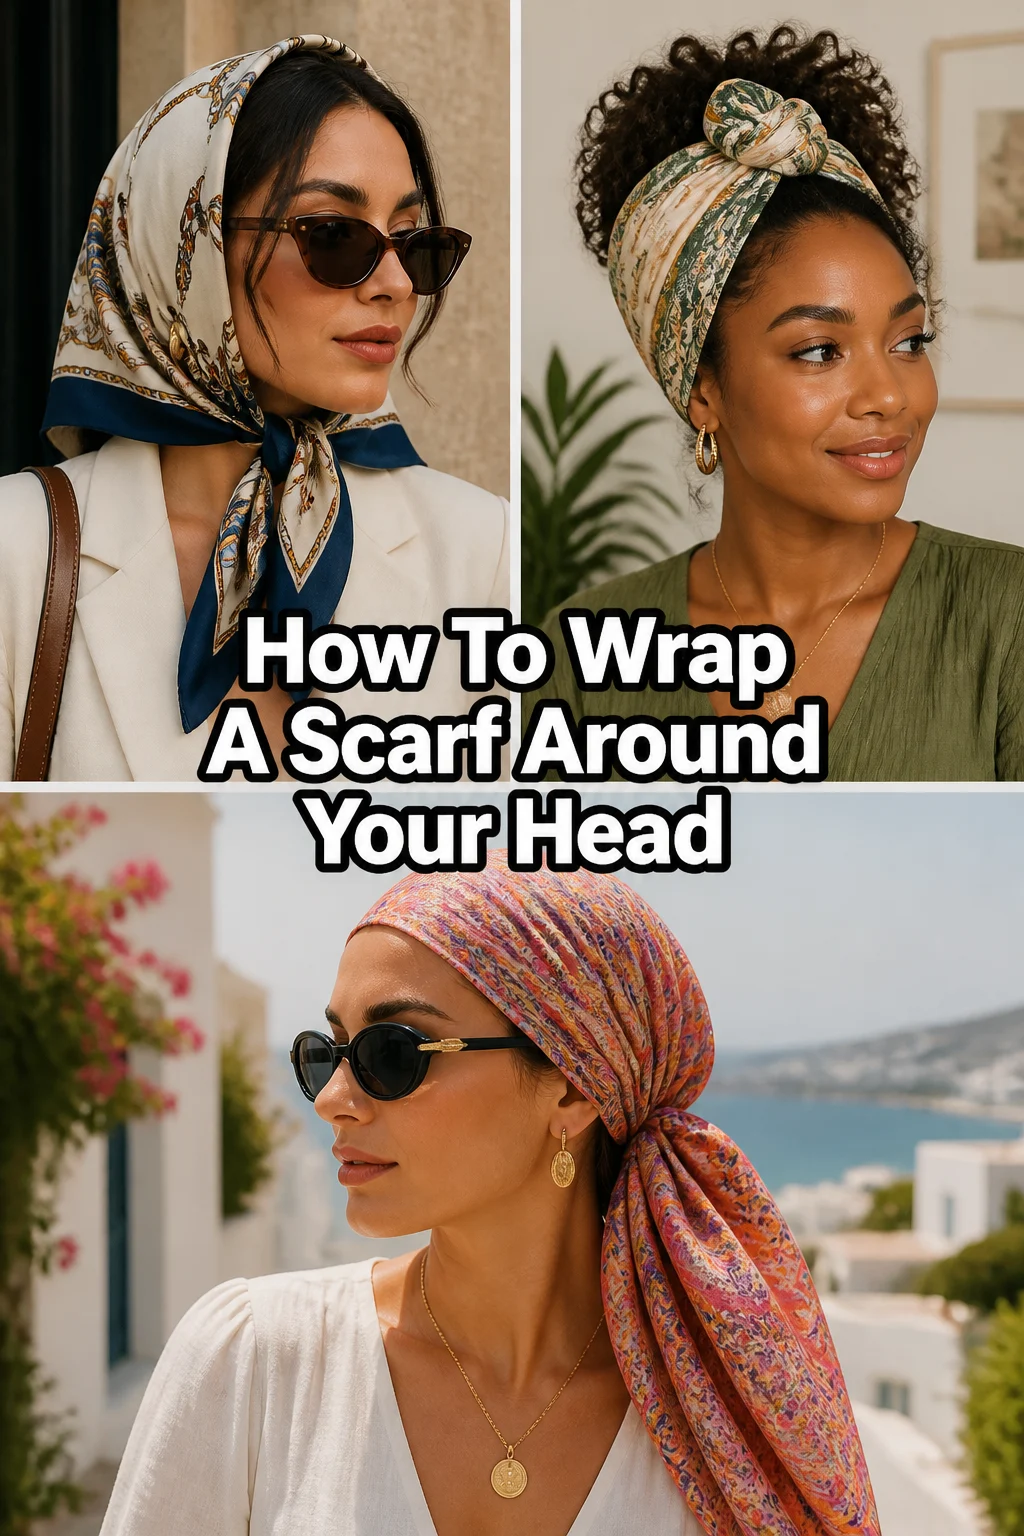
🧣 How To Wrap A Scarf Around Your Head
Learning to wrap a scarf around your head can transform your look. It’s a stylish way to add flair, protect your hair, or simply feel chic. I’ve spent years experimenting with different fabrics and folds, discovering what truly works for comfort and style.
This guide shares my tried-and-true techniques, ensuring you can achieve a beautiful, secure head wrap every time. Prepare to embrace a versatile accessory that instantly elevates your personal style.

Quick Overview
Mastering head scarf wraps adds a new dimension to your wardrobe and offers practical benefits. You’ll learn the foundational techniques to create elegant and secure styles. This guide will equip you with the knowledge to select the right scarf and execute several popular wraps with confidence.
- Time needed: 10-20 minutes (for initial practice)
- Difficulty: Beginner to Intermediate
- What you’ll need: A scarf (square or rectangular), hair ties/clips (optional), mirror
Step-by-Step Instructions
Step 1: Choose Your Scarf Wisely
The right scarf is key to a successful head wrap. Material, size, and shape all play a significant role in how it drapes and holds. Your choice impacts both the look and comfort of the final style.
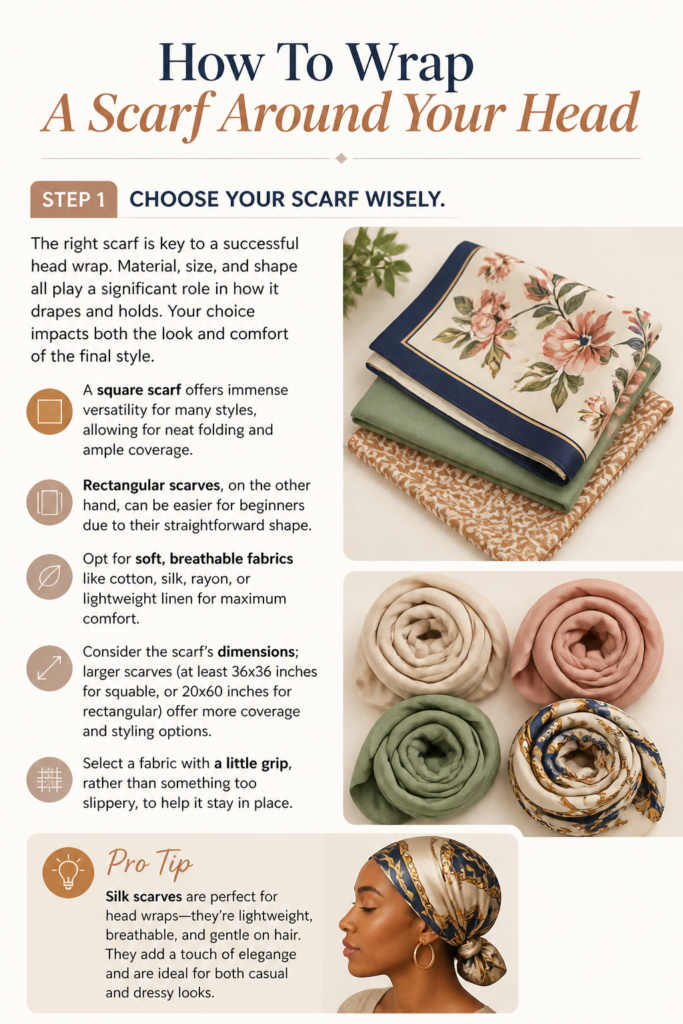
A square scarf offers immense versatility for many styles, allowing for neat folding and ample coverage. Rectangular scarves, on the other hand, can be easier for beginners due to their straightforward shape.
- Opt for soft, breathable fabrics like cotton, silk, rayon, or lightweight linen for maximum comfort.
- Consider the scarf’s dimensions; larger scarves (at least 36×36 inches for square, or 20×60 inches for rectangular) offer more coverage and styling options.
- Select a fabric with a little grip, rather than something too slippery, to help it stay in place.
Pro Tip: Silk scarves are perfect for protecting hair from frizz and breakage, especially if you plan to wear the wrap for an extended period or overnight.
Step 2: Prepare Your Hair
A good foundation helps your scarf wrap stay secure and comfortable all day. How you prepare your hair can make a big difference in the final look and feel. This step ensures your hair is neat and ready for wrapping.
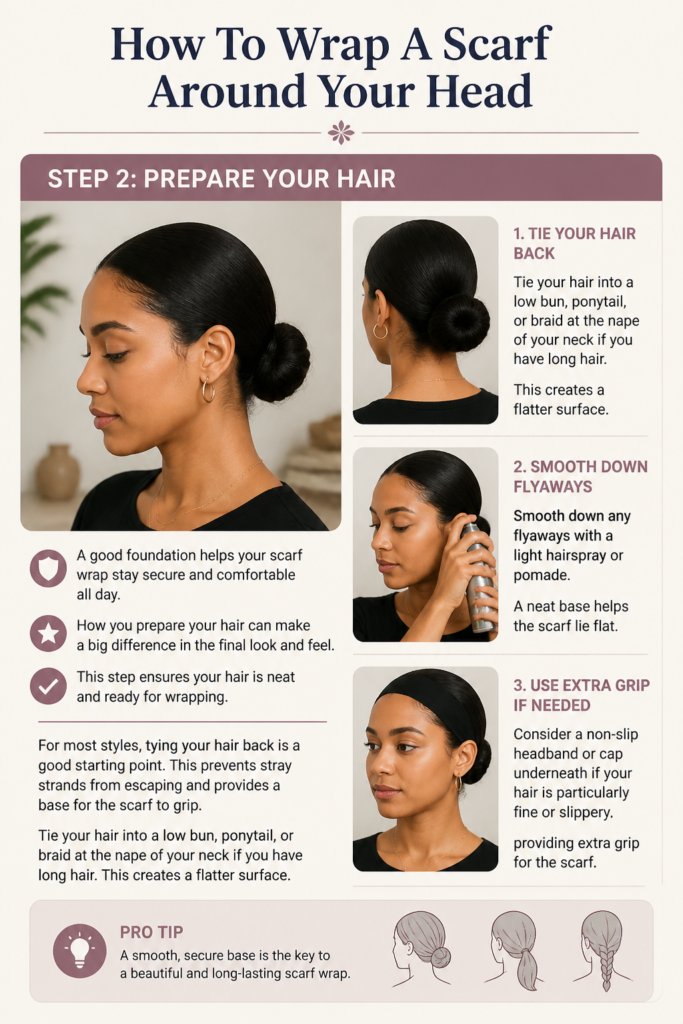
For most styles, tying your hair back is a good starting point. This prevents stray strands from escaping and provides a base for the scarf to grip.
- Tie your hair into a low bun, ponytail, or braid at the nape of your neck if you have long hair. This creates a flatter surface.
- Smooth down any flyaways with a light hairspray or pomade. A neat base helps the scarf lie flat.
- Consider a non-slip headband or cap underneath if your hair is particularly fine or slippery, providing extra grip for the scarf.
Step 3: The Basic Fold (Square Scarf)
This foundational fold is essential for many popular head wrap styles. Mastering it allows you to create a neat, triangular shape that is easy to work with. Precision here ensures a clean finish.

A crisp, even fold provides a strong starting point for your wrap. It also helps to distribute the fabric evenly, preventing bulkiness in one area.
- Lay your square scarf flat on a clean surface, spreading it out completely.
- Fold the scarf diagonally in half, bringing one corner to meet the opposite corner. This creates a large triangle.
- Ensure the edges align perfectly for a symmetrical fold. Press out any wrinkles.
Pro Tip: For less bulk with thicker scarves, you can fold the triangle in half again, creating a narrower band before wrapping. This is great for turban styles.
Step 4: The Classic Turban Wrap
The classic turban is elegant and offers full hair coverage. It’s a sophisticated style that works well for various occasions, from casual outings to more formal events. This method ensures a secure and stylish finish.
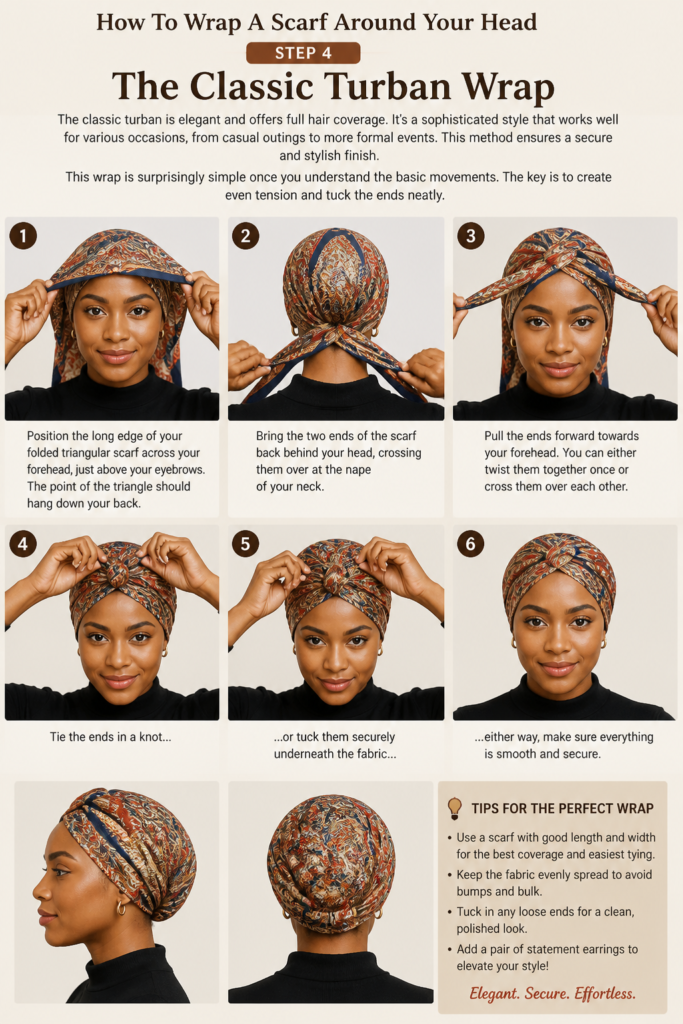
This wrap is surprisingly simple once you understand the basic movements. The key is to create even tension and tuck the ends neatly.
- Position the long edge of your folded triangular scarf across your forehead, just above your eyebrows. The point of the triangle should hang down your back.
- Bring the two ends of the scarf back behind your head, crossing them over at the nape of your neck.
- Pull the ends forward towards your forehead. You can either twist them together once or cross them over each other.
- Tie the ends in a knot or tuck them securely underneath the fabric, either at the front or on the side, depending on your desired look.
- Adjust the fabric, gently pulling and smoothing it to ensure full coverage and a comfortable fit.
Step 5: The Headband Style (Rectangular Scarf)
For a simpler, more casual look, the headband style is quick and chic. It’s perfect for keeping hair out of your face or adding a pop of color to an outfit. This method is incredibly versatile.
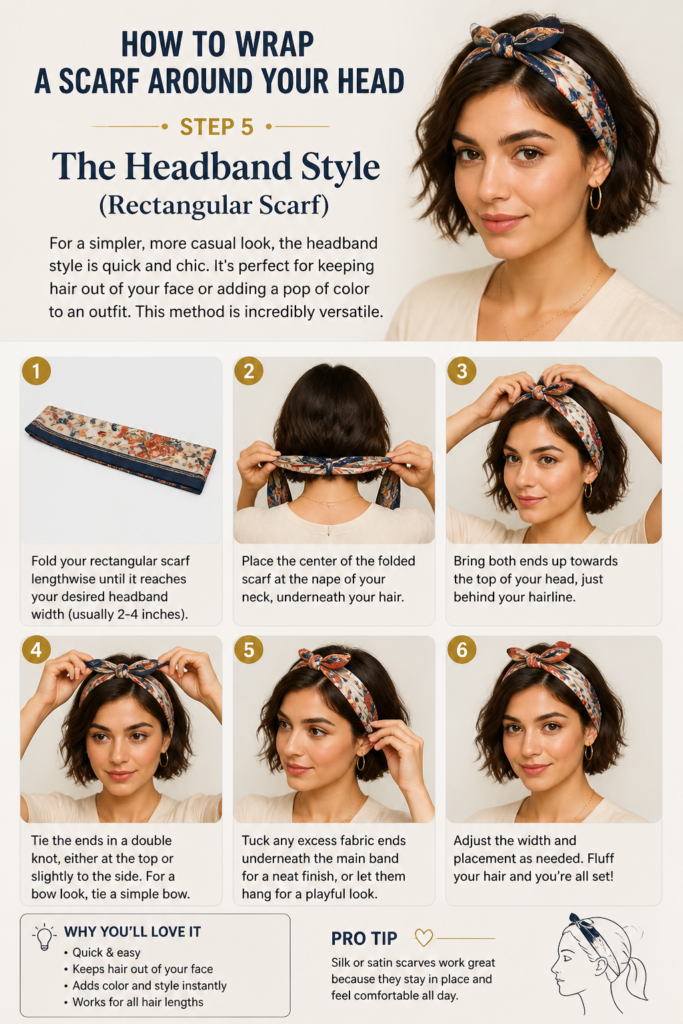
This style works well with both long and short hair, and it’s easy to adjust for different widths. It’s an excellent entry point for beginners.
- Fold your rectangular scarf lengthwise until it reaches your desired headband width (usually 2-4 inches).
- Place the center of the folded scarf at the nape of your neck, underneath your hair.
- Bring both ends up towards the top of your head, just behind your hairline.
- Tie the ends in a double knot, either at the top or slightly to the side. For a bow look, tie a simple bow.
- Tuck any excess fabric ends underneath the main band for a neat finish, or let them hang for a more playful vibe.
Pro Tip: For extra grip and to prevent slipping, place the scarf over a thin, velvet headband. This helps it stay put all day.
Step 6: The Low Bun Wrap
This style is perfect for those with longer hair, creating an elegant and contained look. It’s a sophisticated way to manage your hair while showcasing a beautiful scarf. This wrap combines practicality with grace.
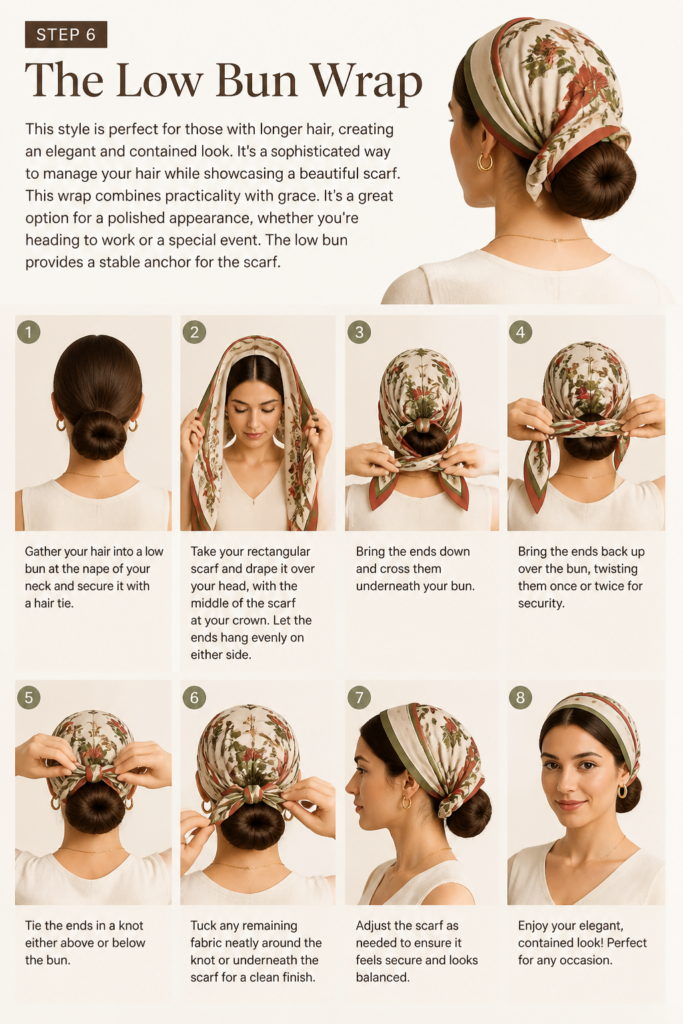
It’s a great option for a polished appearance, whether you’re heading to work or a special event. The low bun provides a stable anchor for the scarf.
- Gather your hair into a low bun at the nape of your neck and secure it with a hair tie.
- Take your rectangular scarf and drape it over your head, with the middle of the scarf at your crown. Let the ends hang evenly on either side.
- Bring the ends down and cross them underneath your bun.
- Bring the ends back up over the bun, twisting them once or twice for security.
- Tie the ends in a knot either above or below the bun, tucking any remaining fabric neatly.
- Gently adjust the scarf around your head, ensuring comfortable coverage and a smooth silhouette.
Step 7: The Top Knot/Bow Wrap
A playful and stylish option, the top knot or bow wrap adds height and personality. It’s a fun way to incorporate a scarf into a more casual or bohemian look. This style is eye-catching and charming.
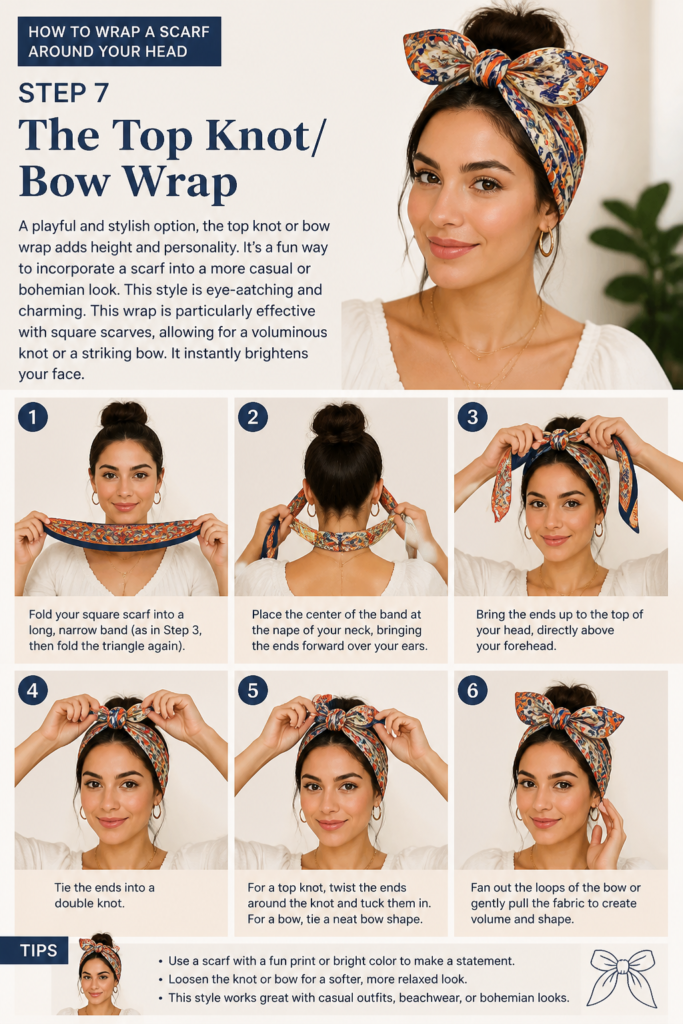
This wrap is particularly effective with square scarves, allowing for a voluminous knot or a striking bow. It instantly brightens your face.
- Fold your square scarf into a long, narrow band (as in Step 3, then fold the triangle again).
- Place the center of the band at the nape of your neck, bringing the ends forward over your ears.
- Bring the ends up to the top of your head, directly above your forehead.
- Tie the ends into a double knot. For a top knot, twist the ends around the knot and tuck them in. For a bow, tie a neat bow shape.
- Fan out the loops of the bow or gently pull the fabric of the knot to create more volume and shape.
Common Mistakes to Avoid
Choosing the Wrong Fabric
Using a scarf that is too slippery, too stiff, or too thick can make wrapping difficult and uncomfortable. Slippery fabrics like pure satin without texture will slide off easily, while stiff materials won’t mold to your head. Very thick scarves can create excessive bulk, leading to an unbalanced and uncomfortable wrap. Always prioritize soft, breathable fabrics with some natural grip, like cotton or rayon, for ease of styling and comfort.
Incorrect Hair Preparation
Skipping the hair preparation step often leads to a messy and insecure wrap. Loose strands can escape, and an uneven base can cause the scarf to shift. Failing to smooth hair or tie it back (if long) means the scarf has nothing firm to grip onto. Always take a few moments to create a neat, stable foundation for your scarf, whether it’s a low bun or simply smoothed-down hair.
Uneven Tension
Applying too much or too little tension during wrapping is a common pitfall. Too much tension can lead to headaches and discomfort, while too little tension will result in a loose wrap that slips off easily. The goal is a snug but comfortable fit that feels secure without being restrictive. Practice finding that sweet spot where the scarf feels firmly in place but doesn’t pull or squeeze.
Ignoring Scarf Placement
Where you start and end your wrap significantly impacts the final look. Placing the scarf too far back can make it look like it’s about to fall off, while placing it too far forward might cover your eyebrows. Pay attention to the starting point, whether it’s at your hairline, forehead, or nape of the neck, as specified by the style. This attention to detail ensures the wrap frames your face beautifully.
Troubleshooting
Scarf Keeps Slipping Off
If your scarf constantly slips, the issue is often a combination of fabric choice and hair preparation. Slippery fabrics like silk can be challenging on fine hair. Try wearing a velvet or silicone-lined headband underneath your scarf for added grip. You can also lightly backcomb the hair around your hairline to create more texture for the scarf to hold onto. Ensure your scarf is tied snugly, but not too tightly, to maintain tension.
Wrap Feels Too Bulky
A bulky wrap usually means your scarf is either too thick, or you’re using too much fabric for the style. For thicker scarves, try folding them into a narrower band before wrapping. If your scarf is large, you might need to adjust the folding technique to reduce layers. Experiment with different scarf sizes; a slightly smaller or thinner scarf might be more suitable for certain styles, especially if you have a smaller head.
Headache from Scarf Pressure
Headaches are a clear sign that your scarf is tied too tightly. While a secure fit is important, it should never be uncomfortable. Loosen the knot or adjust the tension points around your head. If a specific knot is causing pressure, try a different tying method, such as tucking ends instead of knotting them. Ensure the scarf is evenly distributed and not pressing too hard on any single area.
Key Takeaways
- Fabric and Size Matter: Choose soft, breathable fabrics like cotton or silk, and select a scarf size appropriate for your desired style.
- Prepare Your Hair: A smooth, low bun or ponytail provides a stable foundation, preventing slippage and flyaways.
- Master Basic Folds: Learning the diagonal fold for square scarves and the lengthwise fold for rectangular ones is crucial.
- Practice Tension: Aim for a snug but comfortable fit that secures the scarf without causing discomfort.
- Experiment with Styles: Don’t be afraid to try different wraps, from turbans to headbands, to find what suits your face and occasion.
- Adjust for Comfort: Always adjust the fabric and placement to ensure a comfortable fit and a flattering look.
Frequently Asked Questions
Can I wrap a scarf around my head if I have short hair?
Absolutely! Many head wrap styles work beautifully with short hair. The headband style, the top knot, or even a simple turban can add flair. You might find it easier to use a non-slip headband underneath for extra grip, as there’s less hair for the scarf to hold onto. Short hair often makes for a less bulky wrap, which can be a sleek look.
How do I make my head wrap stay on all day?
To ensure your head wrap stays secure, start with clean, dry hair. Use a non-slip velvet or silicone headband underneath for added grip, especially if your hair is fine or silky. Choose a scarf fabric with a little texture, like cotton or a textured rayon, over very smooth satin. Tie your knots firmly but comfortably, and tuck ends securely. A few bobby pins strategically placed can also help anchor the scarf.
What’s the best type of scarf for beginners?
For beginners, a medium-sized rectangular scarf (around 20×60 inches) made of cotton or a cotton blend is often the easiest to start with. Its shape is straightforward to fold, and cotton provides good grip without being too thick or slippery. Once you’re comfortable, you can explore square scarves and more luxurious fabrics like silk.
Can head wraps protect my hair?
Yes, head wraps can offer excellent protection for your hair. They shield your hair from environmental elements like sun, wind, and pollution, which can cause dryness and damage. Wearing a silk or satin-lined head wrap, especially at night, can also reduce friction on your hair, preventing frizz and breakage. This makes them a fantastic tool for hair health and maintenance.
Our Top Recommended Finds
- Large Square Cotton Scarf: Ideal for versatile styling, offering good grip and breathability for various wraps.
- Rectangular Silk Scarf: Perfect for a luxurious feel, gentle on hair, and excellent for elegant, sleek styles.
- Velvet Headband: An essential underlayer for preventing slippage, providing a secure base for any scarf wrap.
Embrace Your New Style Journey
You now have the tools and techniques to confidently wrap a scarf around your head, transforming your look with ease. This isn’t just about covering your hair; it’s about expressing your unique style, adding a touch of elegance, and exploring a world of fashion possibilities. Each wrap you create is a personal statement, a blend of tradition and modern flair.
Don’t let hesitation hold you back. Grab a scarf today and stand in front of your mirror. Experiment with the different folds and styles, adjusting until you find what feels right for you. Consider exploring complementary accessories like earrings or sunglasses to complete your new look. The journey of discovering your perfect head wrap style is just beginning, and it promises to be as rewarding as it is beautiful.