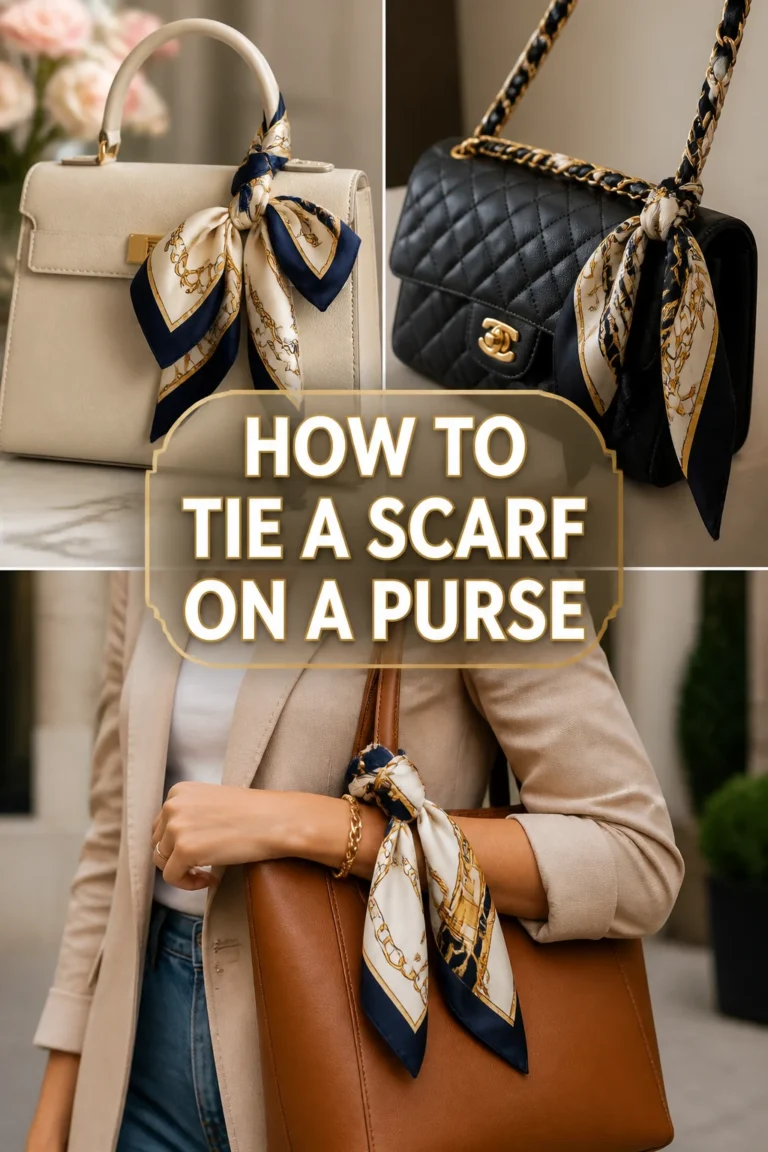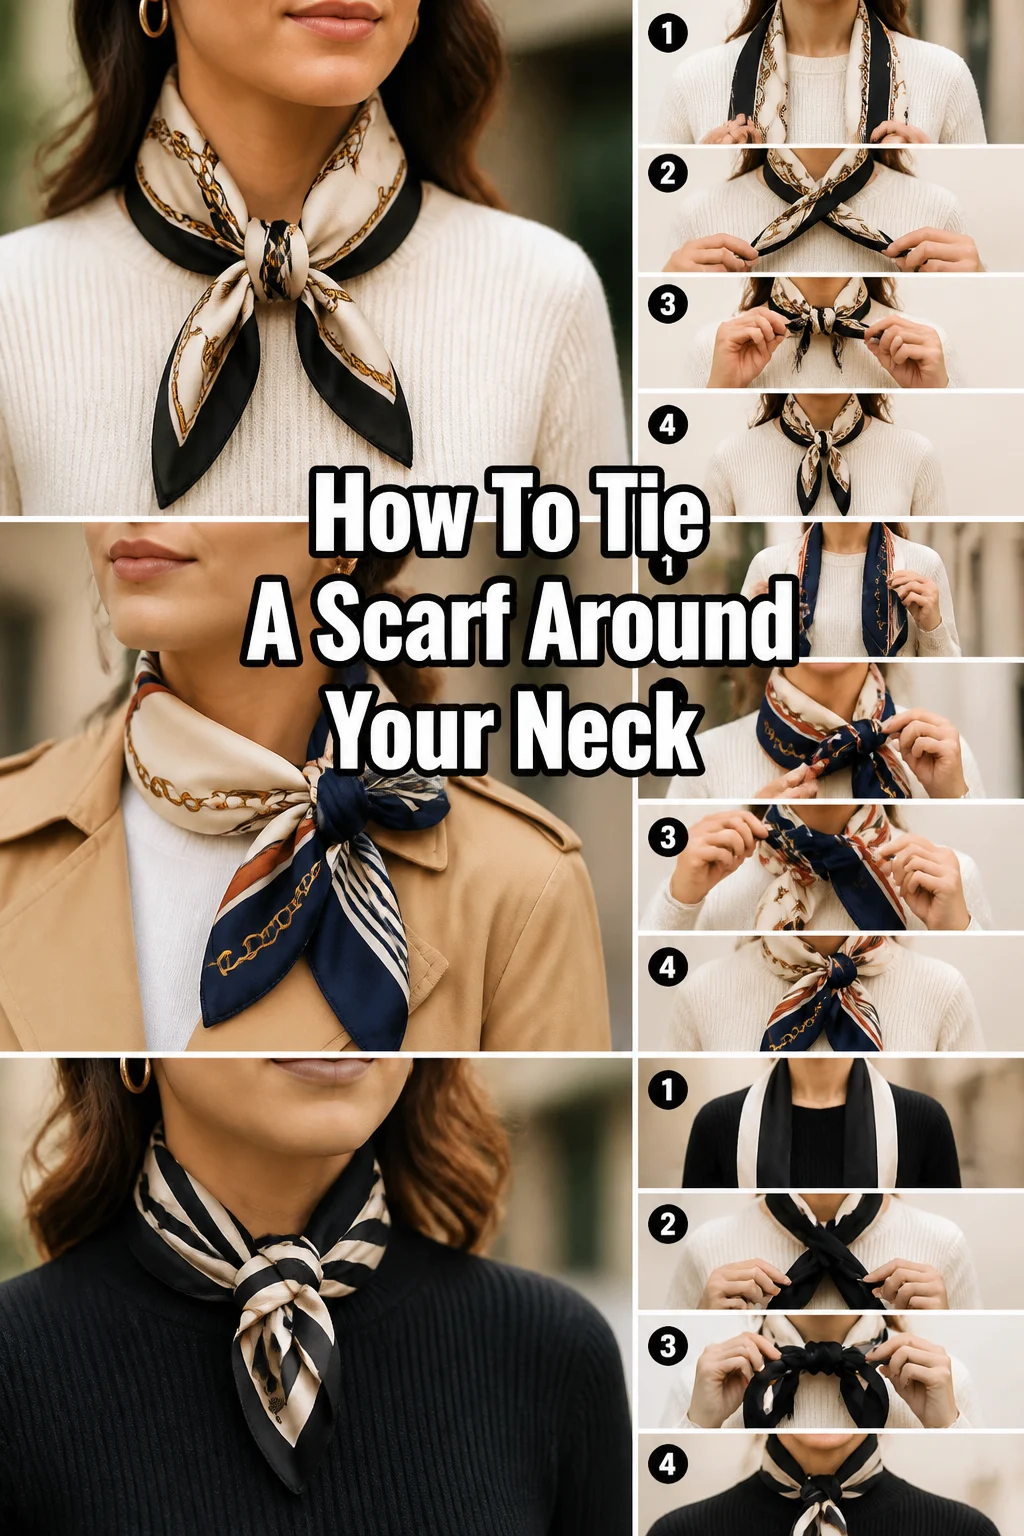
🧣 How To Tie A Scarf Around Your Neck
A well-tied scarf can instantly elevate any outfit, adding a touch of sophistication or a pop of personality. I remember struggling endlessly with my first silk scarf, feeling like it was always too bulky or just “wrong.” This guide is built from years of practice and styling, designed to cut through the confusion and give you truly actionable steps.
You’ll soon discover how simple it is to master a few classic knots that look effortlessly chic.

Quick Overview
This guide will walk you through several popular and easy-to-master scarf tying techniques. You’ll gain the confidence to style various scarf types for different occasions, transforming your look with minimal effort.
- Time needed: 5-15 minutes (per style, less with practice)
- Difficulty: Beginner
- What you’ll need: A scarf (square, rectangular, or infinity), a mirror, your neck.
Step-by-Step Instructions
Step 1: Choose Your Scarf and Style
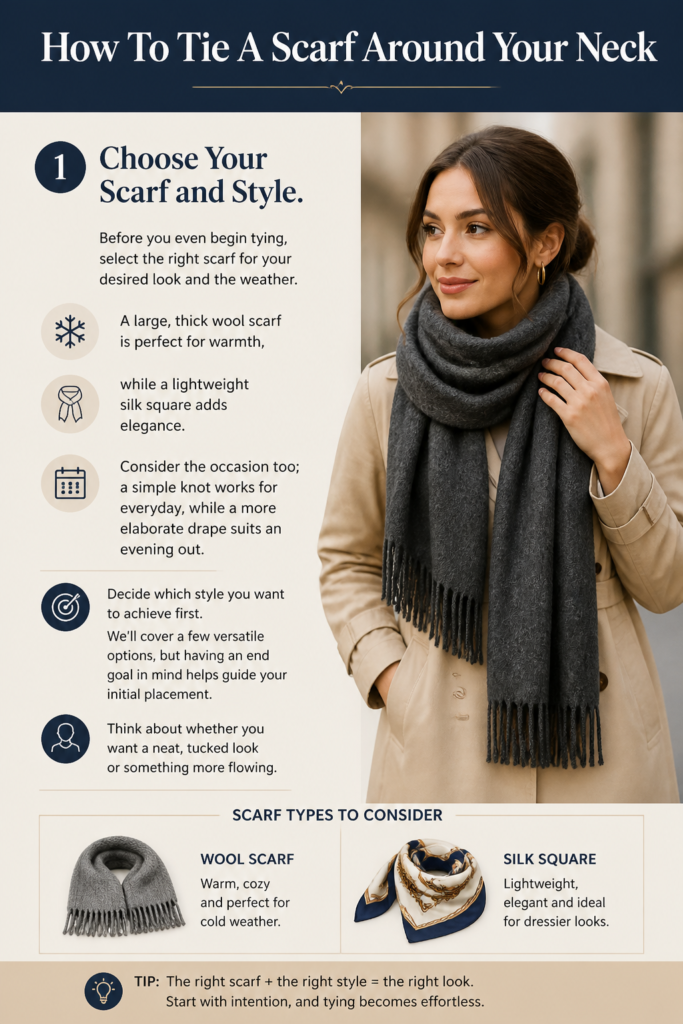
Before you even begin tying, select the right scarf for your desired look and the weather. A large, thick wool scarf is perfect for warmth, while a lightweight silk square adds elegance. Consider the occasion too; a simple knot works for everyday, while a more elaborate drape suits an evening out.
Decide which style you want to achieve first. We’ll cover a few versatile options, but having an end goal in mind helps guide your initial placement. Think about whether you want a neat, tucked look or something more flowing.
Step 2: The Classic Drape (For Rectangular Scarves)
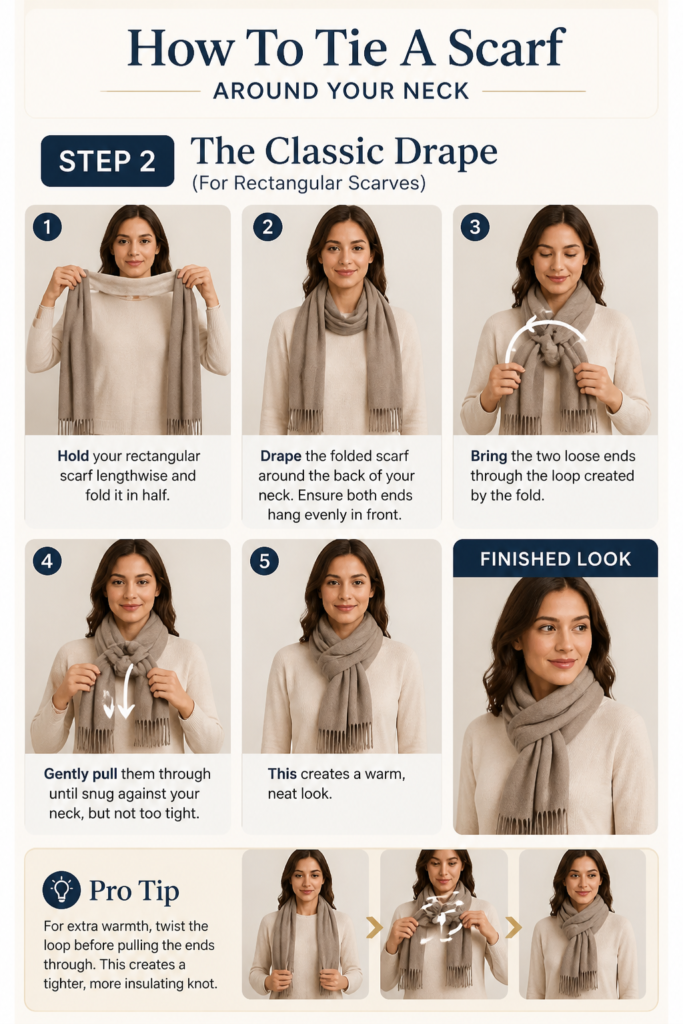
Hold your rectangular scarf lengthwise and fold it in half. Drape the folded scarf around the back of your neck. Ensure both ends hang evenly in front.
Bring the two loose ends through the loop created by the fold. Gently pull them through until snug against your neck, but not too tight. This creates a warm, neat look.
Pro Tip: For extra warmth, twist the loop before pulling the ends through. This creates a tighter, more insulating knot.
Step 3: The Parisian Knot (For Rectangular Scarves)
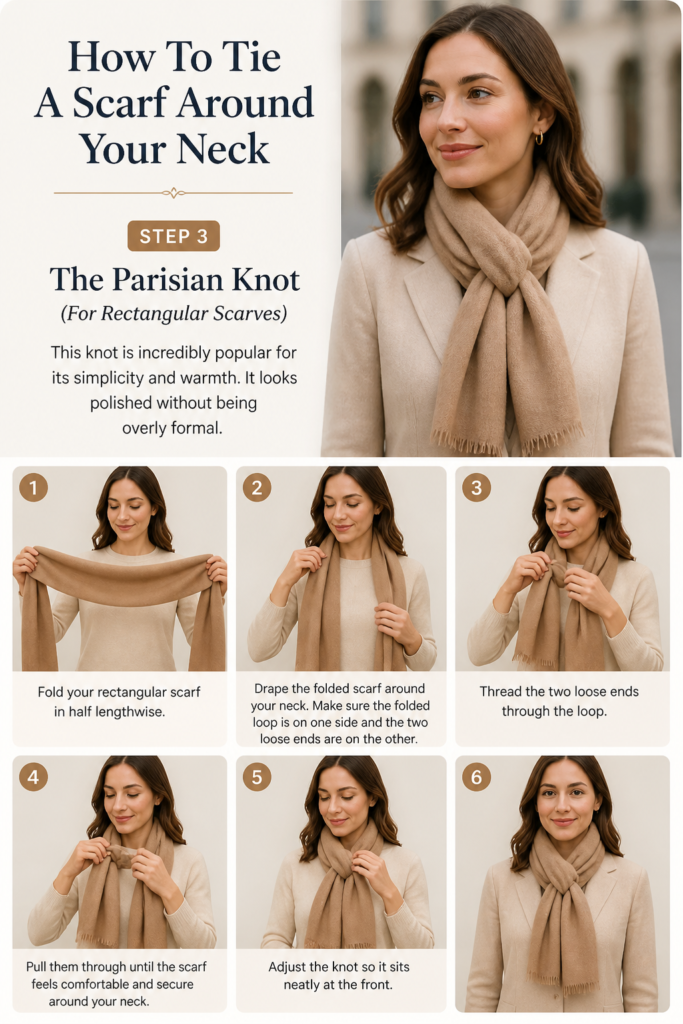
Fold your rectangular scarf in half lengthwise. Drape the folded scarf around your neck. Make sure the folded loop is on one side and the two loose ends are on the other.
Thread the two loose ends through the loop. Pull them through until the scarf feels comfortable and secure around your neck. Adjust the knot so it sits neatly at the front.
This knot is incredibly popular for its simplicity and warmth. It looks polished without being overly formal.
Step 4: The Once Around (For Rectangular Scarves)
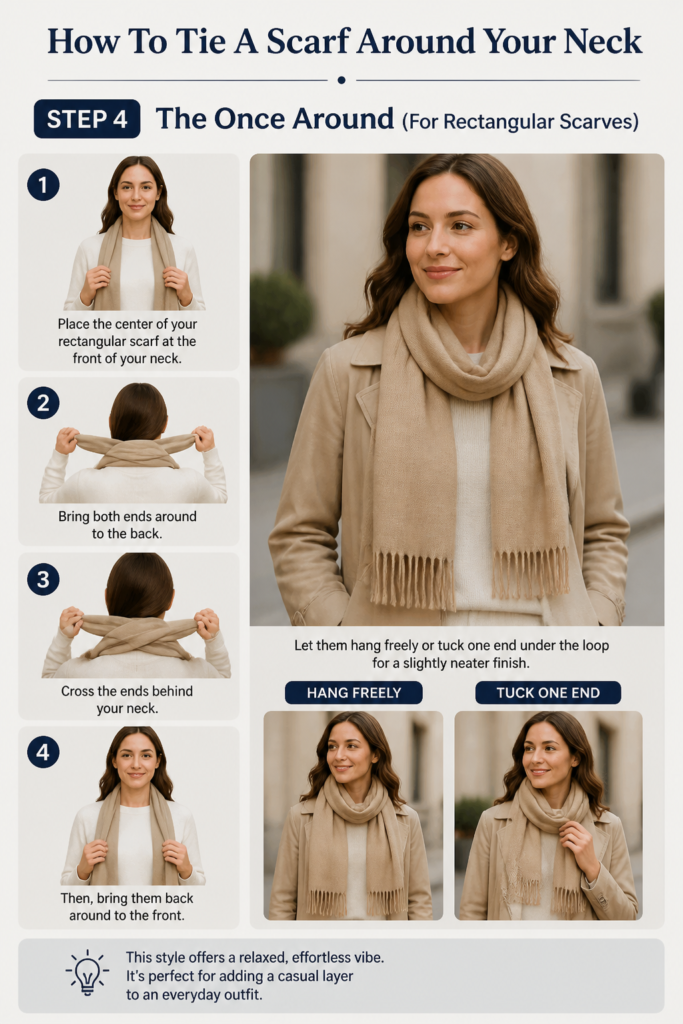
Place the center of your rectangular scarf at the front of your neck. Bring both ends around to the back.
Cross the ends behind your neck. Then, bring them back around to the front. Let them hang freely or tuck one end under the loop for a slightly neater finish.
This style offers a relaxed, effortless vibe. It’s perfect for adding a casual layer to an everyday outfit.
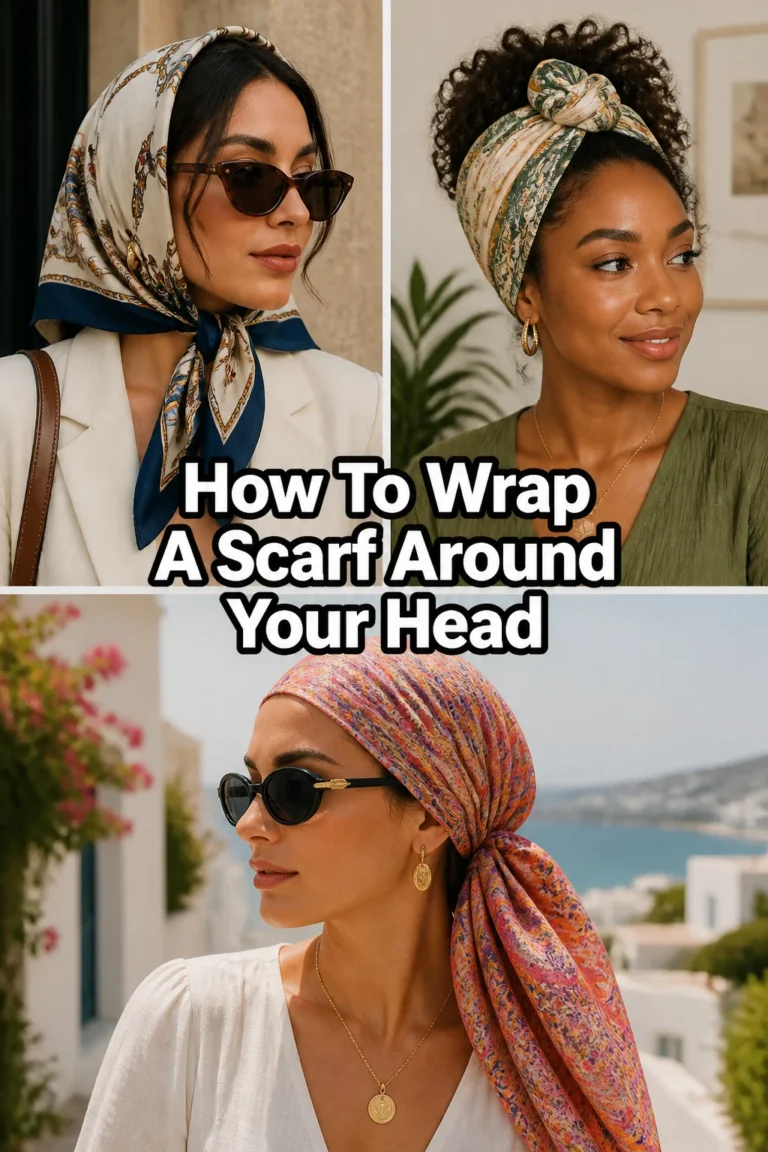
Step 5: The Simple Loop (For Infinity Scarves)
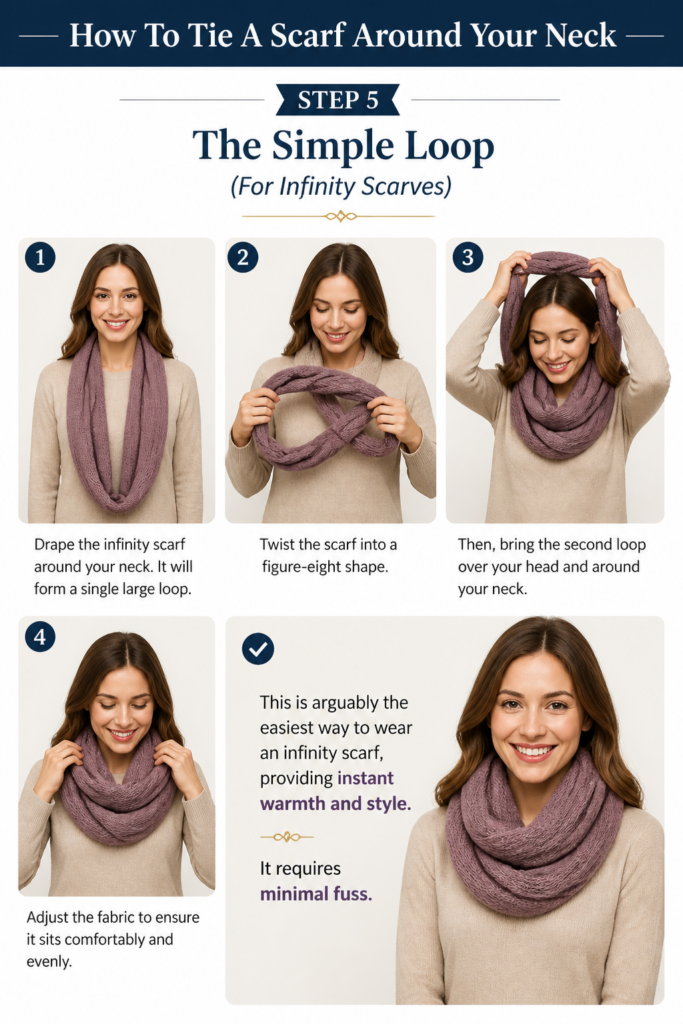
Drape the infinity scarf around your neck. It will form a single large loop.
Twist the scarf into a figure-eight shape. Then, bring the second loop over your head and around your neck. Adjust the fabric to ensure it sits comfortably and evenly.
This is arguably the easiest way to wear an infinity scarf, providing instant warmth and style. It requires minimal fuss.
Step 6: The Double Loop (For Infinity Scarves)
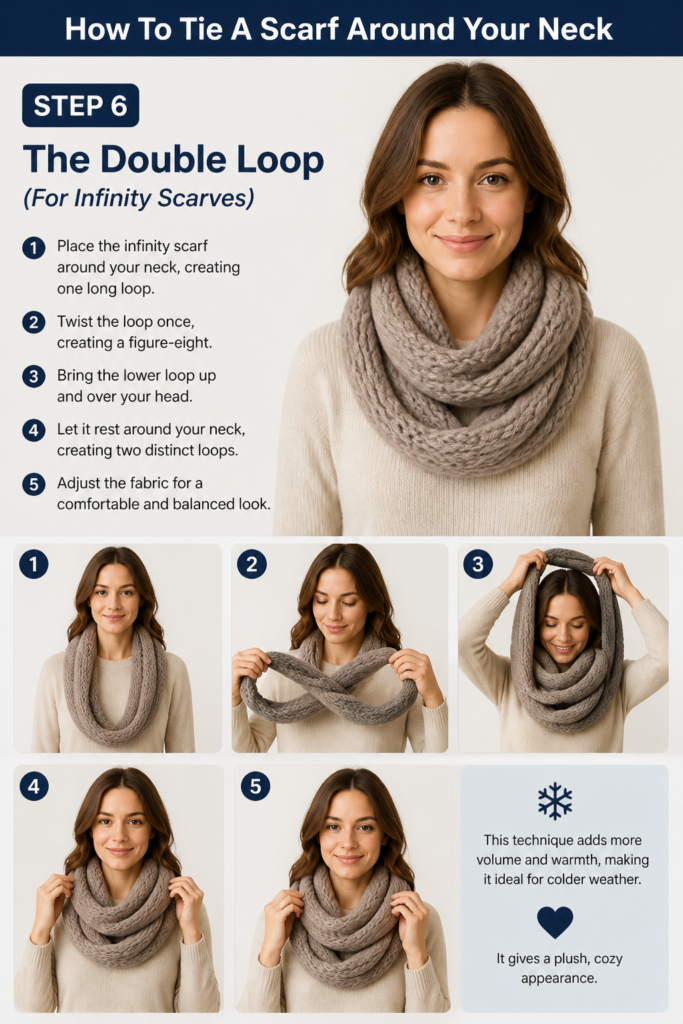
Place the infinity scarf around your neck, creating one long loop. Twist the loop once, creating a figure-eight.
Bring the lower loop up and over your head. Let it rest around your neck, creating two distinct loops. Adjust the fabric for a comfortable and balanced look.
This technique adds more volume and warmth, making it ideal for colder weather. It gives a plush, cozy appearance.
Step 7: The Kerchief Knot (For Square Scarves)
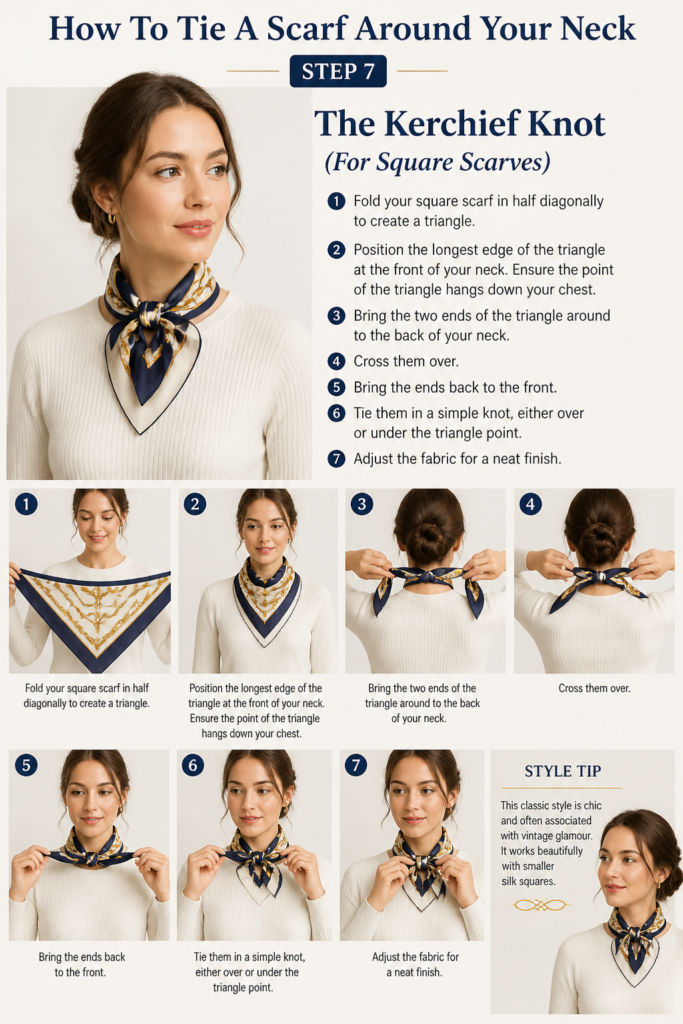
Fold your square scarf in half diagonally to create a triangle. Position the longest edge of the triangle at the front of your neck. Ensure the point of the triangle hangs down your chest.
Bring the two ends of the triangle around to the back of your neck. Cross them over.
Bring the ends back to the front. Tie them in a simple knot, either over or under the triangle point. Adjust the fabric for a neat finish.
This classic style is chic and often associated with vintage glamour. It works beautifully with smaller silk squares.
Step 8: The Bandana Style (For Smaller Square Scarves)
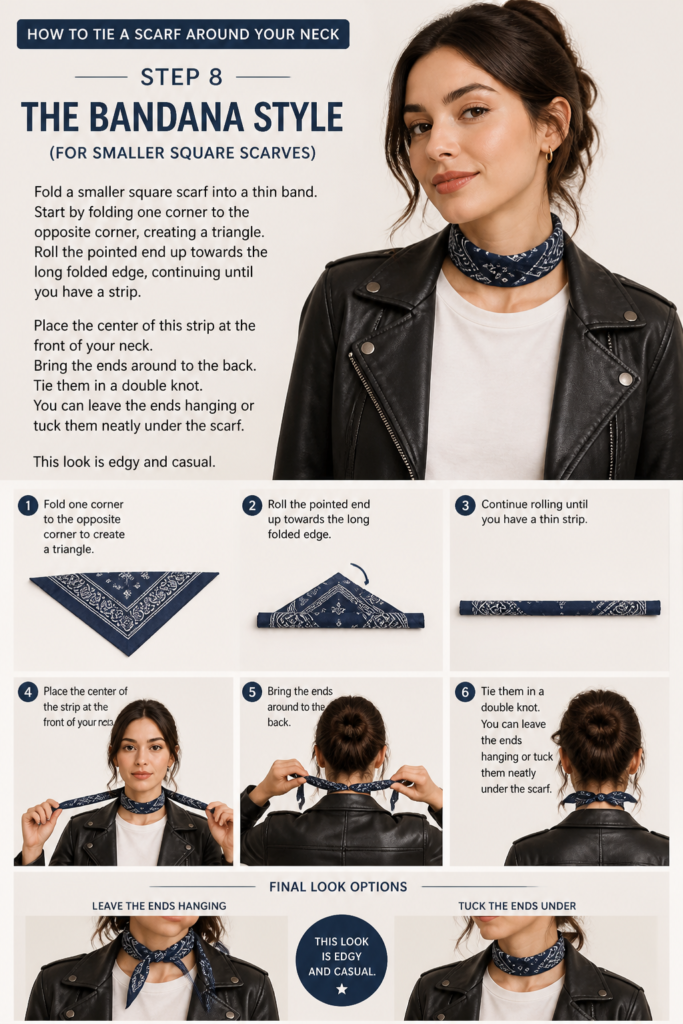
Fold a smaller square scarf into a thin band. Start by folding one corner to the opposite corner, creating a triangle.
Roll the pointed end up towards the long folded edge, continuing until you have a strip. Place the center of this strip at the front of your neck.
Bring the ends around to the back. Tie them in a double knot. You can leave the ends hanging or tuck them neatly under the scarf. This look is edgy and casual.
Step 9: The Fake Knot (For Rectangular Scarves)
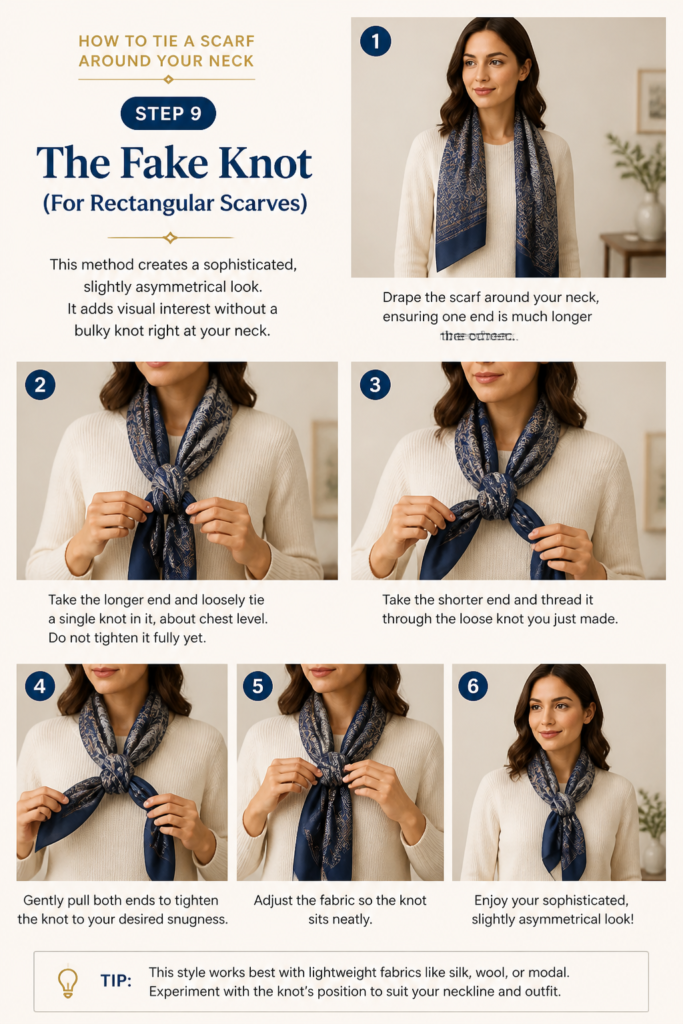
Drape the scarf around your neck, ensuring one end is much longer than the other. Take the longer end and loosely tie a single knot in it, about chest level. Do not tighten it fully yet.
Take the shorter end and thread it through the loose knot you just made. Gently pull both ends to tighten the knot to your desired snugness. Adjust the fabric so the knot sits neatly.
This method creates a sophisticated, slightly asymmetrical look. It adds visual interest without a bulky knot right at your neck.
Step 10: The Waterfall Drape (For Larger Rectangular Scarves)
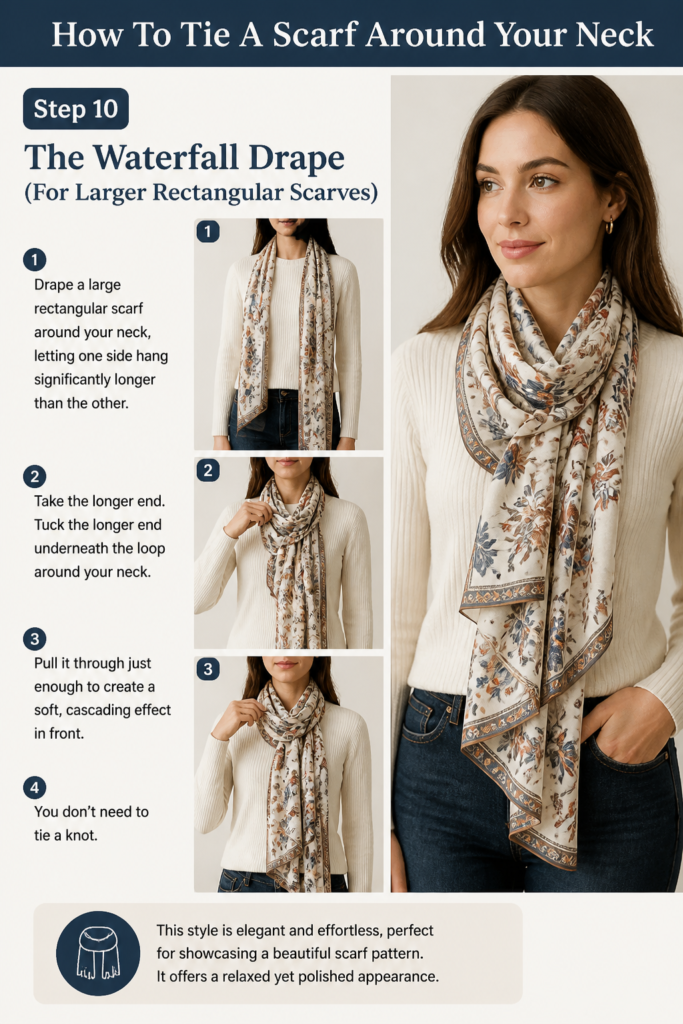
Drape a large rectangular scarf around your neck, letting one side hang significantly longer than the other. Take the longer end.
Tuck the longer end underneath the loop around your neck. Pull it through just enough to create a soft, cascading effect in front. You don’t need to tie a knot.
This style is elegant and effortless, perfect for showcasing a beautiful scarf pattern. It offers a relaxed yet polished appearance.
Common Mistakes to Avoid
Tying Too Tightly
Many people pull their scarves too taut against their neck, especially in colder weather. This can be uncomfortable, restrict movement, and actually look less flattering by creating a choked appearance. Always aim for a snug but comfortable fit that allows a little breathing room.
Instead of yanking, gently adjust the fabric once the knot is formed. You want it to feel secure, not restrictive. A comfortable scarf is a stylish scarf.
Ignoring Scarf Material and Size
Trying to force a bulky wool scarf into a neat, small knot designed for silk will result in a messy, oversized lump. Conversely, a tiny silk square won’t provide the volume needed for a dramatic drape. Always consider the scarf’s material and dimensions when choosing a tying style.
Match the technique to the scarf. A large, thick scarf is best for drapes or simple loops, while smaller, lighter scarves excel in more intricate knots like the kerchief.
Uneven Ends
Often, when initially draping a scarf, one end is significantly longer than the other, making it difficult to create a balanced knot. This leads to a lopsided look or an awkward struggle to adjust later. Take an extra moment at the beginning to ensure the ends are even, unless an asymmetrical look is your specific intention.
Before you start any knot, hold the scarf centered and check the length of both hanging ends in a mirror. A slight adjustment here saves a lot of frustration later.
Over-Styling
Sometimes, less is more. Trying to incorporate too many twists, knots, or layers can make a scarf look overdone and bulky, detracting from your overall outfit. The scarf should complement your look, not overwhelm it.
Focus on one or two simple, elegant techniques rather than complicated arrangements. A clean, well-executed simple knot often looks far more sophisticated than an overly complex one.
Troubleshooting
Scarf Feels Too Bulky
If your scarf feels too bulky, especially with thicker materials, you might be using a knot that’s better suited for thinner fabrics. Or, you might have too much fabric bunched up at the neck.
Try a looser drape or a single loop style that allows the fabric to spread out more. For rectangular scarves, simply letting the ends hang or doing a single wrap around the neck can reduce bulk. If it’s an infinity scarf, ensure you’re not twisting it too many times.
Knot Keeps Slipping or Coming Undone
A slipping knot is often due to smooth fabric like silk or satin, or not tightening the initial knot enough. It can be frustrating to constantly readjust your scarf throughout the day.
For slippery fabrics, consider adding an extra half-knot or using a scarf ring to secure the ends. For standard knots, ensure you pull the ends firmly, but comfortably, during the final tightening step. A slightly rougher texture scarf will naturally hold a knot better.
Scarf Looks Unflattering
Sometimes, a scarf just doesn’t seem to flatter your face shape or outfit. This can be due to the volume, the color, or where the knot sits. A scarf that’s too high can shorten your neck, while one that’s too low might feel disconnected from your outfit.
Experiment with different styles. If a high-volume knot isn’t working, try a longer, looser drape. Pay attention to how the scarf frames your face. A scarf with a V-shape at the front can elongate the neck, while one that sits closer can highlight your jawline. Don’t be afraid to try different colors that complement your skin tone.
Key Takeaways
- Start with the right scarf: Match your scarf’s material and size to the desired tying style.
- Practice basic techniques: Master the Parisian Knot, Classic Drape, and Simple Loop first for versatility.
- Prioritize comfort: Ensure your scarf is snug but never uncomfortably tight around your neck.
- Pay attention to balance: Evenly drape ends unless an asymmetrical look is intentionally desired.
- Adjust for bulk: Thicker scarves often look best in looser drapes or single wraps.
- Experiment and personalize: Don’t be afraid to try different styles and find what flatters you most.
Frequently Asked Questions
Can I tie a square scarf like a rectangular scarf?
Yes, to a certain extent. You would typically fold a square scarf diagonally first to create a triangle, and then roll or fold that triangle into a rectangular strip. This allows you to use methods like the Parisian knot or the once-around style, but the resulting knot might be slightly bulkier or shorter than with a dedicated rectangular scarf.
How do I stop my scarf from wrinkling when tied?
Wrinkling is often inevitable with certain fabrics, but you can minimize it. For silk or delicate fabrics, avoid very tight knots. Instead, opt for looser drapes or ties that allow the fabric to flow. When storing, unknot your scarves and hang them or roll them gently to prevent creases.
What’s the best scarf length for beginners?
For beginners, a rectangular scarf that is approximately 60-70 inches long and 10-14 inches wide is ideal. This length provides enough fabric to comfortably practice most common knots like the Parisian, Classic Drape, and Once Around without being overly cumbersome or too short to achieve a good look.
Can men use these scarf tying techniques?
Absolutely! Many of these techniques, especially the Parisian Knot, the Classic Drape, and the Once Around, are universally stylish and commonly worn by men. The key is to choose scarf colors and patterns that suit personal taste and outfit.
Our Top Recommended Finds
- Classic Cashmere Scarf: Incredibly soft and warm, perfect for luxurious drapes and elegant knots.
- Silk Square Scarf (35×35 inches): Versatile for kerchiefs, bandanas, or adding a pop of color to an outfit.
- Long Wool Blend Scarf: Excellent for colder weather, ideal for the Parisian or Once Around knots due to its length and warmth.
Embrace Your Scarf Style Today
You now have a robust toolkit for transforming your outfits with a simple scarf. From the practical warmth of a Parisian knot to the elegant flow of a waterfall drape, each technique offers a unique way to express your personal style.
Don’t let your scarves gather dust in a drawer. Take one out right now, stand in front of a mirror, and try a new knot. You might be surprised at how quickly you master it and how much it elevates your everyday look.