👔 How To Tie A Tie Step By Step Easy
Learning to tie a tie can feel like a secret handshake, a skill everyone seems to know but few teach clearly. I remember fumbling with my first tie for a school event, feeling completely lost. This guide is built from that experience, making it straightforward for anyone.
You’ll soon master the classic Four-in-Hand knot, a versatile and essential style.

Quick Overview
This guide will walk you through tying the most popular and easiest necktie knot. You will gain a practical skill that boosts your confidence and sharpens your look. We break down each movement into simple, manageable actions.
- Time needed: 5-10 minutes (first attempt), 1-2 minutes (with practice)
- Difficulty: Beginner
- What you’ll need: One necktie, a mirror (optional but helpful)
Step-by-Step Instructions
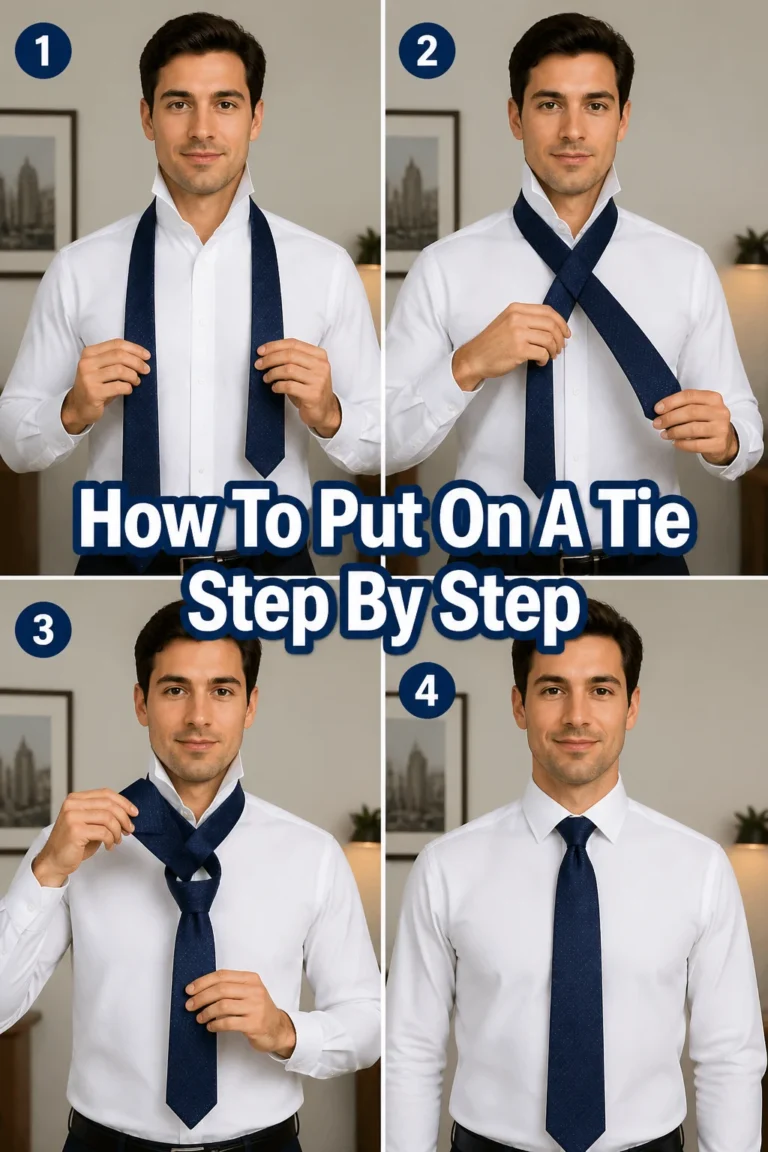
Step 1: Drape the Tie
Begin by draping the tie around your neck. Ensure the wide end hangs on your right side. The narrow end should be on your left.
The wide end needs to hang significantly lower than the narrow end. A good starting point is for the wide end to reach your belt buckle area, while the narrow end is around your sternum. Adjust this based on your height and preferred tie length.
Pro Tip: The final length of the narrow end should be shorter than the wide end, which should just touch your belt. Practice the initial drape to get the proportions right, as this impacts the final knot.
Step 2: Cross the Wide End
Take the wide end of the tie. Cross it over the narrow end. This forms the initial X shape at your collar.
Ensure the wide end stays flat and smooth against the narrow end. Avoid twisting the fabric here.
Step 3: Wrap Underneath
Now, bring the wide end underneath the narrow end. It should pass from left to right, emerging on the opposite side of the narrow end. This creates a loop around the narrow end.
Keep a gentle tension on the tie as you complete this motion. This helps maintain the knot’s structure.
Step 4: Bring Across Again
Take the wide end once more. Bring it across the front of the narrow end. This time, it moves from right to left.
You are essentially wrapping the wide end around the narrow end twice. This forms the front face of your knot.
Step 5: Up Through the Neck Loop
Thread the wide end upwards. Push it through the neck loop you created around your collar. The tip of the wide end should emerge from the bottom of the loop.
This action creates the opening for the final tightening. Be careful not to pull it all the way through yet.
Step 6: Down Through the Front Loop
Once the wide end is through the neck loop, pull it down. Guide it through the front loop you just formed in Step 4. This is the loop on the face of the knot.
Smoothly pull the wide end all the way through this front loop. This completes the knot shape.
Step 7: Tighten and Adjust
Hold the narrow end of the tie with one hand. With the other hand, gently pull down on the wide end. This action tightens the knot.
Slide the knot up towards your collar. Use both hands to adjust its position and firmness. The knot should sit snugly against your neck, centered between your collar points.
Pro Tip: Always ensure the narrow end is hidden behind the wide end. A well-tied knot is firm but not overly tight, allowing comfortable movement. Adjust the dimple just below the knot for a polished look.
Common Mistakes to Avoid
Starting with Uneven Lengths
Many beginners struggle because their initial tie drape is incorrect. If the wide end is too short or too long from the start, your finished tie will be disproportionate. This often results in the narrow end hanging lower than the wide end, or the wide end being too high or low.
Always take a moment in Step 1 to adjust the initial lengths. The wide end should typically be about twice as long as the narrow end at the beginning. This ensures the final knot sits correctly and the wide end reaches your belt.
Over-tightening or Under-tightening
A common issue is pulling the knot too hard or not enough. An over-tightened knot can look constricted and be uncomfortable, while an under-tightened knot appears sloppy and loose. Neither presents a polished appearance.
Aim for a firm, symmetrical knot that sits snugly against your collar. It should be comfortable and allow your shirt collar to lay flat. Practice makes perfect in finding this balance.
Twisting the Fabric
Throughout the tying process, it’s easy to let the tie fabric twist. This creates an untidy, lumpy knot instead of a smooth, elegant one. Twisted fabric also makes the tie less comfortable to wear.
Pay attention to keeping the tie flat as you wrap and pull it. Smooth out any twists as they occur, especially during the initial crosses and when pulling the wide end through the loops.
Forgetting the Dimple
The dimple is the small indentation just below the knot. It adds a touch of elegance and sophistication to your tie. Many people simply pull the knot tight without considering this detail.
To create a dimple, gently pinch the tie fabric vertically just below the knot as you pull the knot up to tighten. This creates a subtle crease that elevates the look of your tie.
Troubleshooting
My Tie is Too Long or Too Short
This is almost always a problem with the initial drape. The starting lengths of the wide and narrow ends dictate the final length. If your tie is too long, you started with the wide end hanging too low. If it’s too short, you started with the wide end too high.
Untie the tie completely. Re-drape it, paying close attention to the starting lengths in Step 1. Adjust the wide end’s initial position until it feels right for your height and preferred finished length.
The Knot Looks Lopsided or Crooked
A lopsided knot often happens when the tension isn’t even throughout the process. It can also occur if the tie gets twisted or if you pull one side more than the other during tightening. A crooked knot suggests it wasn’t centered properly.
Ensure you maintain consistent, gentle tension as you wrap and pull the tie. When tightening, use both hands to center the knot and pull evenly. Smooth out any twists as you go.
The Narrow End Hangs Below the Wide End
This is a classic sign that your initial setup was off. The narrow end should always be shorter than the wide end once the tie is complete. Seeing it peek out from underneath is a common beginner error.
Go back to Step 1. You need to start with the wide end significantly lower than the narrow end. Experiment with starting the wide end at your belt line and the narrow end at your sternum or higher. Adjust until the proportions work for your specific tie and body.
Key Takeaways
- Start Right: Correct initial draping of the tie is crucial for a well-proportioned final knot.
- Keep it Flat: Ensure the tie fabric remains untwisted throughout the process for a smooth, elegant finish.
- Even Tension: Maintain consistent, gentle tension to achieve a symmetrical and firm knot.
- Practice Makes Perfect: Tying a tie is a muscle memory skill; regular practice improves speed and precision.
- Adjust for Comfort: The final knot should be snug against your collar but comfortable to wear.
- Add a Dimple: A small dimple below the knot adds a touch of sophistication to your look.
Frequently Asked Questions
Which knot is the easiest to tie?
The Four-in-Hand knot, which this guide teaches, is widely considered the easiest and most versatile knot. It’s simple to learn and suitable for most shirt collars.
How long should my tie be when tied?
When properly tied, the tip of the wide end of your tie should just reach the top of your belt buckle. The narrow end should be shorter and hidden behind the wide end.
Can I untie my tie and reuse it without re-tying?
It is generally recommended to fully untie your tie after each wear. Leaving the knot tied can cause creases and wear out the fabric prematurely, especially if stored improperly. Untying it helps maintain its shape and extends its life.
What’s the best way to store ties?
Hang your ties on a tie rack or drape them over a hanger to prevent wrinkles. Rolling them loosely is also an option for travel, but avoid folding them sharply. Proper storage keeps them looking fresh.
Our Top Recommended Finds
- Quality Silk Tie: A good quality tie drapes better and is easier to tie, enhancing the final look.
- Tie Clip/Bar: Keeps your tie neatly in place, preventing it from swinging around during movement.
- Full-Length Mirror: An essential tool for seeing your entire outfit and making precise adjustments while tying.
Embrace Your New Skill
You’ve now learned a fundamental skill that will serve you well in many situations. Tying a tie is more than just dressing up; it’s about presenting yourself with confidence and attention to detail. Don’t worry if your first few attempts aren’t perfect.
Practice makes all the difference. Try tying your tie a few times this week, even if you’re not going anywhere. Soon, you’ll be able to do it quickly and effortlessly. Feel free to explore other knots like the Half Windsor or Windsor once you’ve mastered this one. Go ahead, stand tall, and wear your newly tied tie with pride today.