👕 How To Make An Oversized Shirt Fit Ideas
We’ve all been there, staring at a fabulous oversized shirt that just doesn’t quite fit the way we imagined. It might be too baggy, too long, or simply overwhelming our frame. I used to struggle with this constantly, but through a lot of trial and error (and a few sewing mishaps!), I’ve learned how to transform these pieces into stylish, flattering garments. This guide shares those practical, firsthand techniques to help you master the art of making an oversized shirt work for you.

Quick Overview
This guide will walk you through various methods to tailor and style an oversized shirt, ensuring it flatters your unique shape. You’ll learn how to create a more customized fit, bringing new life to your wardrobe.
- Time needed: 15 minutes to 2 hours (depending on chosen method)
- Difficulty: Beginner to Intermediate
- What you’ll need: Fabric scissors, sewing machine (optional), needle and thread, fabric chalk, pins, measuring tape, elastic, safety pins, hair ties, or styling accessories.
Step-by-Step Instructions
Step 1: Assess and Visualize Your Desired Fit
Before making any changes, try on the oversized shirt and stand in front of a mirror. Observe where the shirt feels too big or where you’d like to create more definition. Pin areas like the side seams, shoulders, or hem to get a visual idea of the desired alteration.
Think about the overall silhouette you want to achieve. Do you prefer a slightly cinched waist, a cropped look, or a more tapered sleeve? This initial assessment is crucial for guiding your next steps.
Pro Tip: Take a photo of yourself in the shirt, then use a photo editing app to draw lines where you imagine the new seams or hem. This can help visualize the final outcome.
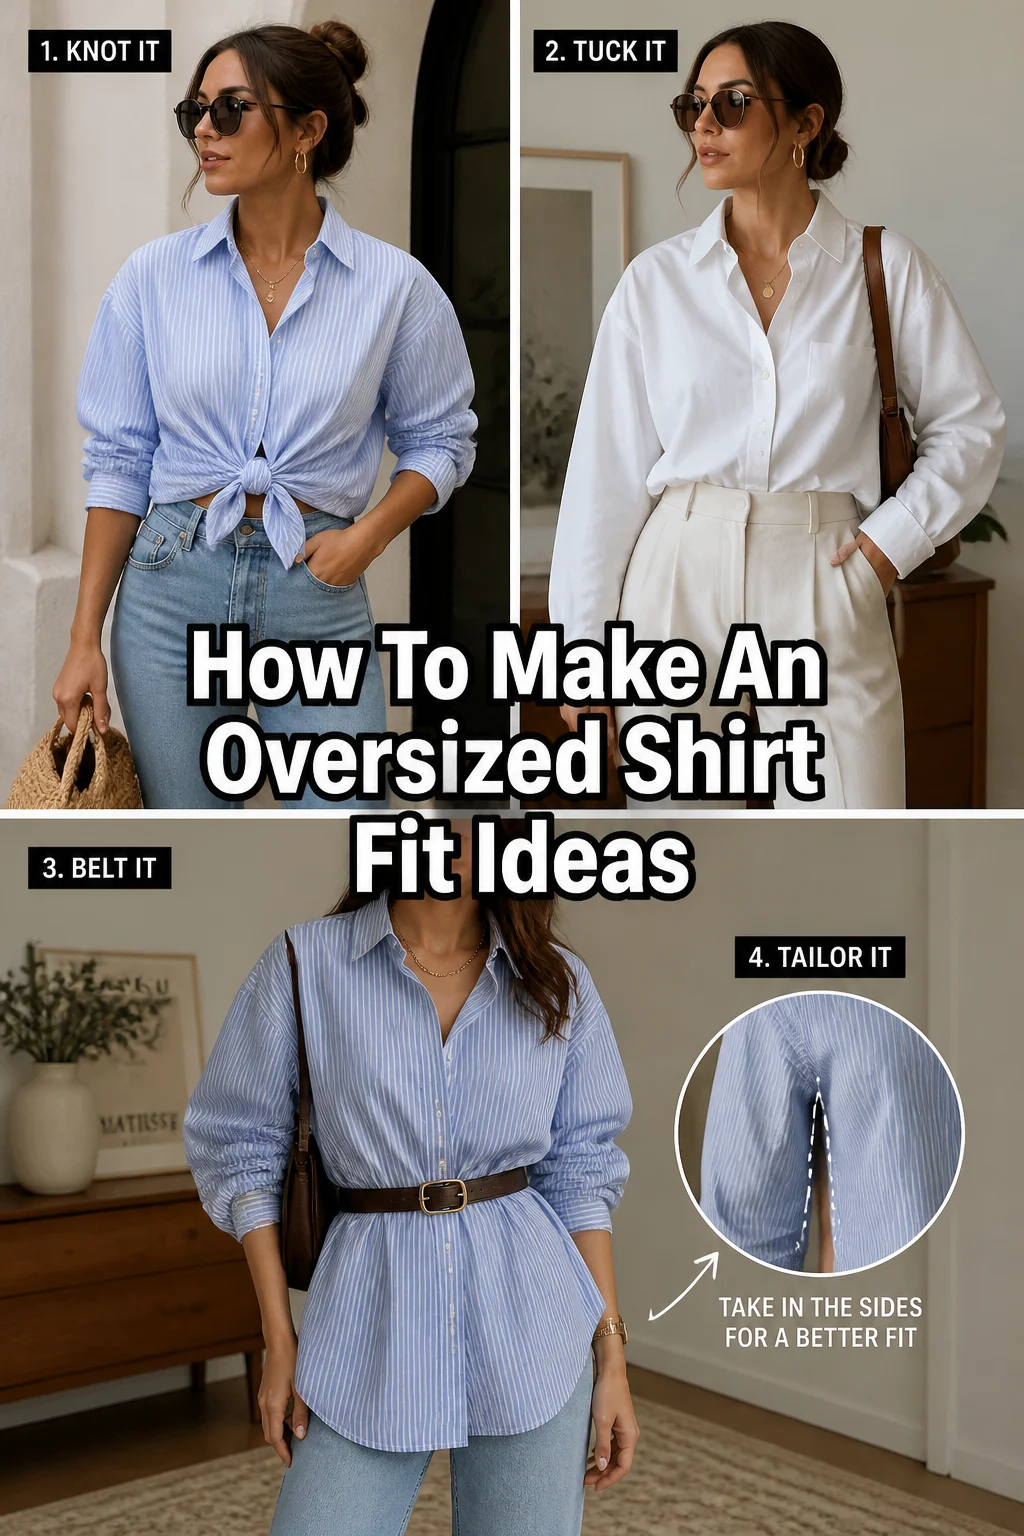
Step 2: The Simple Tuck – Front, Half, or Full
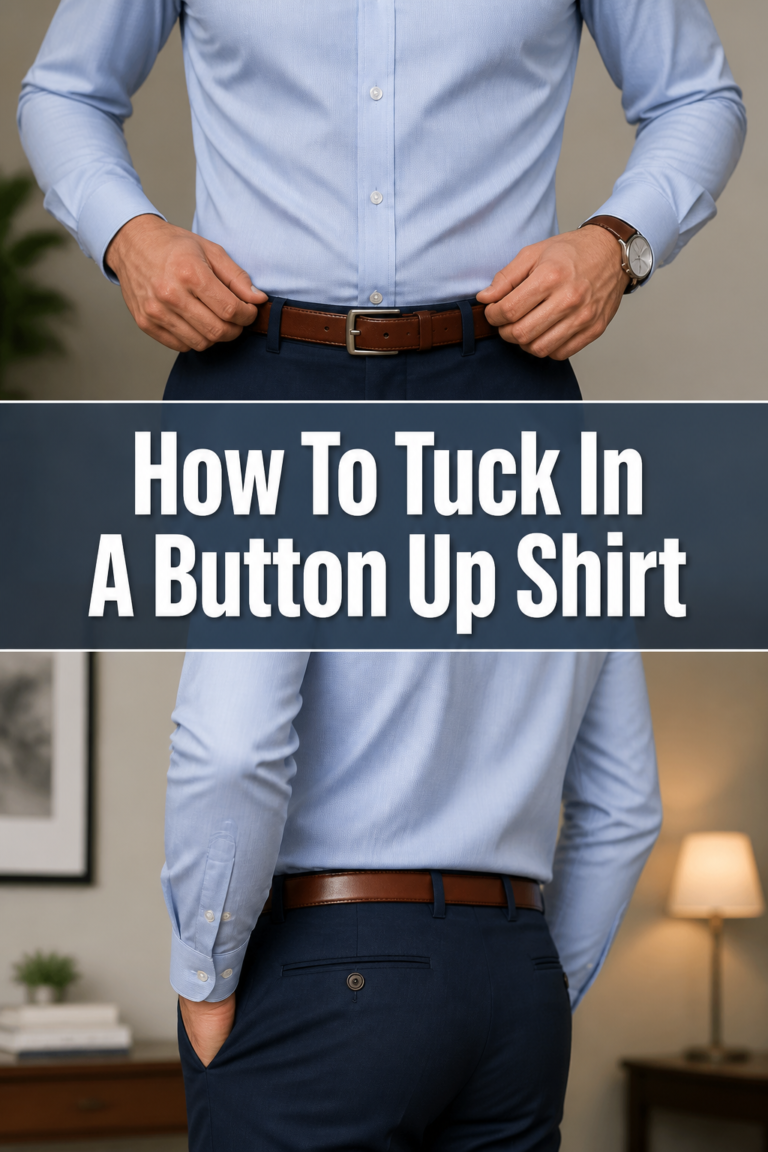
Tucking is the easiest way to add shape without any cutting or sewing. A front tuck involves tucking just the very front of the shirt into your bottoms, leaving the back loose. This creates a relaxed yet defined waistline.
A half-tuck (or French tuck) involves tucking one side of the front of your shirt, often just a few inches. This asymmetrical look is effortless and chic, breaking up the volume of the shirt. For a more polished feel, a full tuck can define your entire waist, especially with high-waisted pants or skirts.
Step 3: Cinching with Accessories – Belts and Ties
Adding a belt is a classic and effective way to instantly transform an oversized shirt. Place the belt at your natural waist or slightly higher to create an hourglass shape. Experiment with different belt widths and styles, from thin delicate belts to wide statement pieces.
You can also use a scarf or a piece of ribbon as a makeshift belt. Simply wrap it around your waist and tie it in a knot or a bow. This method offers versatility and allows you to match your accessories to your outfit.
Step 4: Knotting and Tying Techniques
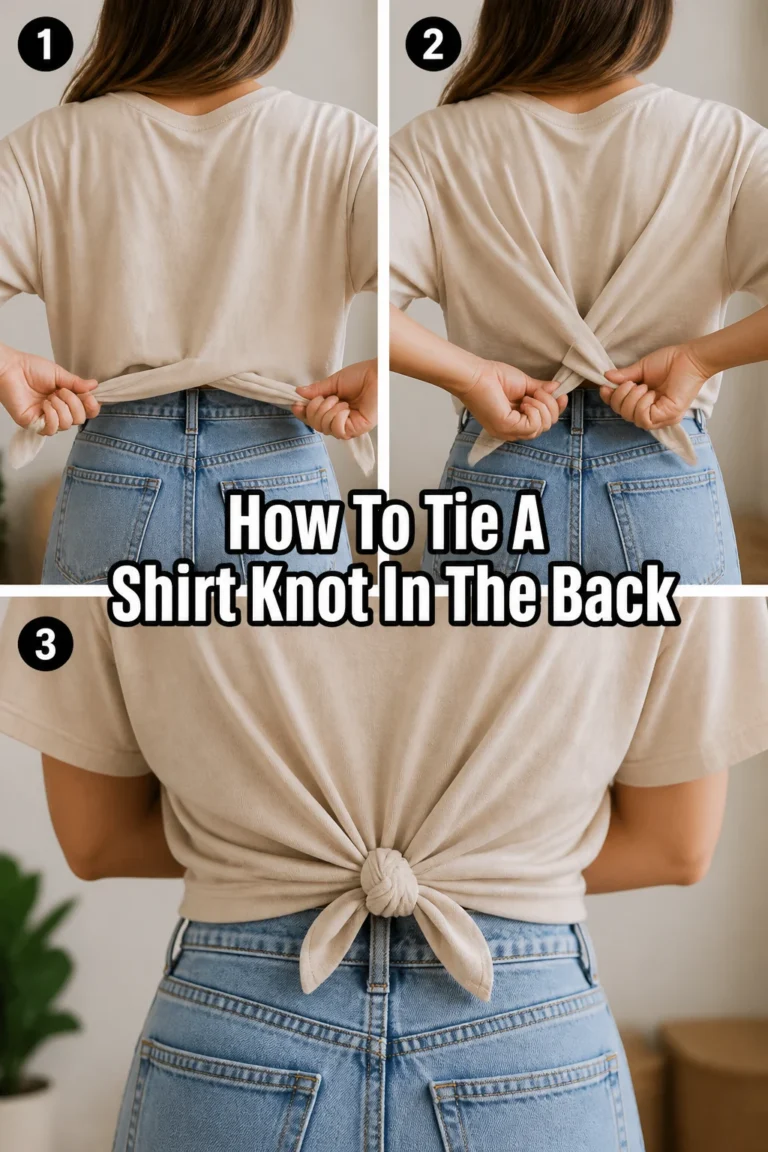
Knotting the hem of your oversized shirt is a playful and quick way to create a cropped look. Gather the excess fabric at the front, side, or back, then tie it into a simple knot. You can leave the ends hanging or tuck them in for a neater finish.
For a more tailored knot, consider tying the front two tails of the shirt together. This works especially well with button-up shirts. It creates a V-shape at the hem and cinches the waist simultaneously.
Step 5: Sleeve Roll-Up or Cinch
Oversized sleeves can sometimes look sloppy. Rolling them up to your elbows or just above the wrist instantly tidies the look and adds a casual flair. Experiment with different roll-up styles, like a simple fold or a more structured cuff.
For a more secure cinch, use a small elastic band or a hair tie around the sleeve just above your elbow. Push the fabric up to create a bloused effect. This technique can add a touch of sophistication to a casual shirt.
Step 6: The DIY Side Seam Adjustment (No-Sew or Minimal Sew)
If the shirt is too wide, you can create a more fitted silhouette at the sides. For a no-sew option, gather the excess fabric at each side seam and secure it with a safety pin on the inside. This creates a temporary dart, pulling the shirt in.
For a more permanent but still simple fix, turn the shirt inside out. Put it on and pinch the excess fabric along the side seams, pinning it evenly. Carefully take the shirt off, draw a new seam line with fabric chalk, and then sew a straight stitch along this line. Trim the excess fabric, leaving a small seam allowance.
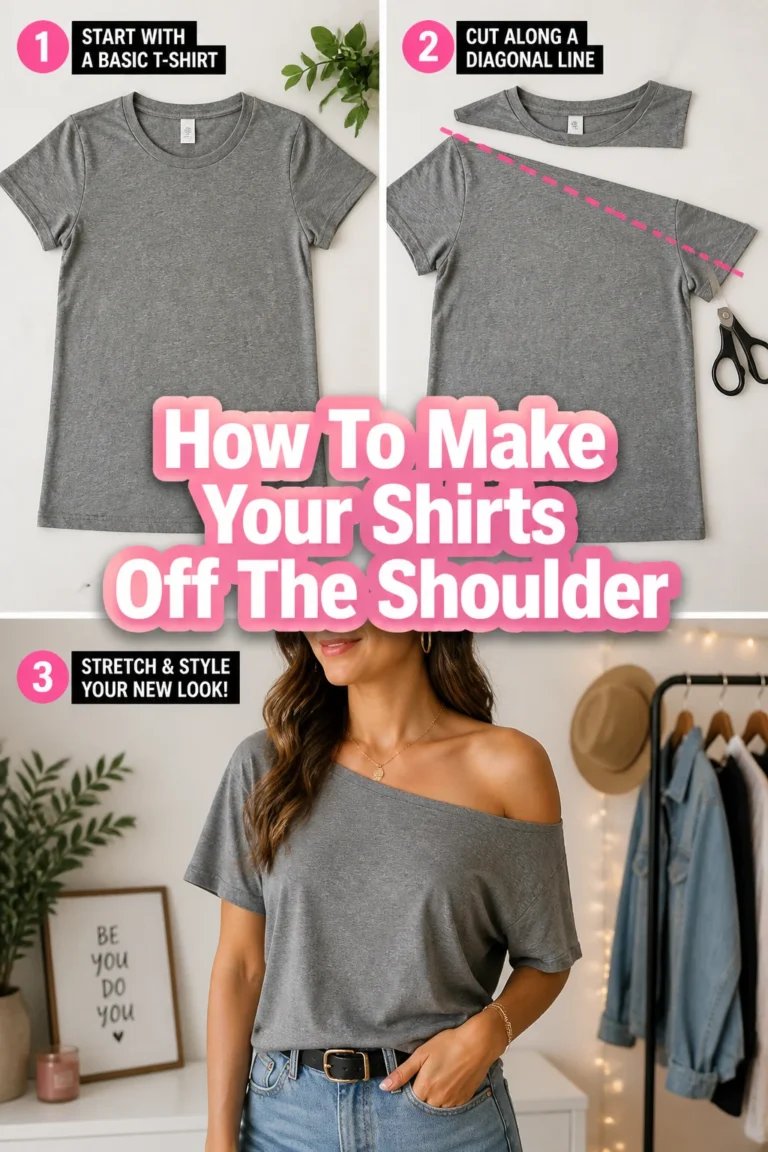
Step 7: Cropping the Hem
A simple crop can completely change the look of an oversized shirt, making it more modern and flattering with high-waisted bottoms. Try on the shirt and mark your desired new hemline with fabric chalk. Remember to add about an inch for a hem allowance if you plan to sew.
For a no-sew raw hem, simply cut along your marked line with sharp fabric scissors. For a neater finish, fold the raw edge up by half an inch, press, then fold another half inch and press again. Stitch this hem in place using a sewing machine or by hand.
Step 8: Elastic Cuffs or Hem (For a Bloused Effect)
Adding elastic to the cuffs can transform wide sleeves into a stylish bloused look. Measure your wrist or arm circumference where you want the sleeve to gather. Cut a piece of elastic slightly shorter than this measurement.
Turn the sleeve inside out, fold the cuff up, and create a small casing. Thread the elastic through the casing, secure the ends, and stitch it closed. You can apply the same technique to the bottom hem of the shirt for a bloused waist effect, which works wonderfully with a tucked-in look.
Step 9: Shoulder Adjustment for Better Fit
If the shoulder seams hang too low, the entire shirt can look ill-fitting. This is a more advanced alteration but makes a huge difference. Put the shirt on inside out and have a friend pin the shoulder seams where they should naturally sit. The new seam should follow the line of your natural shoulder.
Carefully take off the shirt, mark the new shoulder line with fabric chalk, and stitch along it. Trim the excess fabric, leaving a small seam allowance. This adjustment often requires resizing the armhole slightly as well, so proceed with caution or consider professional help if you’re not comfortable.
Step 10: Layering for Structure
Sometimes, the best way to make an oversized shirt “fit” is by strategically layering. Wear a fitted tank top or camisole underneath to add a base layer that defines your torso. Then, wear the oversized shirt open or partially buttoned over it.
Alternatively, layer a fitted jacket, vest, or cardigan over the oversized shirt. This adds structure and breaks up the volume, creating a more balanced silhouette. The oversized shirt then becomes a relaxed, comfortable layer within a more defined outfit.
Common Mistakes to Avoid
Cutting Without Measuring
Many people get excited and just start snipping away at the fabric. This often leads to uneven hems or a shirt that is too short. Always measure twice and cut once, using fabric chalk to mark your desired lines. Taking the time to properly measure ensures a clean, professional-looking alteration.
Over-Cinching with a Belt
While belting is a great technique, cinching too tightly can make the shirt balloon out awkwardly above and below the belt. It can also be uncomfortable. Aim for a comfortable, defined waistline that allows the fabric to drape naturally, not tightly constrict your body.
Ignoring Fabric Type
Not all fabrics behave the same way when altered. A stiff cotton will hold a structured shape better than a fluid rayon. Attempting a raw hem on a fabric prone to heavy fraying (like some linens or loose weaves) might result in a messy look rather than an intentional one. Consider the fabric’s drape and fraying potential before choosing your alteration method.
Forgetting About Seam Allowance
When sewing, always factor in seam allowance. If you cut exactly on your desired finished line, you won’t have any fabric left to create a seam, and the garment will end up too small. Always add at least a half-inch to an inch beyond your desired cut line for hemming or seaming.
Troubleshooting
Shirt Still Feels Too Boxy After Tucking
If a simple tuck isn’t enough to reduce the boxiness, try adding a belt over the tucked shirt. This provides a stronger waist definition. You could also try a half-tuck combined with rolling up the sleeves; the exposed forearms and defined waist break up the rectangular shape.
Hem is Uneven After Cutting
An uneven hem can be frustrating. To fix it, lay the shirt flat on a large, even surface. Use a ruler and fabric chalk to draw a new, perfectly straight line across the hem. If the original cut was very uneven, you might need to sacrifice a little more length to achieve a clean line. Recut carefully, then re-hem or leave raw.
Sleeves Don’t Stay Rolled Up
If your sleeves keep unrolling, try a more secure method. Roll the sleeve once, then fold it again more tightly. Alternatively, use a small piece of double-sided fabric tape on the inside of the roll to hold it in place. For a permanent fix, you can sew a small hidden stitch at the top of the roll.
Alteration Looks Unprofessional or Messy
This often happens with hurried work or dull tools. Ensure you use sharp fabric scissors for clean cuts. For sewing, take your time, use an iron to press seams flat before stitching, and practice on scrap fabric first. A seam ripper is your best friend for fixing mistakes without damaging the fabric.
Key Takeaways
- Start with simple styling: Tucking, knotting, and belting are quick, no-sew ways to add shape.
- Accessorize strategically: Belts, scarves, and even hair ties can transform a baggy silhouette.
- Consider your fabric: Different materials react differently to cutting and sewing, so plan accordingly.
- Measure twice, cut once: Precision is key for professional-looking alterations, especially when cropping or adjusting seams.
- Layering adds structure: Use fitted inner layers or outer garments to balance the volume of an oversized shirt.
- Don’t be afraid to experiment: Trial and error will help you discover what methods work best for your body and your shirts.
Frequently Asked Questions
Can I shrink an oversized shirt in the wash?
Yes, you can attempt to shrink cotton or linen shirts in a hot wash and hot dryer. However, this method is unpredictable. You can’t control where the shirt shrinks, and it might not shrink evenly or enough. It’s often better to tailor it if you want a specific fit.
What’s the easiest no-sew way to make a shirt fit better?
The easiest no-sew methods are tucking (front tuck, half-tuck, full tuck) and belting. These methods instantly define your waist and create a more flattering silhouette without any permanent changes to the garment.
Will these methods work for all types of oversized shirts?
Most of these styling and simple alteration methods work for a wide range of oversized shirts, from t-shirts to button-downs. However, more complex alterations like shoulder adjustments might be easier on woven fabrics than on stretchy knits. Always consider the fabric type before starting.
How do I make sure my alterations are symmetrical?
To ensure symmetry, always fold the shirt in half lengthwise when marking cuts or pinning seams. Use a ruler and fabric chalk to draw straight lines. For side seam adjustments, pin both sides evenly while wearing the shirt inside out.
Our Top Recommended Finds
- Sharp Fabric Scissors: Essential for clean, fray-free cuts when altering hems or seams.
- Fabric Chalk Wheel: Creates precise, temporary lines that easily brush off, crucial for marking alterations.
- Assorted Safety Pins: Perfect for temporary no-sew fixes, holding fabric in place, or creating quick cinches.
Embrace Your Style, One Fit at a Time
Transforming an oversized shirt doesn’t have to be daunting. With these practical steps, you have the power to turn those baggy garments into flattering, stylish pieces that truly reflect your personal aesthetic. Don’t let a “too big” label stop you from loving your clothes.
Start with a simple tuck or knot today, and see the immediate difference. Experiment with different techniques and find what makes you feel confident and comfortable. Your wardrobe is waiting for a refresh, and it all begins with understanding how to make your clothes fit you.