🧣 How To Tie A Bandana Around Your Neck
I remember the first time I tried to tie a bandana around my neck. It looked so effortless on others, but my attempt ended up lumpy and awkward. It felt like a secret club I wasn’t part of.
After some trial and error, and a lot of practice, I mastered the art of the perfect bandana knot. Now, I wear them constantly, adding a touch of style to any outfit. This guide shares everything I learned so you can achieve that cool, comfortable look too.
Quick Overview
Learning to tie a bandana around your neck is a simple skill that adds flair to your personal style. You’ll master a classic, comfortable knot perfect for any occasion.
Time needed: 5-10 minutes (initially), 30 seconds (once mastered)
Difficulty: Beginner
What you’ll need: One square bandana (cotton or silk recommended)
Step-by-Step Instructions
Step 1: Choose Your Bandana
Select a bandana that complements your outfit and personal taste. Material matters for drape and comfort. Cotton is classic and casual, while silk offers a more elegant look.
Consider the size of your bandana as well. A standard 22×22 inch square is versatile for most neck-tying styles. Smaller bandanas might be too tight, larger ones too bulky.
Step 2: Lay It Flat
Find a clean, flat surface like a table or bed. Carefully unfold your bandana and lay it out completely flat. Smooth out any wrinkles or creases.
Ensuring it’s perfectly flat helps create clean lines in your fold. This initial step is crucial for a neat final appearance.
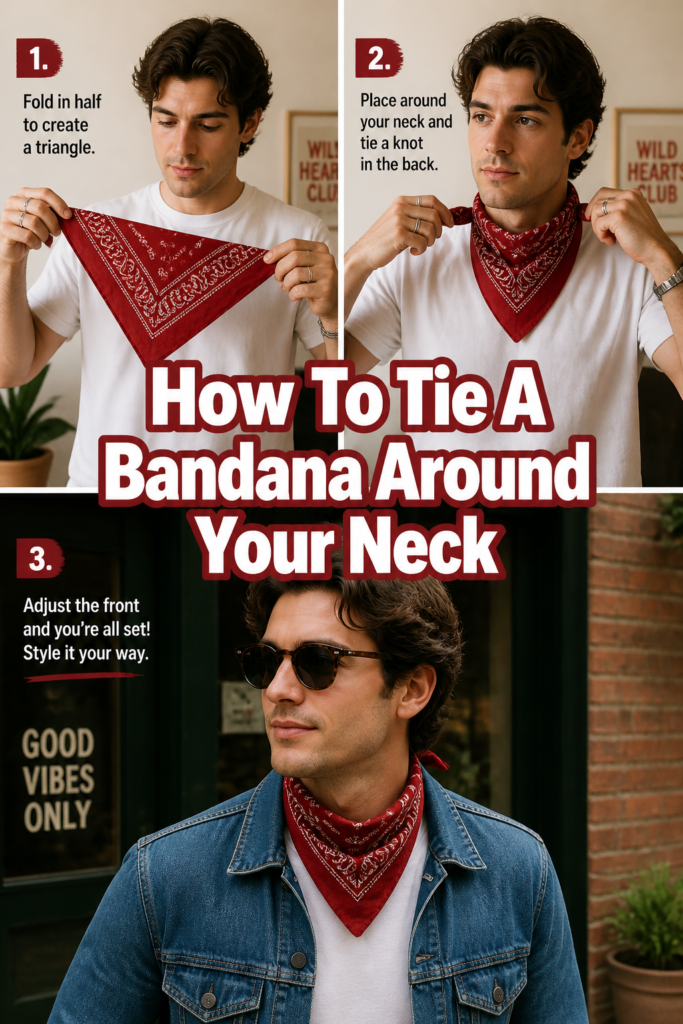
Step 3: Create a Triangle
Pick up one corner of the square bandana. Bring it diagonally across to meet the opposite corner. This action will form a perfect triangle shape.
Align the edges precisely to ensure an even fold. The cleaner your triangle, the better your subsequent folds will be.
Pro Tip: For a more relaxed, less structured look, you can slightly offset the corners before folding. This creates a softer, less defined point.
Step 4: Start Rolling (The Point)
Locate the longest edge of your newly formed triangle. This is the folded edge. Now, take the pointed tip of the triangle (the corner opposite the long folded edge).
Begin to roll this point inwards towards the long folded edge. Roll it tightly and evenly.
Step 5: Continue Rolling
Keep rolling the bandana from the point towards the long edge. Each roll should be consistent in width. Aim for a smooth, cylindrical shape.
Stop rolling when you have about 2-3 inches remaining from the long, folded edge. You should now have a long, strip-like shape.
Step 6: Determine Placement
Hold the rolled bandana by its ends. Decide where you want the bandana to sit on your neck. Some prefer it high, close to the chin, while others like it lower, at the base of the neck.
Consider your collar line and the overall neckline of your shirt. This helps frame your face and outfit effectively.
Step 7: Position on Neck
Place the center of the rolled bandana against the front of your neck. Bring both ends around to the back. Ensure the bandana feels comfortable and is centered.
You can also start by placing the center at the back of your neck and bringing the ends forward. Experiment to find what feels most natural.
Step 8: Cross the Ends
Once the ends are at the back, cross them over each other. Bring the right end over the left, or vice versa. This prepares for the first part of your knot.
Maintain a snug, but not tight, feeling around your neck. You should be able to breathe and move easily.
Step 9: Bring Ends to Front
After crossing at the back, bring both ends back around to the front of your neck. They should now be hanging down in front of you.
Adjust the tension as you bring them forward. The goal is a comfortable fit that doesn’t feel restrictive.
Step 10: Tie the Knot
Take the two ends now hanging in front. Tie a simple square knot. This means crossing one end over the other and looping it through, then repeating the process with the other end on top.
For example, right over left, then left over right. This creates a secure and flat knot.
Pro Tip: For a less bulky knot, try a simple “granny knot” (right over left, then right over left again). It’s less secure but lays flatter.
Step 11: Adjust and Refine
Gently pull on the ends of the bandana to tighten the knot to your desired comfort. Adjust the position of the knot itself. You can have it centered, or slightly off to the side.
Fluff and arrange the folds of the bandana around your neck. Ensure the fabric lays smoothly and evenly. Check yourself in a mirror from all angles.
Common Mistakes to Avoid
Tying Too Tightly
A common pitfall is cinching the bandana too tightly around your neck. This can be uncomfortable, restrict movement, and even look unflattering. It creates a “choking” effect rather than a stylish accessory.
Always ensure you can comfortably fit two fingers between the bandana and your neck. The goal is a relaxed, effortless look, not a tourniquet. Loosen the knot and reposition until it feels right.
Uneven Folding
Starting with a poorly folded triangle or rolling unevenly leads to a lumpy, messy final product. The bandana won’t sit flat or look crisp. This detracts from the intended stylish effect.
Take the extra minute to smooth out the bandana and make precise folds from the beginning. A clean foundation makes all the difference in the finished look. Patience in the initial steps pays off.
Using the Wrong Size
A bandana that is too small will look like a thin string around your neck, offering little style impact. Conversely, one that’s too large can create excessive bulk, making your neck appear shorter or overwhelmed.
Stick to standard sizes, typically 22×22 inches, especially when starting out. This size offers the best balance for most neck-tying styles and body types. Experiment with larger or smaller sizes once you’re comfortable.
Ignoring Material
The fabric of your bandana significantly impacts how it drapes and holds its shape. A stiff, cheap fabric might not roll smoothly or sit comfortably. It can look rigid and less appealing.
Opt for soft, breathable materials like cotton, linen, or silk. These fabrics are more forgiving, comfortable against the skin, and drape beautifully. They also hold their shape better after tying.
Troubleshooting
Bandana Feels Too Bulky
If your bandana feels too thick or bulky once tied, it often stems from the rolling process. You might have rolled it too loosely or left too much fabric in the roll. This creates unnecessary volume around your neck.
Try re-rolling the bandana more tightly and consistently from the tip towards the base. Ensure you’re aiming for a compact, even strip. You can also try a slightly smaller bandana for less bulk.
Knot Keeps Slipping Loose
A slipping knot is usually a sign that you’re not using the correct knot type or not tightening it enough. A simple “granny knot” can sometimes come undone easily, especially with silky fabrics.
Ensure you’re tying a proper square knot (right over left, then left over right). This type of knot is much more secure. For very slippery fabrics, a small, subtle safety pin can help anchor the knot discreetly.
It Looks Messy and Uneven
A messy appearance often traces back to the initial setup and folding. If the bandana wasn’t laid flat, folded into a precise triangle, or rolled evenly, the final result will reflect those inconsistencies.
Untie the bandana completely and start from scratch. Pay close attention to smoothing out wrinkles and making precise folds at each step. Practice makes perfect for achieving that crisp, even look.
Key Takeaways
Always start with a clean, flat bandana for the best results.
Folding into a precise triangle is the foundation for a neat roll.
Roll the bandana tightly and evenly to create a smooth strip.
Position the bandana comfortably on your neck before tying the knot.
Use a square knot for security, or a simple knot for a flatter look.
Adjust and fluff the bandana to ensure it lays perfectly around your neck.
Frequently Asked Questions
What’s the best material for a neck bandana?
Cotton is a popular choice for its breathability, comfort, and classic look. Silk offers a more luxurious feel and elegant drape. Linen is great for warmer weather. Choose a material that feels good against your skin and suits the occasion.
Can I wear a bandana with any outfit?
Bandanas are incredibly versatile. They can elevate a casual t-shirt and jeans, add a touch of personality to a button-down shirt, or even soften a more formal blazer. Consider the colors and patterns to ensure it complements your overall ensemble.
How do I keep my bandana from getting wrinkled throughout the day?
The initial roll and knot are key. A tightly rolled bandana will hold its shape better. For persistent wrinkles, a light starch spray before ironing can help. You can also gently re-fluff and adjust the bandana throughout the day if needed.
Are there other ways to tie a bandana around the neck?
Absolutely! While this guide covers a classic knot, you can also try a simple loop (where the ends hang loose), a cowboy knot (with the triangle point visible), or a double knot for extra security. Experiment to find your favorite style.
Our Top Recommended Finds
Soft Cotton Bandana Set: A multi-pack of 100% cotton bandanas in various colors. Perfect for daily wear and easy to wash.
Silk Twill Scarf: A luxurious alternative to cotton, offering a smoother feel and elegant drape. Ideal for dressing up.
Bandana Storage Box: Keeps your bandanas neatly folded and wrinkle-free, ready for use whenever you need them.
Embrace Your New Style
Tying a bandana around your neck is more than just a functional act; it’s a statement. It adds a dash of personality, a hint of rebellion, or a touch of timeless elegance to your look. You’ve now got the skills to master this versatile accessory.
Don’t let your bandanas sit in a drawer. Pull one out right now and give these steps a try. Experiment with different colors and patterns. Discover how this simple piece of fabric can transform your entire outfit. Your new signature look awaits.