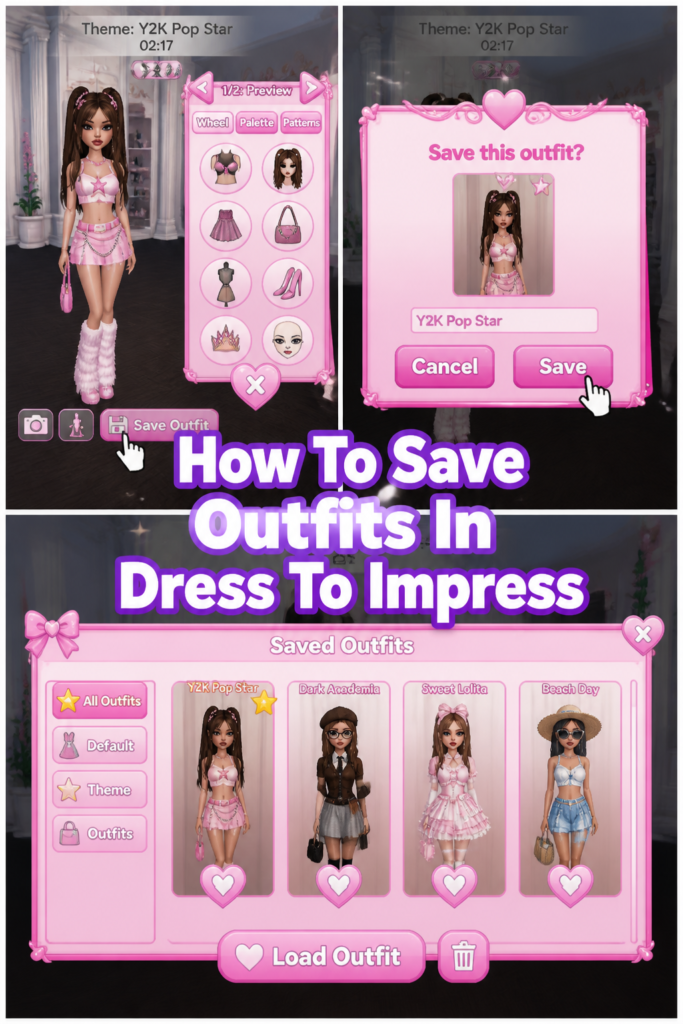
👗 How To Save Outfits In Dress To Impress
I remember the frustration of crafting the perfect look, only for it to vanish after I closed the game. Losing that ideal combination of top, skirt, and accessories was a real setback in my styling journey.
This guide comes from countless hours spent perfecting looks and mastering the save feature in Dress To Impress. You can trust these steps to help you keep every stunning creation you design.
Quick Overview
Saving your custom outfits in Dress To Impress allows you to quickly access your favorite styles for future events or challenges. This process ensures your creativity is never lost and always ready to impress.
You’ll soon be a master at organizing your virtual wardrobe. Here’s a quick look at what you’ll achieve.
- Time needed: 5-10 minutes (after initial setup)
- Difficulty: Beginner
- What you’ll need: Your mobile device, the Dress To Impress game installed, an active account.
Step-by-Step Instructions
Step 1: Launch Dress To Impress and Access the Styling Area
Begin by opening the Dress To Impress application on your device. Tap on the game icon to start it up.
Once the game loads, navigate to the main menu or home screen. Look for an option that allows you to start styling an outfit, often labeled “Dress Up,” “Create Look,” or “Fashion Studio.”
Step 2: Navigate Your Wardrobe and Select Garments
Upon entering the styling area, you’ll see various categories for clothing items. These typically include tops, bottoms, dresses, outerwear, and shoes.
Tap on each category to browse through your available inventory. Choose the specific garment you wish to include in your current outfit.
Pro Tip: Experiment with different combinations before committing. Drag and drop items onto your model to see how they look together in real-time. This helps visualize the complete ensemble.
Step 3: Add Accessories, Hair, and Makeup
After selecting your core clothing items, move on to accessories. This usually involves categories like jewelry, handbags, headwear, and eyewear.
Choose complementary pieces that enhance your outfit’s theme. Next, select a hairstyle and apply makeup options like lipstick, eyeshadow, and blush to complete the look.
Step 4: Review Your Complete Outfit
Once you’ve placed all desired items on your model, take a moment to review the entire outfit. Zoom in and out if the game allows, checking for any clashing colors or mismatched styles.
Ensure every detail, from the shoes to the earrings, contributes to your intended aesthetic. This final check helps confirm your outfit is perfect before saving.
Step 5: Locate the “Save” or “Outfit Slots” Button
Look for a clearly labeled “Save,” “My Outfits,” or an icon resembling a hanger, star, or folder. This button is usually found at the bottom or top of the styling screen.
Tapping this button will typically open a new interface dedicated to managing your saved looks. This is where your outfit will be stored for future use.
Step 6: Choose an Empty Slot or Select an Existing One
The save interface will display a series of empty slots, often numbered or presented as blank thumbnails. If you’re saving a new outfit, select an empty slot.
If you intend to update an existing saved outfit, tap on its thumbnail. Be aware that choosing an occupied slot will typically overwrite the previous outfit stored there.
Pro Tip: Create a system for your outfit slots. For instance, dedicate the first few slots to everyday looks, the next to formal wear, and subsequent slots to themed outfits. This organization makes finding specific styles much easier.
Step 7: Name Your Outfit
After selecting a slot, a prompt will usually appear asking you to name your outfit. This is a crucial step for easy identification later.
Enter a descriptive name that helps you remember the outfit’s purpose or style. For example, “Emerald Gala Gown,” “Casual Denim Day,” or “Summer Beach Chic.”
Step 8: Confirm the Save Action
Once you’ve named your outfit, look for a “Confirm,” “Save,” or “OK” button within the naming prompt. Tap this button to finalize the saving process.
The game will then store your outfit in the chosen slot. You might see a brief confirmation message or the outfit’s thumbnail update with your new creation.
Step 9: Access Saved Outfits for Future Use
To retrieve a saved outfit, return to the “My Outfits” or “Saved Looks” section. Tap on the thumbnail of the outfit you wish to use.
The game will then load that entire outfit onto your model, ready for a competition, event, or further modifications. This makes swapping styles incredibly efficient.
Common Mistakes to Avoid
Forgetting to Save Your Masterpiece
One of the most common pitfalls is spending significant time crafting a fantastic outfit, then exiting the styling screen without saving it. All your hard work will be lost, requiring you to recreate the look from scratch.
Always make it a habit to look for the “Save” button before leaving the styling interface. A quick save ensures your effort is preserved.
Overwriting the Wrong Outfit Slot
When saving a new outfit, it’s easy to accidentally tap on an occupied slot instead of an empty one. This action will permanently replace the existing outfit with your new creation without much warning.
Always double-check which slot you’ve selected before confirming your save. If you need to overwrite, ensure it’s an outfit you no longer need.
Not Utilizing All Available Outfit Slots
Many players only save a few favorite outfits, leaving numerous slots empty. This limits your flexibility and means you might be constantly recreating looks for different events.
Make full use of all the provided outfit slots. Think of them as a comprehensive wardrobe for every occasion the game offers.
Saving Incomplete or Unfinished Outfits
Sometimes, in a hurry, players save an outfit before adding all the intended accessories, hair, or makeup. Later, when they retrieve it, the look feels unfinished and requires additional work.
Take a moment to review your outfit as a whole before hitting save. Ensure every detail is in place to avoid future disappointment.
Troubleshooting
Saved Outfit Not Appearing in the List
If you’ve saved an outfit but can’t find it later, first check if you actually completed the saving process. Sometimes players name an outfit but forget to tap the final “Confirm” button.
Try restarting the game app. Often, a quick restart can refresh the game’s data and make your saved outfit appear correctly in its slot.
The “Save” Button Is Greyed Out or Unresponsive
A greyed-out or unresponsive save button usually indicates an incomplete action or a system issue. Ensure you have at least one item of clothing on your model, as some games require a basic outfit before saving.
If the problem persists, check your internet connection, as some game features, including saving, might require online validation. If all else fails, a game restart can often resolve minor glitches.
Game Crashes During the Save Process
A game crash while saving can be frustrating and may result in the loss of your current outfit. This often happens due to memory issues on your device or a temporary game bug.
Free up some RAM by closing other apps running in the background. Ensure your device’s operating system and the Dress To Impress game itself are updated to their latest versions.
Key Takeaways
- Always confirm the save action after naming your outfit to ensure it’s stored.
- Utilize descriptive names for your outfits to easily identify them later.
- Regularly check your saved outfit slots to avoid accidental overwrites.
- Take a moment to review your complete outfit before saving to ensure it’s perfect.
- Restarting the game can often resolve issues with missing or unresponsive save features.
- Make it a habit to save frequently, especially after creating an impressive look.
Frequently Asked Questions
Can I rename a saved outfit?
Most games, including Dress To Impress, allow you to rename saved outfits. You usually need to tap on the outfit’s thumbnail in your “My Outfits” section, then look for an “Edit” or “Rename” option. This will bring up the naming prompt again.
How many outfits can I save?
The number of outfits you can save depends on the game’s design. Dress To Impress typically provides a set number of free slots, often between 10-20. Some games offer additional slots for purchase or as rewards.
What happens if I uninstall the game?
If you uninstall the game, your saved outfits and game progress are usually lost unless your account is linked to a cloud save feature (like Google Play Games or Apple Game Center). Always ensure your game progress is backed up to an online account if you plan to uninstall.
Can I share my saved outfits with friends?
The ability to share saved outfits directly with friends varies by game. Some versions of Dress To Impress might allow you to showcase your outfits in competitions or on social media, but direct sharing of the outfit data itself is less common.
Elevate Your Style Game Today
Now that you understand the ins and outs of saving outfits, it’s time to put that knowledge into action. No more losing those incredible combinations you’ve spent time perfecting.
Start building a robust collection of looks for every occasion the game throws your way. Experiment with bold new styles, save them, and always have the perfect ensemble ready. Your virtual wardrobe awaits your creative touch.
Consider exploring advanced styling techniques within the game next. Perhaps learn how to layer items effectively or master color palettes. The world of fashion in Dress To Impress is yours to conquer!
Our Top Recommended Finds
- Stylus Pen: Offers greater precision for selecting small accessories and applying intricate makeup details on your mobile screen.
- Portable Power Bank: Ensures your device stays charged during extended styling sessions, especially when you’re on the go.
- Comfortable Headphones: Enhances the immersive experience with background music and sound effects, making your styling time more enjoyable.