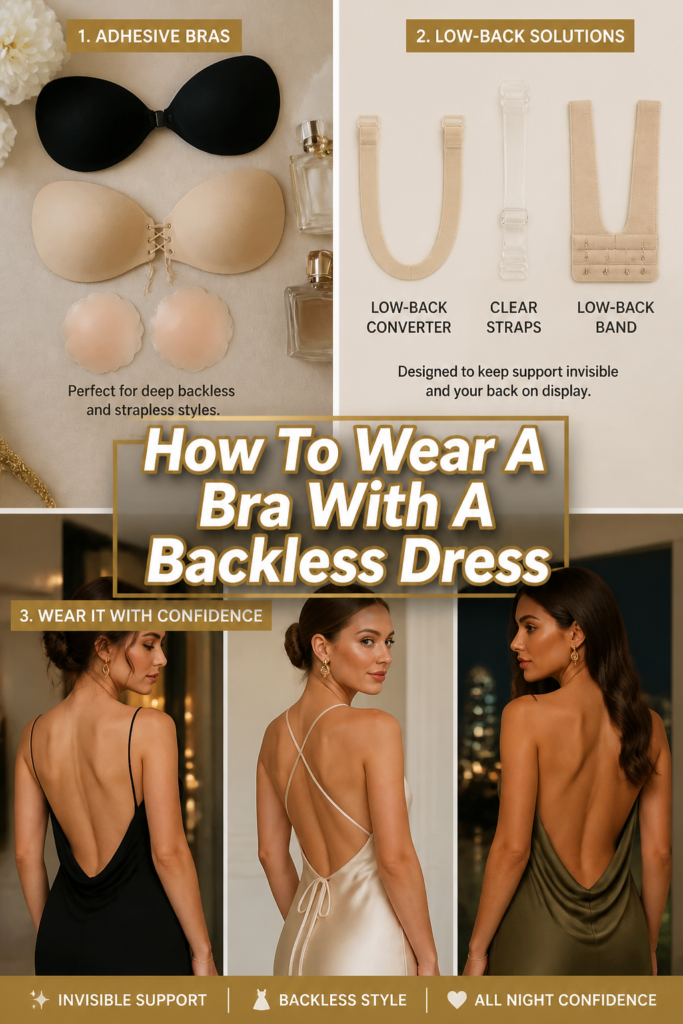
✨ How To Wear A Bra With A Backless Dress
Wearing a backless dress truly makes a statement, exuding confidence and style.
However, the question of bra support often arises, creating a dilemma for many.
I’ve personally navigated countless events in backless ensembles, discovering the best techniques and products to ensure flawless support and comfort.
Quick Overview
This guide will show you how to confidently wear a bra with any backless dress.
You’ll learn to choose the right support, apply it correctly, and avoid common styling issues.
- Time needed: 15-30 minutes (initial setup), 5 minutes (daily application)
- Difficulty: Beginner to Intermediate
- What you’ll need: Your backless dress, various bra options (adhesive, tape, silicone pasties), measuring tape, skin prep items.
Step-by-Step Instructions
Step 1: Understand Your Dress’s Backline
Before choosing a bra, carefully examine the back of your dress.
Is it a low-back design, a deep V, or completely open?
Knowing the exact cut helps you select a bra solution that remains invisible.
Pro Tip: Try on your dress and take a photo of your back. This visual reference will guide your bra choice and application, ensuring no straps or bands peek out.
Step 2: Explore Your Bra Options
Different backless styles require specific bra types to provide discreet support.
Consider adhesive bras, breast lift tape, or nipple covers as your primary solutions.
Each offers unique benefits depending on your bust size and the dress’s design.
Adhesive Bras: These silicone or fabric cups stick directly to your skin, offering lift and cleavage without a back band or straps. They are ideal for moderate support.
Breast Lift Tape: Medical-grade body tape can lift and shape your breasts, providing significant support for larger busts or intricate dress designs. It’s versatile for various necklines.
Nipple Covers/Pasties: For those who only need to prevent show-through, silicone or fabric pasties are perfect. They offer no support but ensure modesty.
U-Plunge or Low-Back Converters: Some conventional bras come with U-plunge fronts or convertible straps that can be lowered significantly. These work for dresses with slightly lower backs, not fully open ones.
Step 3: Measure for the Perfect Fit
Proper sizing is crucial for comfort and invisible support, especially with adhesive options.
Measure your bust and band size even if you’re opting for stick-on cups.
Many adhesive bras are sized A, B, C, D, which roughly correspond to your cup size.
Pro Tip: When using breast tape, test a small piece on sensitive skin (like your inner arm) 24 hours beforehand. This checks for any allergic reactions or irritation, preventing discomfort on your event day.
Step 4: Prepare Your Skin Thoroughly
For any adhesive bra solution, clean, dry skin is non-negotiable for maximum adhesion.
Shower and gently exfoliate your chest area, then dry completely.
Avoid applying any lotions, oils, powders, or perfumes to the skin where the adhesive will sit.
These products create a barrier that prevents the bra from sticking securely, leading to slippage.
Step 5: Apply Adhesive Bras Correctly
Positioning is key for a natural look and lasting hold with adhesive bras.
Lean forward slightly to allow your breasts to fall naturally into position.
Peel back the protective film from one cup and place it on your breast, starting from the outer edge and smoothing inward.
Repeat for the other cup, ensuring they are symmetrical and at your desired lift level.
Most adhesive bras have a front clasp; connect it to create cleavage and further secure the cups.
Press firmly around the entire surface of both cups for several seconds to activate the adhesive.
Step 6: Master Breast Lift Tape Application
Breast tape requires a bit more technique but offers incredible customization and support.
Cut strips of tape to appropriate lengths, usually starting from below the breast and extending upwards.
Lift your breast into the desired position with one hand.
Apply the tape from the bottom, pulling upwards and smoothing it over your breast towards your shoulder or collarbone.
Use multiple overlapping strips to create a supportive structure, shaping and lifting as needed.
Experiment with different patterns (e.g., vertical, diagonal, U-shape) to find what works best for your dress and bust.
Pro Tip: Always round the corners of your tape strips. This prevents edges from lifting prematurely and makes the tape less noticeable under clothing.
Step 7: Check for Visibility and Comfort
Once your chosen bra solution is in place, put on your backless dress.
Turn around and check your reflection in a mirror from all angles.
Ensure no edges of the bra, tape, or pasties are visible through the fabric or peeking out from the backline.
Move around, sit, and raise your arms to confirm the bra stays securely in place and feels comfortable.
Any discomfort or visible lines need immediate adjustment.
Step 8: Final Adjustments and Confidence Boost
Make any last-minute tweaks to the bra’s position or the dress itself.
Smooth out any wrinkles or bulges that might have appeared.
Take a deep breath and feel confident in your perfectly supported backless look.
You’ve mastered the art of invisible support.
Common Mistakes to Avoid
Ignoring Skin Preparation
Applying adhesive bras to skin that isn’t clean and dry is a common error.
Lotions, oils, and even natural body oils will significantly reduce the adhesive’s effectiveness.
Always cleanse the area thoroughly with soap and water, then dry completely before application, to ensure a strong, long-lasting hold.
Choosing the Wrong Size
Many assume one-size-fits-all for adhesive options, or they guess their cup size.
An ill-fitting bra will not provide adequate support, can create an unnatural shape, or may even be visible.
Always refer to the product’s sizing chart and measure yourself to get the best fit for your body.
Not Testing the Look
Waiting until the last minute to try on your bra solution with your backless dress is a recipe for stress.
You need time to adjust, reposition, or even switch to a different bra type if the first one doesn’t work.
Always do a full dress rehearsal at least a day before your event to ensure everything looks and feels perfect.
Forgetting to Account for Movement
A bra might look great when you’re standing still, but what happens when you sit, dance, or reach?
Failing to test the bra’s security and comfort during various movements can lead to wardrobe malfunctions or constant adjustments.
Practice moving naturally in your dress and bra to confirm it holds up to real-world activity.
Troubleshooting
Bra Slipping or Losing Adhesion
If your adhesive bra isn’t staying put, the most likely culprit is skin preparation.
Ensure your skin is completely free of any products like moisturizers, perfumes, or natural oils.
Clean the adhesive surface of the bra with mild soap and water, then air dry, if it’s reusable, to restore stickiness.
Visible Bra Edges or Lines
This usually means the bra solution isn’t quite right for your dress’s cut or your body shape.
Try repositioning the bra cups slightly, or consider a different type, such as thinner silicone pasties or carefully applied breast tape.
Sometimes, a slightly larger cup size in an adhesive bra can blend more seamlessly with your skin.
Discomfort or Irritation
If you feel itching, pulling, or general discomfort, remove the bra immediately.
You might be allergic to the adhesive, or the bra is too tight or improperly applied.
Try a different brand or type of adhesive, or switch to breast tape designed for sensitive skin, ensuring it’s not pulled too taut.
Key Takeaways
- Always begin by understanding your dress’s specific backline.
- Select your bra solution from options like adhesive bras, breast tape, or nipple covers.
- Meticulous skin preparation is critical for any adhesive product to work effectively.
- Properly measure and apply your chosen bra for optimal fit and invisibility.
- Conduct a full test with your dress to ensure comfort and no visible lines during movement.
- Avoid lotions and oils on application areas to prevent slippage.
Frequently Asked Questions
Can I reuse adhesive bras?
Most silicone adhesive bras are designed for multiple uses, typically 10-20 times with proper care.
After each wear, gently hand wash the adhesive surface with mild soap and warm water, then air dry with the protective film reapplied once dry.
How do I remove breast tape without pain?
Always remove breast tape slowly and gently, preferably in the shower or after applying an oil-based product (like baby oil or coconut oil) around the edges.
Let the oil soak in for a few minutes to help loosen the adhesive, then peel back carefully, supporting your skin.
Are adhesive bras suitable for larger busts?
While adhesive bras can provide some lift and cleavage for larger busts, they might not offer the same level of support as a traditional bra.
For significant support, breast lift tape is often a more effective solution for those with fuller chests, as it allows for customized shaping and lift.
What if I sweat a lot?
Sweat can compromise the adhesion of stick-on bras and tape.
Ensure your skin is completely dry before application, and consider using a small amount of antiperspirant on the surrounding skin (but not where the adhesive will sit).
Look for adhesive products specifically marketed as “sweat-proof” or “waterproof” for better performance in warm conditions.
Our Top Recommended Finds
- Reusable Silicone Adhesive Bra: Provides seamless lift and cleavage for multiple wears.
- Medical-Grade Breast Lift Tape: Offers customizable, strong support for various bust sizes and dress styles.
- Invisible Nipple Covers: Essential for preventing show-through when no support is needed.
Embrace Your Backless Style with Confidence
Wearing a backless dress doesn’t have to mean sacrificing comfort or support.
With the right knowledge and tools, you can confidently showcase your style.
Take these steps, experiment with the options, and find what works perfectly for you.
Go ahead, choose that stunning backless dress and step out feeling amazing today!