👚 How To Tuck In Shirt Women Button Up
Tucking in a button-up shirt can transform your entire look, adding polish and professionalism.
For years, I struggled with shirts bunching or coming untucked, making me feel less put-together than I wanted.
This guide shares the techniques I’ve mastered to achieve a smooth, lasting tuck every time, ensuring your outfit stays sharp from morning to night.
Quick Overview
Mastering the shirt tuck is a simple skill that elevates your style. You’ll learn several techniques to keep your button-up looking neat and tailored.
- Time needed: 5-10 minutes (initially), 1-2 minutes (once practiced)
- Difficulty: Beginner
- What you’ll need: A button-up shirt, pants or a skirt with a waistband, a mirror
Step-by-Step Instructions
Step 1: Choose the Right Shirt and Bottoms
Start with a button-up shirt that fits well through the shoulders and bust. Avoid shirts that are overly baggy or too tight, as they make tucking harder.
Select bottoms with a defined waistband. High-waisted pants or skirts often work best, providing more fabric to hold the tuck in place.
Pro Tip: Look for shirts made from fabrics with a bit of structure, like crisp cotton or linen blends. These hold their shape better when tucked.
Step 2: Button Up and Prepare
Fully button your shirt, from bottom to top. Stand in front of a mirror to easily see your progress.
Ensure the shirt is smooth and wrinkle-free. A wrinkled shirt will look messy even when perfectly tucked.
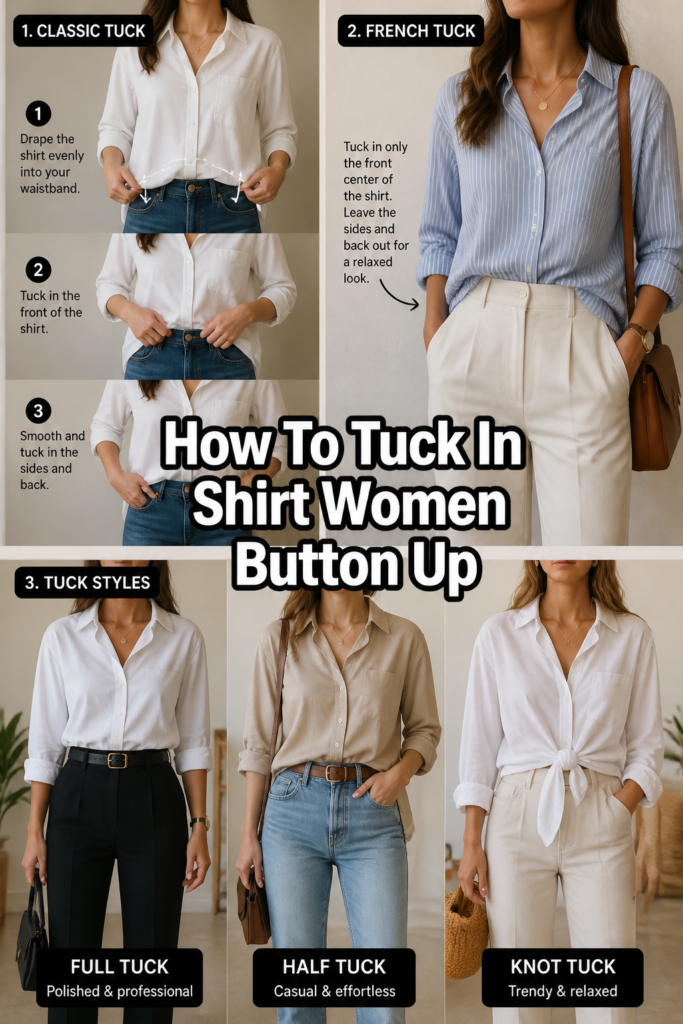
Step 3: The Basic Front Tuck (The “French Tuck”)
This casual tuck is perfect for a relaxed yet put-together look. It involves tucking only the very front of your shirt.
Take the front center portion of your shirt and gently push it into your waistband. Aim for about 2-3 inches of fabric.
Let the sides of the shirt hang loose. Adjust the tucked portion so it looks natural and not too stiff.
Pro Tip: For the French tuck, make sure the tucked fabric isn’t pulling too tightly across your hips. It should create a gentle drape.
Step 4: The Full Tuck (Classic Method)
This technique creates a clean, polished appearance. It’s ideal for professional settings or formal outfits.
Start by pulling your shirt taut around your body. Ensure there’s no excess fabric bunching at the sides.
Carefully push the entire hem of your shirt into your waistband, all the way around. Make sure the shirt is smooth against your skin.
Fasten your pants or skirt. Check for any bumps or folds that might have formed during the tuck.
Step 5: The Military Tuck (For a Tailored Fit)
The military tuck is excellent for creating a very sleek silhouette, especially if your shirt is a bit loose around the waist.
First, perform a full tuck as described in Step 4. Ensure your pants or skirt are unbuttoned for this part.
Next, stand in front of a mirror. Locate the excess fabric at each side seam of your shirt, roughly at your hip bone level.
Pinch this excess fabric into a sharp, vertical fold, creating a pleat. Fold this pleat backward towards your back, tucking it under itself and into your waistband.
Repeat on the other side. Then, button your pants or skirt, securing these new pleats in place.
Pro Tip: The military tuck works best with structured shirts. Practice in front of a mirror to get the pleats even and smooth.
Step 6: The “Shirt Stays” Method (For Ultimate Security)
If you constantly battle with your shirt coming untucked, shirt stays are a game-changer. These are elastic straps that connect your shirt to your socks or thigh.
Attach one end of the shirt stay to the bottom hem of your shirt, usually near a side seam. Make sure the clip is secure.
Pull the strap down and attach the other end to the top of your socks or a thigh band. Adjust the length so there’s gentle tension.
Perform your preferred tuck, knowing the stays will keep your shirt perfectly in place throughout the day.
Step 7: Adjust and Refine
After any tucking method, always take a moment to adjust. Move around, sit down, and stand up to see how the shirt settles.
Gently pull up on the shirt’s hem around your waist to create a slight billow. This prevents the shirt from looking too stiff or pulling uncomfortably.
Smooth out any wrinkles that formed. Ensure the placket (the buttoned strip) of your shirt aligns with the center of your body and your pants fly.
Common Mistakes to Avoid
Tucking a Too-Long Shirt Without Adjustment
Many button-ups are designed to be worn untucked, meaning they have a longer hem. Simply tucking a very long shirt often results in excessive bulk around your waist.
This creates a lumpy, uncomfortable look. Instead, for longer shirts, use the military tuck or try to create a slight billow to disguise the extra fabric. Sometimes, a tailor can shorten the shirt for a perfect tuck.
Leaving Too Much Slack
If you don’t pull your shirt taut before tucking, you’ll end up with a ballooned effect. This makes your waist look wider and less defined.
Always pull the shirt down firmly before pushing it into your waistband. This ensures a clean line and a flattering silhouette.
Ignoring the Back
It’s easy to focus only on the front and sides, forgetting about the back of your shirt. A neglected back can lead to major bunching or the shirt coming untucked easily.
Always check your reflection from all angles. Smooth the shirt all the way around your body, ensuring the back is just as neat as the front.
Forgetting to Adjust After Movement
Shirts naturally shift as you move, sit, and stand throughout the day. If you don’t periodically adjust your tuck, it can become messy.
Make it a habit to quickly smooth and adjust your shirt after significant movement. A quick bathroom mirror check can save your look.
Troubleshooting
Shirt Comes Untucked Easily
This is a common frustration, especially if you’re active. The shirt might be too short for tucking, or your pants waistband isn’t providing enough grip.
Try using the military tuck for a more secure hold. Consider investing in shirt stays; they are incredibly effective. Also, ensure your pants or skirt waistband sits snugly, not too loose.
Excess Fabric Bunching Around the Waist
A bulky waist can be uncomfortable and unflattering. This usually happens with shirts that are too large or too long for your torso.
Experiment with the military tuck to create neat pleats that reduce bulk. You can also try pulling the shirt up slightly after tucking to create a subtle billow, distributing the fabric more evenly. A tailor can sometimes slim down a shirt for a better tuck.
Shirt Looks Too Stiff or Pulled
Sometimes a tuck can feel too rigid or pull uncomfortably across your bust or hips. This often means the shirt is tucked too tightly or is slightly too small.
After tucking, gently pull up on the hem of the shirt about an inch or two all around your waist. This creates a small amount of slack, allowing for more comfortable movement and a softer, more natural drape.
Key Takeaways
- The right shirt fit and proper bottoms are fundamental for a successful tuck.
- Practice different tucking methods like the French tuck, full tuck, and military tuck to find what suits your style and shirt.
- Always smooth your shirt and adjust it after tucking to prevent bunching and ensure a clean line.
- Address common issues like shirts coming untucked or excess fabric by trying shirt stays or tailoring.
- Regularly check and adjust your tuck throughout the day to maintain a polished appearance.
Frequently Asked Questions
Can I tuck in any button-up shirt?
While most button-ups can be tucked, shirts designed to be worn untucked often have a shorter hem and a straighter cut. Shirts with a curved or “shirttail” hem are generally best for tucking, as they stay put more easily.
What’s the best way to tuck a shirt into high-waisted pants?
High-waisted pants are ideal for tucking. Use either the full tuck or the military tuck. The higher waistband provides more fabric to grip the shirt, keeping it secure and creating a defined waistline.
How do I prevent my shirt from wrinkling after tucking?
Starting with an ironed shirt is key. After tucking, avoid pulling the shirt too tightly. Create a slight billow by gently pulling up on the hem. This allows for movement without creating sharp creases. Fabric choice also matters; wrinkle-resistant fabrics help significantly.
Is the French tuck only for casual outfits?
The French tuck is versatile. While it certainly lends a casual-chic vibe, it can also be appropriate for business casual settings, especially when paired with tailored trousers or a pencil skirt. It offers a relaxed alternative to a full tuck without looking sloppy.
Our Top Recommended Finds
- High-waisted Trousers: Provide an excellent anchor for a secure and flattering tuck.
- Shirt Stays: Essential for anyone who struggles with their shirt coming untucked, offering all-day security.
- Steamer/Iron: Keeps your button-ups crisp and wrinkle-free, ensuring a smooth tuck every time.
Embrace Your Polished Style
You now have the tools and techniques to confidently tuck in your button-up shirts, transforming your outfits from ordinary to impeccably styled.
Experiment with these methods, find what works best for your body and your shirts, and enjoy the renewed confidence a perfectly tucked shirt brings.
Start practicing today and elevate your everyday look with ease.