🎀 How To Tie A Bow On A Dress
A perfectly tied bow on a dress can transform an outfit.
It adds a touch of elegance, charm, and personality that a simple knot just can’t achieve.
Having tied countless bows for everything from casual sundresses to formal gowns, I’ve learned the subtle art of creating that flawless, symmetrical loop.

Quick Overview
This guide will walk you through the process of tying a beautiful, enduring bow on any dress with a sash or ties.
You’ll learn techniques to ensure your bow stays neat and pretty all day or night.
- Time needed: 5-10 minutes
- Difficulty: Beginner
- What you’ll need: A dress with a sash or ties
Step-by-Step Instructions
Step 1: Prepare the Dress and Sash
Lay the dress flat or have someone wear it. This helps you get a clear view and comfortable working position.
Ensure the sash is untangled and smooth. Any twists or creases will show in the final bow, so take a moment to straighten it out.
Pro Tip: If the dress is on a hanger, ensure the hanger is sturdy. A person wearing the dress provides the most natural drape for tying.
Step 2: Position the Sash Evenly
Center the sash at the back of the waist, or wherever the dress is designed for the bow to sit.
Pull both ends of the sash firmly to the front, then wrap them around to meet at the back again. Make sure the fabric lies flat against the waist.
Adjust the ends so they are of equal length. This is crucial for creating a symmetrical bow.
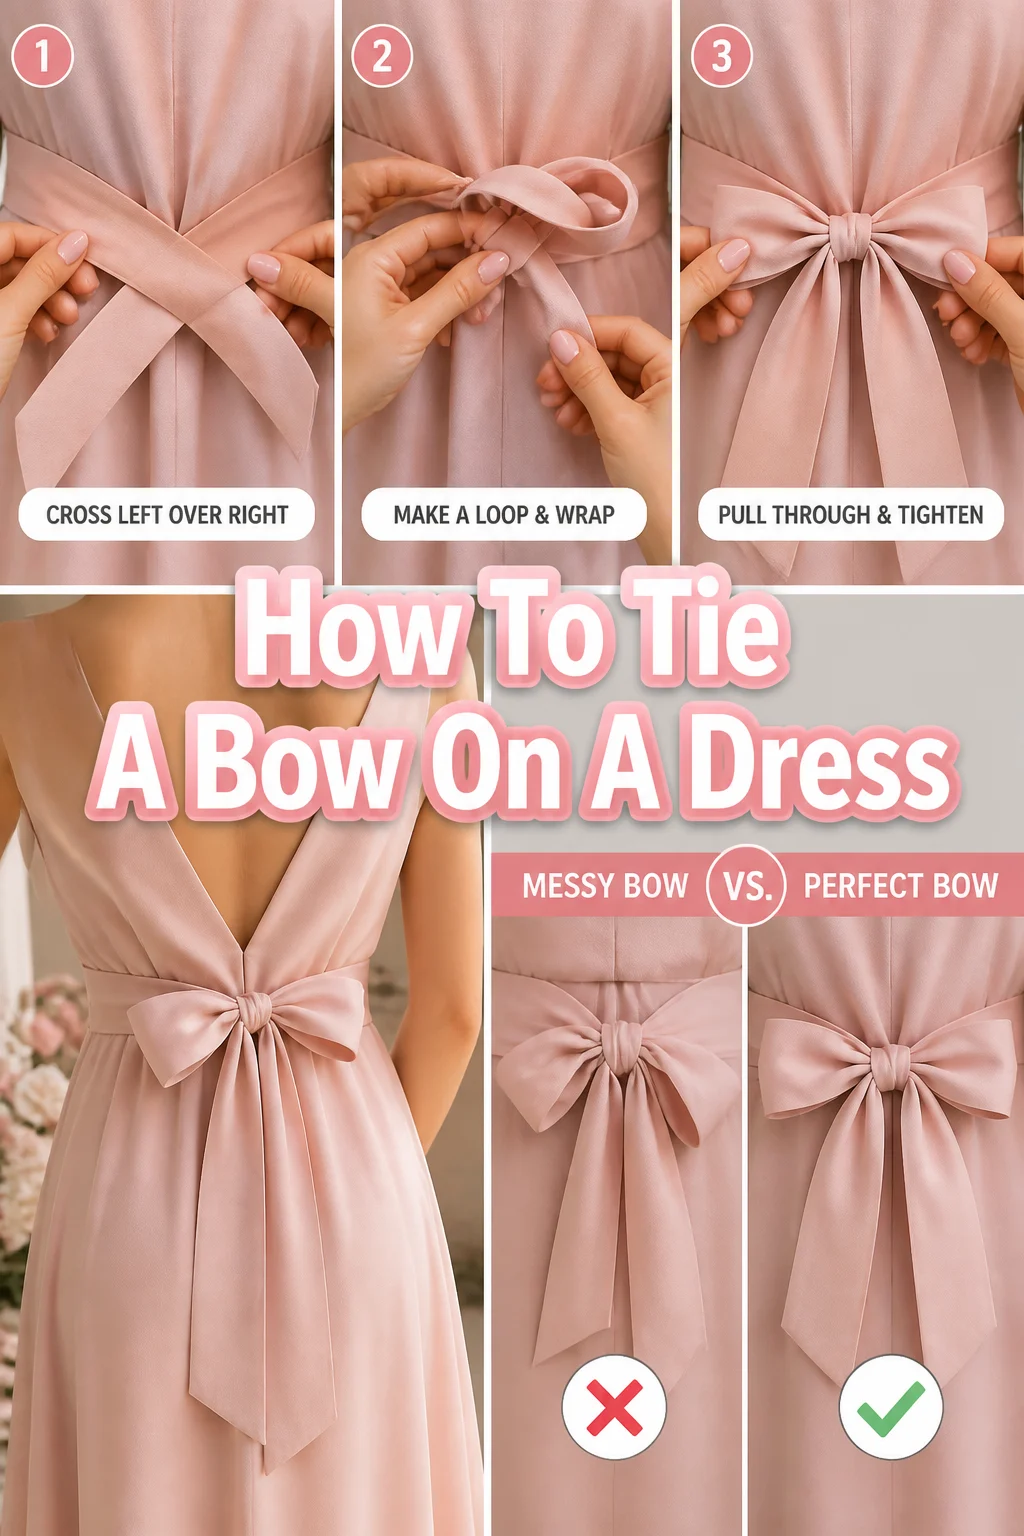
Step 3: Create the Initial Knot
Cross the right sash end over the left sash end.
Bring the right end underneath the left and pull it through the loop you just formed.
Tighten this knot gently against the dress. It should be snug but not uncomfortably tight for the wearer.
Step 4: Form the First Loop
Take one of the loose ends – let’s start with the right one – and fold it into a loop. The size of this loop will determine the size of one side of your bow.
Hold this loop firmly between your thumb and forefinger at the base, where it meets the initial knot.
Step 5: Wrap and Thread the Second Loop
Bring the remaining loose end (the left one) over the top of the first loop you just created.
Wrap it around the base of the first loop, moving from front to back.
Thread this second end through the space directly behind the first loop, pushing it through to form a second loop.
Step 6: Adjust for Symmetry
Gently pull both loops outwards, away from the knot.
Observe the size and shape of both loops. They should ideally be identical.
Adjust by carefully pulling the “ears” (loops) or the “tails” (hanging ends) of the bow until they match.
Pro Tip: Don’t yank too hard. Small, consistent adjustments yield the best results for perfect symmetry.
Step 7: Tighten the Bow
Hold the center knot of the bow firmly with one hand.
Pull both loops simultaneously and gently away from the knot. This action tightens the bow and secures its shape.
Ensure the knot itself is flat and compact, not bulky or twisted.
Step 8: Refine the Loops and Tails
Fluff out the loops of the bow. You want them to stand out nicely, not lie flat against the dress.
Smooth down the tails of the bow. They should hang elegantly and be free of wrinkles.
Trim the ends of the tails if necessary, ensuring they are even and angled attractively. Some sashes have pre-finished ends, so this might not be needed.
Step 9: Secure the Bow (Optional)
For extra security, especially with slippery fabrics or for long events, you can add a small stitch.
Use a needle and thread matching the sash color to place a tiny stitch at the very center of the bow, anchoring the loops to the knot.
This prevents the bow from loosening throughout the day. It’s a discreet way to maintain perfection.
Common Mistakes to Avoid
Uneven Sash Ends
Starting with one sash end significantly longer than the other makes tying a symmetrical bow almost impossible. You’ll end up with one tiny loop and one giant loop, or tails of vastly different lengths.
Always ensure the sash ends are perfectly even before you begin tying the initial knot. Take an extra moment to measure them against each other.
Tying Too Loosely
A loose initial knot or a bow that isn’t pulled tight enough will quickly unravel or sag. The bow will look sloppy and fail to hold its shape, detracting from the dress.
Make sure your initial knot is snug against the dress, and always tighten the bow by pulling the loops firmly away from the center. This locks the bow in place.
Twisted Fabric
Allowing the sash fabric to twist as you tie the bow creates an untidy, lumpy appearance. The beautiful sheen or texture of the fabric won’t be showcased properly.
Continuously smooth the fabric as you work. Ensure each section of the sash remains flat and untwisted throughout the entire tying process.
Over-tightening
While a snug bow is good, over-tightening can cause the fabric to bunch up unattractively or even damage delicate materials. It can also be uncomfortable for the wearer.
Tighten the bow just enough so it feels secure and holds its shape, but without causing stress to the fabric or the wearer’s waistline.
Troubleshooting
Bow Keeps Slipping or Coming Undone
This often happens with very silky or satin fabrics. The smooth texture doesn’t provide enough friction to hold the knot securely.
Try making the initial knot a double knot, but keep it flat. Alternatively, consider the optional security stitch mentioned in Step 9. A tiny piece of fashion tape placed discreetly under the knot can also help grip.
Loops Are Uneven Despite Adjustments
Sometimes, even with careful pulling, one loop seems stubbornly larger than the other. This usually means the initial lengths of the “tails” you started with were slightly off, or one side was pulled tighter during the knot formation.
Untie the bow completely and start again, paying extra attention to ensuring the sash ends are perfectly even after the first knot. Practice makes perfect for developing an eye for symmetry.
Bow Looks Flat and Lifeless
A flat bow lacks dimension and doesn’t enhance the dress. This can happen if the fabric is very thin or if the loops aren’t properly fluffed.
Once the bow is tied, gently “puff” out each loop with your fingers. You can also carefully insert a small piece of tissue paper or cotton wool into the back of each loop for extra volume if the fabric allows without showing through.
Key Takeaways
- Always start with perfectly even sash ends for a symmetrical bow.
- Smooth out any twists in the fabric as you tie to avoid lumps.
- Tighten the initial knot firmly, but not excessively, against the dress.
- Pull both loops simultaneously when tightening the bow to maintain balance.
- Take time to adjust loops and tails for ideal shape and drape.
- Consider a small security stitch for slippery fabrics or extended wear.
Frequently Asked Questions
Can I tie a bow on any dress with a sash?
Yes, most dresses with a sash or long ties are designed for a bow. The technique remains largely the same, regardless of the fabric or sash width. You might need to adjust the loop size for very wide sashes.
How do I make the bow stay perky all day?
The key is a firm initial knot and pulling the loops tight after forming them. For extra security, a tiny dab of fabric glue or a discreet stitch at the center of the bow can prevent it from loosening.
What if my sash is very wide or very narrow?
For wide sashes, make sure your loops are appropriately sized – not too small, or they’ll look stubby. For narrow sashes, ensure the loops aren’t so large they flop. The principles of evenness and tension still apply.
Should the bow be tied at the front, back, or side?
This depends entirely on the dress design and your personal preference. Many dresses feature the bow at the back, but side or even front bows can be equally charming. Follow the dress’s natural lines or experiment to see what you like best.
Our Top Recommended Finds
- Dressmaker’s Pins: Useful for temporarily holding sash ends in place while you adjust, or for marking desired tail lengths before trimming.
- Fabric Glue Pen: A clear, washable fabric glue pen can offer a temporary, non-permanent way to secure the bow’s center for a special event without sewing.
- Small, Sharp Fabric Scissors: Essential for neatly trimming sash ends if they fray or if you want to create a specific angle for the tails.
Embrace the Art of the Perfect Bow
Tying a beautiful bow on a dress is a small detail that makes a big impact. It’s a skill that adds polish and charm to any garment with a sash.
With a little practice, you’ll find yourself creating elegant, picture-perfect bows every time.
Don’t hesitate to experiment with different sash materials and widths. Each one offers a unique drape and feel.
Take these steps, refine your technique, and enjoy the satisfaction of a beautifully adorned dress. Your next event awaits your perfectly tied bow!